

Feuchtigkeitssensor Trübner SMT50 und iobroker?
-
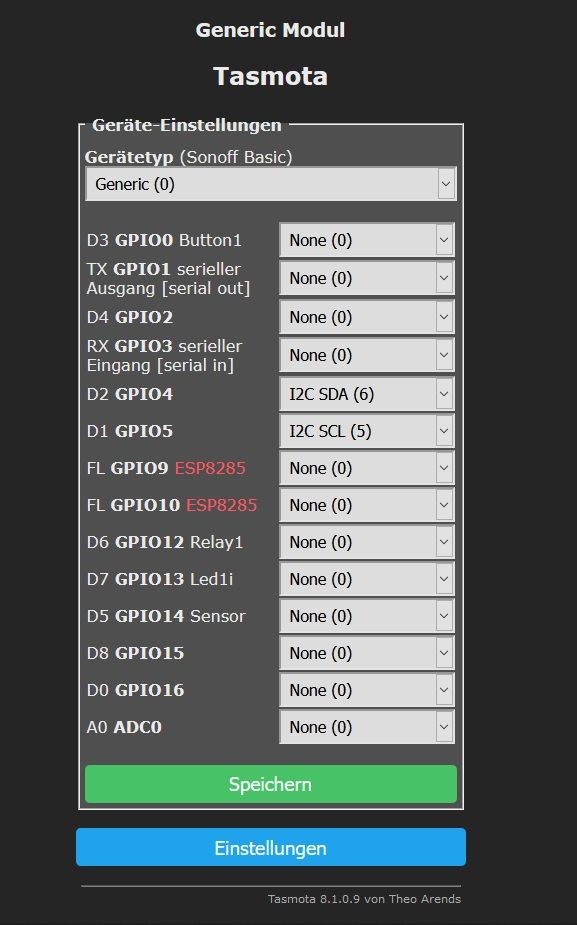
Es gibt keine passende Version. Nimm einfach die aktuelle tasmota und aktiviere vor dem compilieren den ADS1115 Wandler. Das ist alles.
@saeft_2003 dann kann ich nicht D1 I2C SLC und unter D1 I2C SDA zuweisen. Die Optionen fehlen.
Wenn ich die Firmware Tasmota-Sensors verwende habe ich die Optionen, aber dennoch zeigt er vom Sensor keine Werte an. weder Temperatur noch Feuchtigkeit.
Ich muss dazusagen, weder mit Wemos noch mit Tasmota hab ich bisher etwas gemacht. -
@saeft_2003 dann kann ich nicht D1 I2C SLC und unter D1 I2C SDA zuweisen. Die Optionen fehlen.
Wenn ich die Firmware Tasmota-Sensors verwende habe ich die Optionen, aber dennoch zeigt er vom Sensor keine Werte an. weder Temperatur noch Feuchtigkeit.
Ich muss dazusagen, weder mit Wemos noch mit Tasmota hab ich bisher etwas gemacht.Hast du bei Gerät generic gewählt? zeig mal screenshots...
-
Hast du bei Gerät generic gewählt? zeig mal screenshots...
@saeft_2003 ich hab jetzt alles beiseite geräumt. Ich mache morgen Screenshots. Danke das du mir hilfst...ich war heute schon am verzweifeln
-
@saeft_2003 ich hab jetzt alles beiseite geräumt. Ich mache morgen Screenshots. Danke das du mir hilfst...ich war heute schon am verzweifeln
ok alles klar, so gehts auf jeden Fall bei mir. Ist doch klar das ich helfe wenn ich kann dafür ist das Forum ja da :-)
-
ok alles klar, so gehts auf jeden Fall bei mir. Ist doch klar das ich helfe wenn ich kann dafür ist das Forum ja da :-)
@saeft_2003 ich bin jetzt gerade dabei mir das Compilieren und den Upload mir VSC anzulesen und da ist mir aufgefallen das es ja auch noch diesen Programmcode für den Wemos gibt
https://github.com/top-gun/SMT50-ESPMuss der Auch vorher in der Firmware eingetragen werden oder macht man das hinterher?
Du merkst...blutiger (aber lernwilliger) Anfänger.
Und glaube mir, wenn dieser Sensor nicht so Sch... teuer gewesen wäre, er wäre längst in der Tonne :-) -
@saeft_2003 ich bin jetzt gerade dabei mir das Compilieren und den Upload mir VSC anzulesen und da ist mir aufgefallen das es ja auch noch diesen Programmcode für den Wemos gibt
https://github.com/top-gun/SMT50-ESPMuss der Auch vorher in der Firmware eingetragen werden oder macht man das hinterher?
Du merkst...blutiger (aber lernwilliger) Anfänger.
Und glaube mir, wenn dieser Sensor nicht so Sch... teuer gewesen wäre, er wäre längst in der Tonne :-)Das aktivieren vom ADS Wandler muss man vor dem compilieren machen...
-
Das aktivieren vom ADS Wandler muss man vor dem compilieren machen...
@saeft_2003
ja, das aktivieren ist mir inzwischen klar, das hab ich auch hingekriegt.Aber es soll ja noch dieses Programm auf den Wemos
wenn ich das richtig verstanden habe muss man das hinterher noch über platform.io auf den Wemos flashen?
-
@saeft_2003
ja, das aktivieren ist mir inzwischen klar, das hab ich auch hingekriegt.Aber es soll ja noch dieses Programm auf den Wemos
wenn ich das richtig verstanden habe muss man das hinterher noch über platform.io auf den Wemos flashen?
Das weiß ich nicht sicher, ich habe mit atom nur die normale tasmota mit aktivierten ads Wandler geflasht.
-
Das weiß ich nicht sicher, ich habe mit atom nur die normale tasmota mit aktivierten ads Wandler geflasht.
@saeft_2003
ok, danke dir -
@saeft_2003
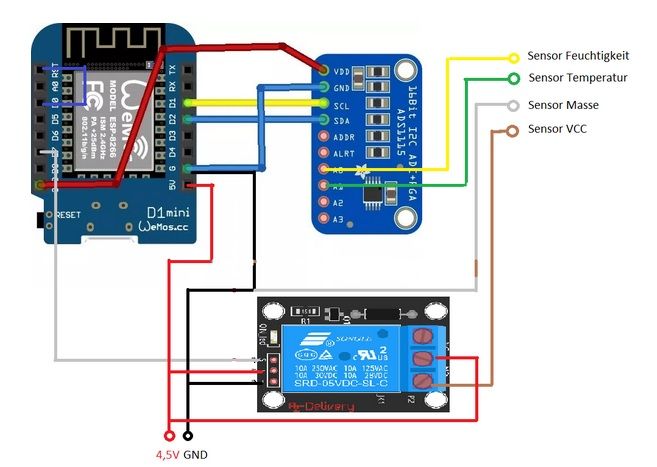
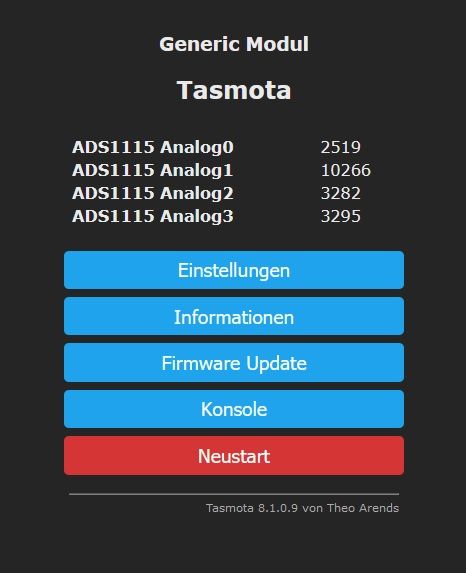
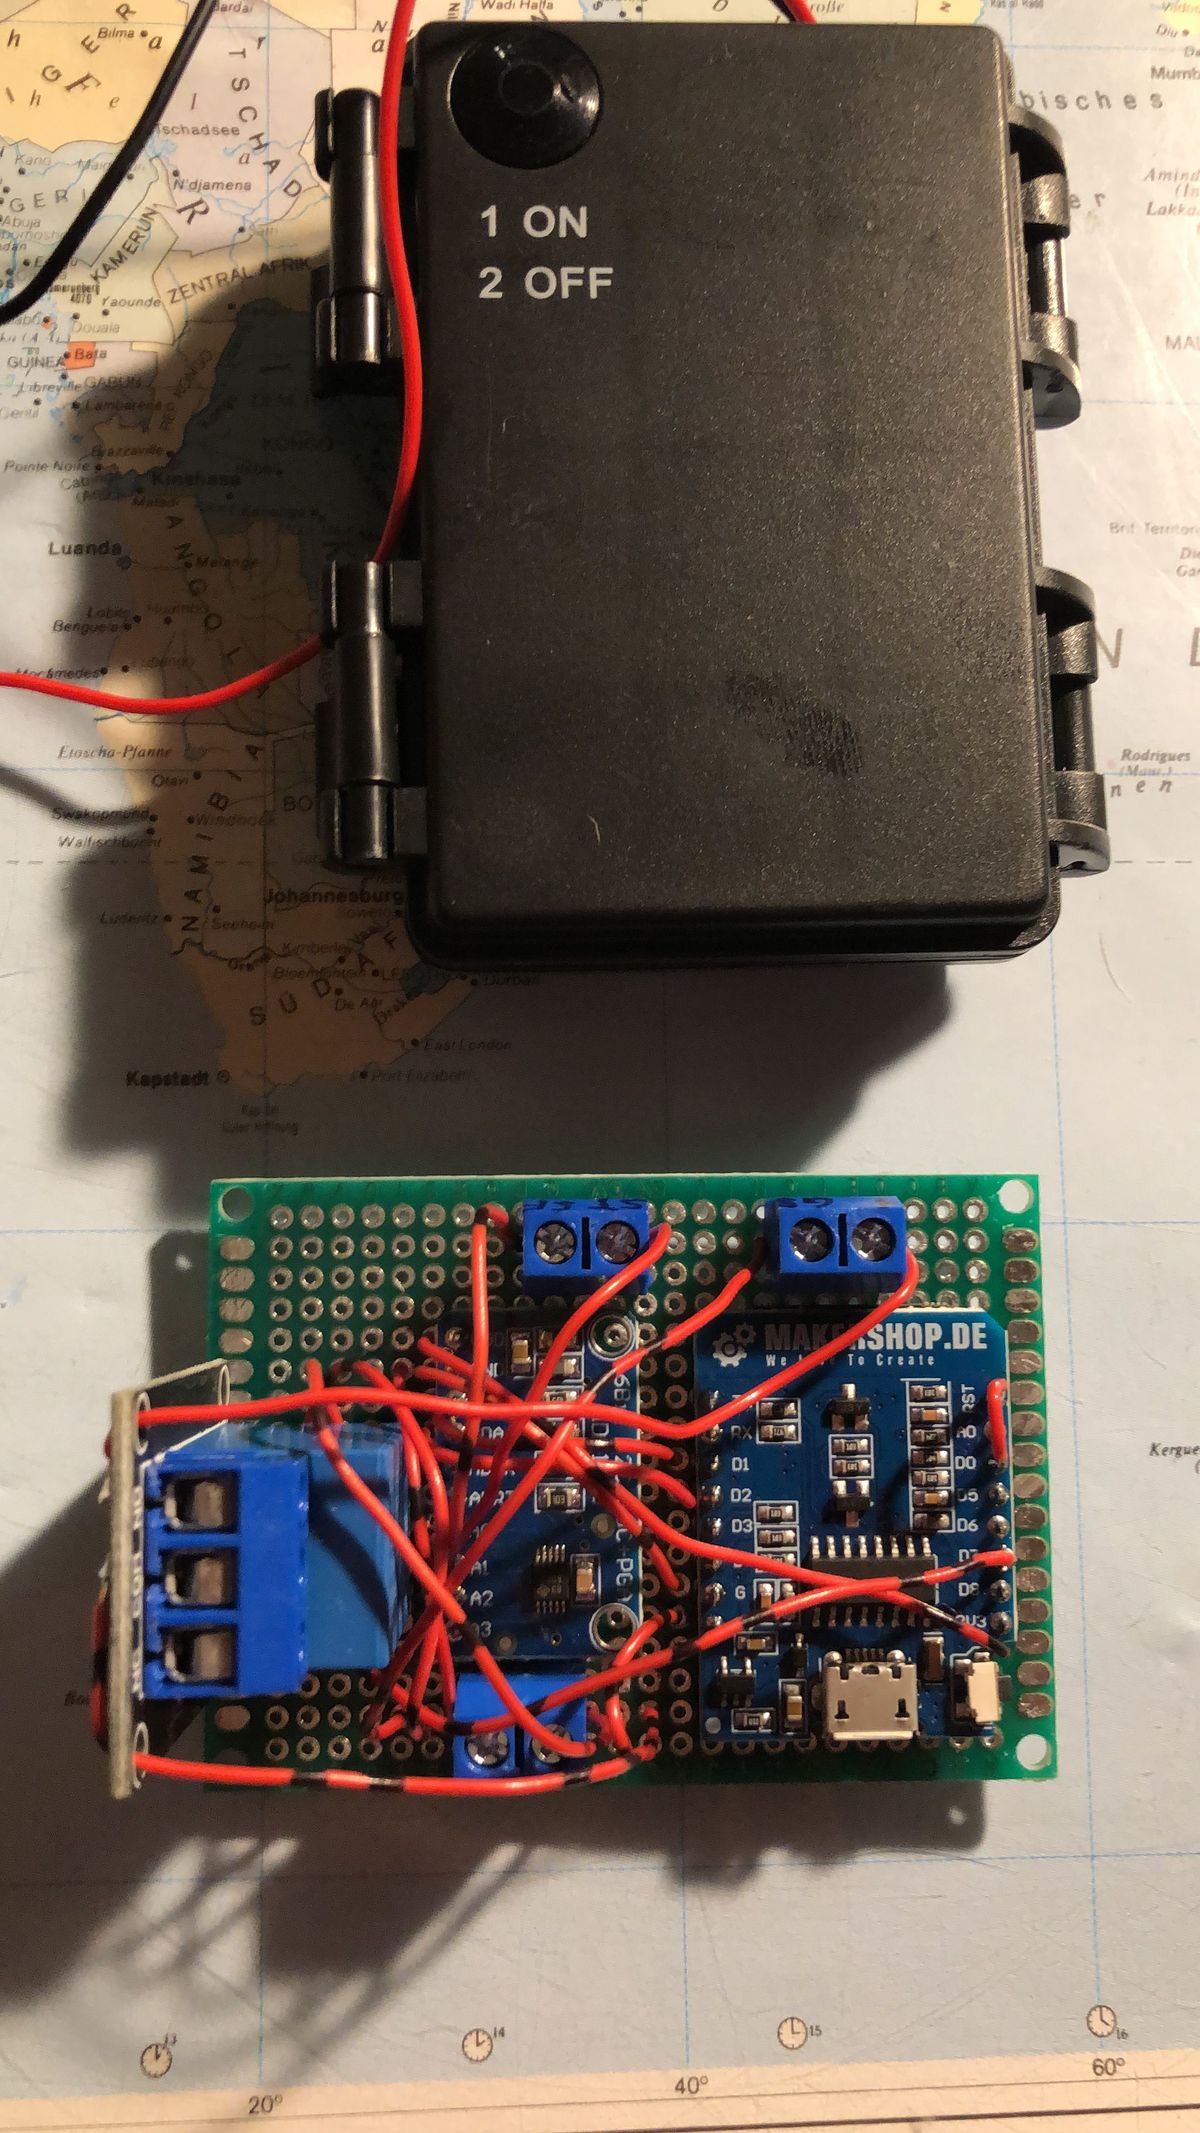
ok, danke dirIch habe die Sensor-Schaltung nach Vorbild von topgun bzw. saeft_2003 nachgebaut, die Messung von Temperatur und Feuchte funktioniert einwandfrei. Vielen Dank für die gute Vorarbeit!!
Die Messung scheint auch tatsächlich recht genau zu sein. Als Firmware habe ich Tasmota geflasht und vorher den ADS1115 im Quellcode aktiviert. Die Stromversorgung erfolgt bei mir über drei AA-Batterien. Um den Stromverbrauch zu minimieren, nutze ich die DeepSleep Funktion in Tasmota und schalte den Wemos nur zur vollen Stunde ein Mal kurz für 30s ein. Sensor und AD-Wandler sind über ein Relais geschaltet und werden entsprechend ebenfalls nur kurz mit Strom versorgt. Mal sehen wie lange er dann mit einer Batterieladung durchhält. Aufgefallen ist mir beim DeepSleep, dass die RTC recht ungenau geht: Mal wacht der Wemos zur vollen Stunden auf, mal 3 min. zu früh, mal 4 min. zu früh. Ist an sich kein großes Problem, hat mich aber gewundert.
Eine Frage hätte ich noch: Wie rechnet ihr mit dem Bodenfeuchte-Wert (vol. Wassergehalt 0-50%) weiter? Hier kann man nachlesen, dass man bewässern sollten, wenn im Boden 40-50% der nutzbaren Feldkapazität unterschritten werden. Das ist eigentlich ein sehr praxistauglicher Ansatz, weil man damit über eine lineare Funktion die Bewässerungsdauer bzw. -menge festlegen könnte.
-
Ich habe die Sensor-Schaltung nach Vorbild von topgun bzw. saeft_2003 nachgebaut, die Messung von Temperatur und Feuchte funktioniert einwandfrei. Vielen Dank für die gute Vorarbeit!!
Die Messung scheint auch tatsächlich recht genau zu sein. Als Firmware habe ich Tasmota geflasht und vorher den ADS1115 im Quellcode aktiviert. Die Stromversorgung erfolgt bei mir über drei AA-Batterien. Um den Stromverbrauch zu minimieren, nutze ich die DeepSleep Funktion in Tasmota und schalte den Wemos nur zur vollen Stunde ein Mal kurz für 30s ein. Sensor und AD-Wandler sind über ein Relais geschaltet und werden entsprechend ebenfalls nur kurz mit Strom versorgt. Mal sehen wie lange er dann mit einer Batterieladung durchhält. Aufgefallen ist mir beim DeepSleep, dass die RTC recht ungenau geht: Mal wacht der Wemos zur vollen Stunden auf, mal 3 min. zu früh, mal 4 min. zu früh. Ist an sich kein großes Problem, hat mich aber gewundert.
Eine Frage hätte ich noch: Wie rechnet ihr mit dem Bodenfeuchte-Wert (vol. Wassergehalt 0-50%) weiter? Hier kann man nachlesen, dass man bewässern sollten, wenn im Boden 40-50% der nutzbaren Feldkapazität unterschritten werden. Das ist eigentlich ein sehr praxistauglicher Ansatz, weil man damit über eine lineare Funktion die Bewässerungsdauer bzw. -menge festlegen könnte.
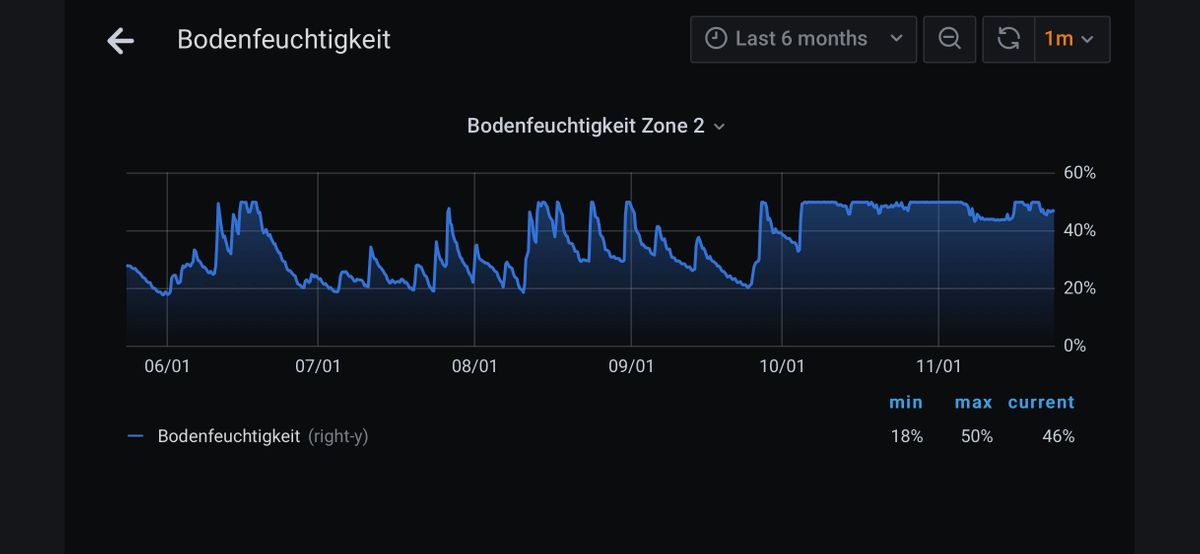
Ab wie viel Prozent man gießen muss hängt extrem davon ab was für einen Boden man hat.
Ich habe es über den Sommer so gehandhabt das ich bei unter 20% bewässert habe. Über den Sommer hat er ein paar braune Stellen bekommen (da wo auch wenig Wasser hinkommt) aber nach feuchterer Witterung waren diese sehr schnell wieder weg.
Im großen und Ganzen bin ich mit dieser Taktik gut über den Sommer gekommen, weil ich habe auch nicht unendlich viel Wasser/Geld zu Verfügung.
-
Ich habe die Sensor-Schaltung nach Vorbild von topgun bzw. saeft_2003 nachgebaut, die Messung von Temperatur und Feuchte funktioniert einwandfrei. Vielen Dank für die gute Vorarbeit!!
Die Messung scheint auch tatsächlich recht genau zu sein. Als Firmware habe ich Tasmota geflasht und vorher den ADS1115 im Quellcode aktiviert. Die Stromversorgung erfolgt bei mir über drei AA-Batterien. Um den Stromverbrauch zu minimieren, nutze ich die DeepSleep Funktion in Tasmota und schalte den Wemos nur zur vollen Stunde ein Mal kurz für 30s ein. Sensor und AD-Wandler sind über ein Relais geschaltet und werden entsprechend ebenfalls nur kurz mit Strom versorgt. Mal sehen wie lange er dann mit einer Batterieladung durchhält. Aufgefallen ist mir beim DeepSleep, dass die RTC recht ungenau geht: Mal wacht der Wemos zur vollen Stunden auf, mal 3 min. zu früh, mal 4 min. zu früh. Ist an sich kein großes Problem, hat mich aber gewundert.
Eine Frage hätte ich noch: Wie rechnet ihr mit dem Bodenfeuchte-Wert (vol. Wassergehalt 0-50%) weiter? Hier kann man nachlesen, dass man bewässern sollten, wenn im Boden 40-50% der nutzbaren Feldkapazität unterschritten werden. Das ist eigentlich ein sehr praxistauglicher Ansatz, weil man damit über eine lineare Funktion die Bewässerungsdauer bzw. -menge festlegen könnte.
-
Das weiß ich nicht sicher, ich habe mit atom nur die normale tasmota mit aktivierten ads Wandler geflasht.
@saeft_2003
wie aktiviere ich den ADS 4415 vor dem flashen?
Ich benutze den Tasmotizer.exe in Windows? -
@saeft_2003
wie aktiviere ich den ADS 4415 vor dem flashen?
Ich benutze den Tasmotizer.exe in Windows?Kann ich leider nicht weiter helfen da ich mit atom flashe.
-
@saeft_2003 ich bin jetzt gerade dabei mir das Compilieren und den Upload mir VSC anzulesen und da ist mir aufgefallen das es ja auch noch diesen Programmcode für den Wemos gibt
https://github.com/top-gun/SMT50-ESPMuss der Auch vorher in der Firmware eingetragen werden oder macht man das hinterher?
Du merkst...blutiger (aber lernwilliger) Anfänger.
Und glaube mir, wenn dieser Sensor nicht so Sch... teuer gewesen wäre, er wäre längst in der Tonne :-)@htrecksler ,
wie genau geht das mit der Aktivierung des ADS1115 vor dem Flashen der Tasmota Firmware ?
Oder kannst du mir deine fertigen kompiliert Version mit dem ADS als bin file zuschicken?INTEL-Nuc I3 CPU,16GB RAM
Promox/Iobroker /Zwave Aero-Stick
PI4 incl. piVCCU3 /Deconz
Vis im Aufbau...
Gartenbewässerung im Aufbau mit Sonoff 4CH... -
@htrecksler ,
wie genau geht das mit der Aktivierung des ADS1115 vor dem Flashen der Tasmota Firmware ?
Oder kannst du mir deine fertigen kompiliert Version mit dem ADS als bin file zuschicken?@Hundefreund
ich kann dir leider auch nicht helfen, ich hab das Projekt damals erstmal auf Eis gelegt, weil ich keine Zeit mehr hatte mich damit zu beschäftigen. Das Ganze Tasmota und flashen und und und sind "Böhmische Dörfer".
Ich weiß noch, das es tausende Anleitungen gab, aber keine hat funktioniert.
Dann hab ich es irgendwann aufgegeben. Ich bewunder die Leute bei denen sowas klappt. :-)
Beim Lesen klingt das immer alles total einfach, aber dann :-)
Das hab ich noch gefunden. Aber ist von Mai...keine Ahnung ob das das richtige ist...
firmwareTreADS.bin -
@htrecksler ,
wie genau geht das mit der Aktivierung des ADS1115 vor dem Flashen der Tasmota Firmware ?
Oder kannst du mir deine fertigen kompiliert Version mit dem ADS als bin file zuschicken?@Hundefreund Aber wenn du das Teil zum Laufen bringst, dann bin ich ein dankbarer Abnehmer :-)
-
@Hundefreund Aber wenn du das Teil zum Laufen bringst, dann bin ich ein dankbarer Abnehmer :-)
Habt ihr mal probiert mit atom zu flashen, weil da war das ganze kein großes Ding.
-
Habt ihr mal probiert mit atom zu flashen, weil da war das ganze kein großes Ding.
@saeft_2003 ich hab in der Woche vor Weihnachten Urlaub. Ich glaube, ich starte noch einmal einen Versuch. Das Ding war ja auch nicht billig...Zum rumliegen echt zu schade
-
@saeft_2003 ich bin jetzt gerade dabei mir das Compilieren und den Upload mir VSC anzulesen und da ist mir aufgefallen das es ja auch noch diesen Programmcode für den Wemos gibt
https://github.com/top-gun/SMT50-ESPMuss der Auch vorher in der Firmware eingetragen werden oder macht man das hinterher?
Du merkst...blutiger (aber lernwilliger) Anfänger.
Und glaube mir, wenn dieser Sensor nicht so Sch... teuer gewesen wäre, er wäre längst in der Tonne :-)
Hey! Du scheinst an dieser Unterhaltung interessiert zu sein, hast aber noch kein Konto.
Hast du es satt, bei jedem Besuch durch die gleichen Beiträge zu scrollen? Wenn du dich für ein Konto anmeldest, kommst du immer genau dorthin zurück, wo du zuvor warst, und kannst dich über neue Antworten benachrichtigen lassen (entweder per E-Mail oder Push-Benachrichtigung). Du kannst auch Lesezeichen speichern und Beiträge positiv bewerten, um anderen Community-Mitgliedern deine Wertschätzung zu zeigen.
Mit deinem Input könnte dieser Beitrag noch besser werden 💗
Registrieren Anmelden291
Online33.0k
Benutzer83.4k
Themen1.3m
Beiträge