Navigation

    Logo
    • Register
    • Login
    • Search
    • Recent
    • Tags
    • Unread
    • Categories
    • Unreplied
    • Popular
    • GitHub
    • Docu
    • Hilfe
    1. Home
    2. Deutsch
    3. ioBroker Allgemein
    4. Feuchtigkeitssensor Trübner SMT50 und iobroker?

    NEWS

    • Neuer Blog: Fotos und Eindrücke aus Solingen

    • ioBroker@Smart Living Forum Solingen, 14.06. - Agenda added

    • ioBroker goes Matter ... Matter Adapter in Stable

    Feuchtigkeitssensor Trübner SMT50 und iobroker?

    This topic has been deleted. Only users with topic management privileges can see it.
    • S
      saeft_2003 Most Active last edited by

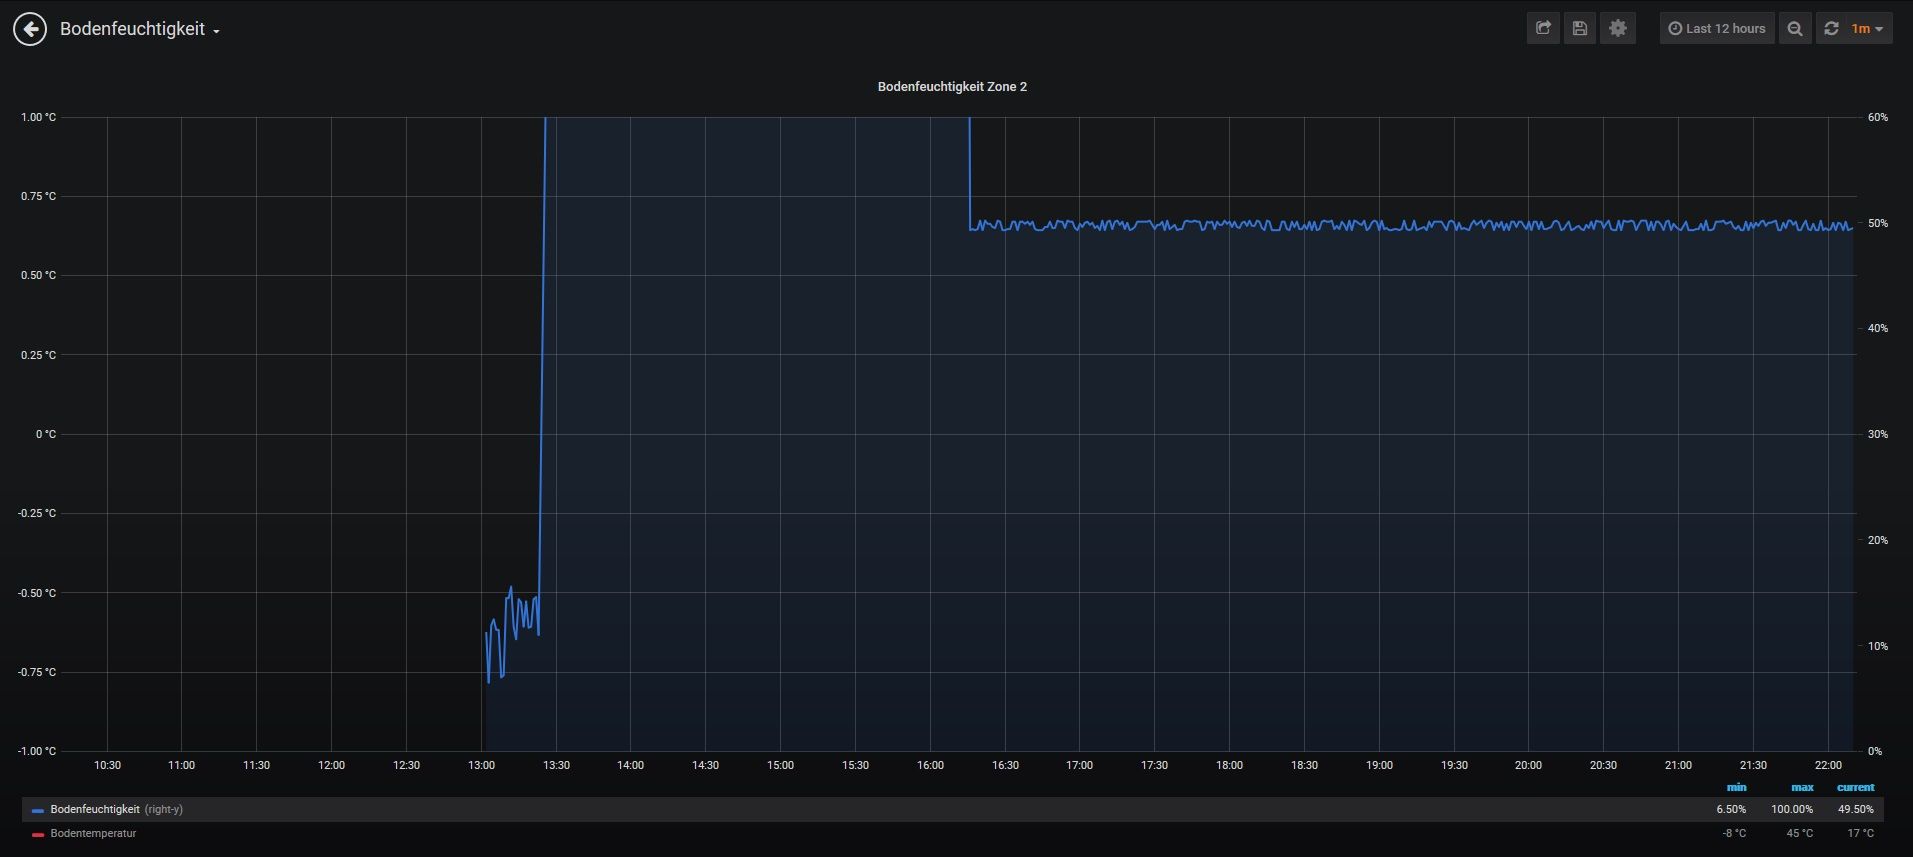
      So das ganze läuft jetzt bei mir seit heute... 50% passt da ich die Erde richtig nass gemacht habe beim einbau.
      smt.jpg

      htrecksler 1 Reply Last reply Reply Quote 0
      • htrecksler
        htrecksler Forum Testing @saeft_2003 last edited by

        @saeft_2003 ich habe mir den Sensor ebenfalls zugelegt und scheitere im Moment daran eine passende Firmware von Tasmota zu compilieren um diese auf den Wemos zu flashen.
        Irgendwie will es nicht funktionieren. Hast Du eventuell Deine verwendete Firmware die Du mir zur Verfügung stellen kannst?

        S 1 Reply Last reply Reply Quote 0
        • S
          saeft_2003 Most Active @htrecksler last edited by

          @htrecksler

          Es gibt keine passende Version. Nimm einfach die aktuelle tasmota und aktiviere vor dem compilieren den ADS1115 Wandler. Das ist alles.

          htrecksler 2 Replies Last reply Reply Quote 0
          • htrecksler
            htrecksler Forum Testing @saeft_2003 last edited by

            @saeft_2003 und genau das klappt irgendwie nicht. Wenn ich das mache kann ich nachher die gpios nicht zuweisen.

            1 Reply Last reply Reply Quote 0
            • htrecksler
              htrecksler Forum Testing @saeft_2003 last edited by

              @saeft_2003 dann kann ich nicht D1 I2C SLC und unter D1 I2C SDA zuweisen. Die Optionen fehlen.
              Wenn ich die Firmware Tasmota-Sensors verwende habe ich die Optionen, aber dennoch zeigt er vom Sensor keine Werte an. weder Temperatur noch Feuchtigkeit.
              Ich muss dazusagen, weder mit Wemos noch mit Tasmota hab ich bisher etwas gemacht.

              S 1 Reply Last reply Reply Quote 0
              • S
                saeft_2003 Most Active @htrecksler last edited by

                @htrecksler

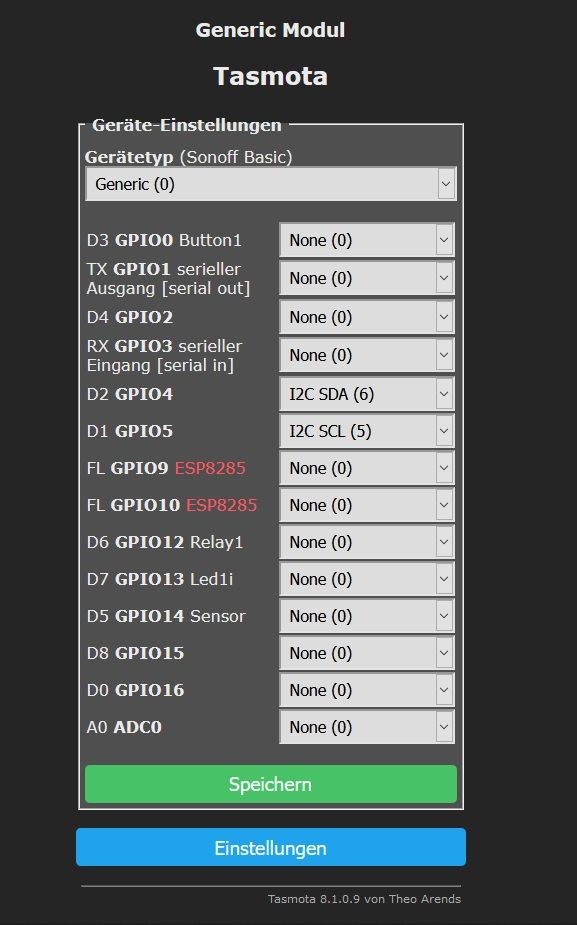
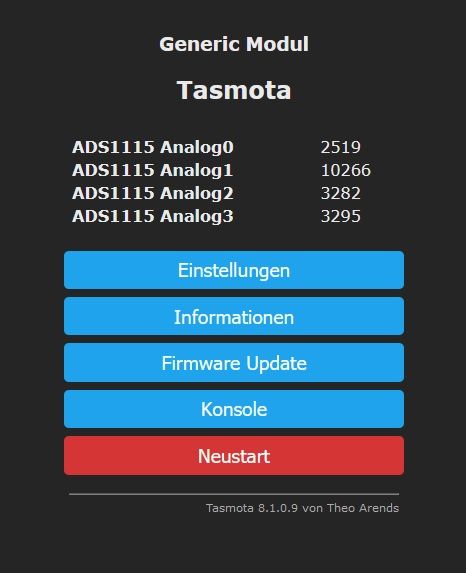
                Hast du bei Gerät generic gewählt? zeig mal screenshots...

                htrecksler 1 Reply Last reply Reply Quote 0
                • htrecksler
                  htrecksler Forum Testing @saeft_2003 last edited by

                  @saeft_2003 ich hab jetzt alles beiseite geräumt. Ich mache morgen Screenshots. Danke das du mir hilfst...ich war heute schon am verzweifeln

                  S 1 Reply Last reply Reply Quote 0
                  • S
                    saeft_2003 Most Active @htrecksler last edited by

                    @htrecksler

                    ok alles klar, so gehts auf jeden Fall bei mir. Ist doch klar das ich helfe wenn ich kann dafür ist das Forum ja da 🙂

                    Unbenannt2.jpg Unbenannt.jpg

                    htrecksler 1 Reply Last reply Reply Quote 0
                    • htrecksler
                      htrecksler Forum Testing @saeft_2003 last edited by

                      @saeft_2003 ich bin jetzt gerade dabei mir das Compilieren und den Upload mir VSC anzulesen und da ist mir aufgefallen das es ja auch noch diesen Programmcode für den Wemos gibt

                      https://github.com/top-gun/SMT50-ESP
                      

                      Muss der Auch vorher in der Firmware eingetragen werden oder macht man das hinterher?
                      Du merkst...blutiger (aber lernwilliger) Anfänger.
                      Und glaube mir, wenn dieser Sensor nicht so Sch... teuer gewesen wäre, er wäre längst in der Tonne 🙂

                      S H 3 Replies Last reply Reply Quote 0
                      • S
                        saeft_2003 Most Active @htrecksler last edited by

                        @htrecksler

                        Das aktivieren vom ADS Wandler muss man vor dem compilieren machen...

                        htrecksler 1 Reply Last reply Reply Quote 0
                        • htrecksler
                          htrecksler Forum Testing @saeft_2003 last edited by

                          @saeft_2003
                          ja, das aktivieren ist mir inzwischen klar, das hab ich auch hingekriegt.

                          Aber es soll ja noch dieses Programm auf den Wemos

                          #include <Wire.h>
                          #include <ESP8266WiFi.h>
                          #include <PubSubClient.h>
                          #include <Adafruit_ADS1015.h>
                          
                          // Update these with values suitable for your network.
                          const char* ssid = "xxxxxx";
                          const char* password = "yyyyyyyy";
                          const char* mqtt_server = "192.168.178.37";
                          
                          // DS-Intervall is one minute in Mikroseconds, needed for the calculation of the Deep Sleep between measurements
                          const uint32_t DS_Intervall = 60*1000000;
                          // Minuten is the Deep Sleep-time between measurements
                          uint32_t Minuten = 30;
                          
                          // The ESP8266 RTC memory is arranged into blocks of 4 bytes. The access methods read and write 4 bytes at a time,
                          // so the RTC data structure should be padded to a 4-byte multiple.
                          struct {
                           uint32_t crc32;   // 4 bytes
                           uint8_t channel;  // 1 byte,   5 in total
                           uint8_t bssid[6]; // 6 bytes, 11 in total
                           uint8_t padding;  // 1 byte,  12 in total
                          } rtcData;
                          
                          // or use this for debugging purposes: 3 minutes
                          //const uint32_t DS_Intervall = 3*60*1000000;
                          
                          //  define object for the handling of the ADC-chip
                          Adafruit_ADS1115 ads(0x48);     // Use this for the 16-bit version
                          
                          // define object for the WiFi-communication
                          WiFiClient espClient;
                          
                          // define object for MQTT-communication to the server
                          PubSubClient client(espClient);
                          
                          // configure the internal ADC to monitor the 3.3V-powersupport
                          ADC_MODE(ADC_VCC);
                          
                          void setup_wifi() {
                          
                          // Use Wifi.config to manually configure the network. 
                          // static address configuration. You can leave these out and use DHCP by using WiFi.begin() instead of WiFi.config
                           IPAddress ip(192, 168, 178, 57);
                           IPAddress gateway(192, 168, 178, 1);
                           IPAddress subnet(255, 255, 255, 0);
                           //IPAddress dns(192, 168, 178, 1);
                           WiFi.config(ip, gateway, subnet);  // we work locally and don't need DNS
                           //WiFi.config(ip, dns, gateway, subnet); // use this in case you use an external MQTT-service
                          
                          // Bring up the WiFi connection
                           WiFi.forceSleepWake();
                           delay( 1 );
                           WiFi.mode( WIFI_STA );
                          
                          // Try to read WiFi settings from RTC memory
                           bool rtcValid = false;
                           if( ESP.rtcUserMemoryRead( 0, (uint32_t*)&rtcData, sizeof( rtcData ) ) ) {
                           // Calculate the CRC of what we just read from RTC memory, but skip the first 4 bytes as that's the checksum itself.
                             uint32_t crc = calculateCRC32( ((uint8_t*)&rtcData) + 4, sizeof( rtcData ) - 4 );
                             if( crc == rtcData.crc32 ) {
                               rtcValid = true;
                             }
                           }
                          
                          // We start by connecting to a WiFi network
                           Serial.print("Connecting to ");
                           Serial.println(ssid);
                           if( rtcValid ) {
                             // The RTC data was good, make a quick connection
                             Serial.println("connecting with data from rtc memory");
                             WiFi.begin(ssid,password, rtcData.channel, rtcData.bssid, true );
                           }
                           else {
                             // The RTC data was not valid, so make a regular connection
                             Serial.println("connecting fresh, just SSID and password");
                             WiFi.begin(ssid,password);
                           }
                          
                          
                           int retries = 0;
                           int wifiStatus = WiFi.status();
                           while( wifiStatus != WL_CONNECTED ) {
                             retries++;
                             if( retries == 100 ) {
                               // Quick connect is not working, reset WiFi and try regular connection
                               Serial.println("Changing strategy, attemting fresh connection");
                               WiFi.disconnect();
                               delay( 10 );
                               WiFi.forceSleepBegin();
                               delay( 10 );
                               WiFi.forceSleepWake();
                               delay( 10 );
                               WiFi.begin(ssid,password);
                             }
                             if( retries == 600 ) {
                               // Giving up after 30 seconds and going back to sleep
                               Serial.println("Giving up after 30 seconds without success");
                               WiFi.disconnect( true );
                               delay( 1 );
                               WiFi.mode( WIFI_OFF );
                               ESP.deepSleep( Minuten * DS_Intervall, WAKE_RF_DISABLED );
                               return; // Not expecting this to be called, the previous call will never return.
                             }
                             delay( 50 );
                             wifiStatus = WiFi.status();
                           }
                           Serial.println("");
                           Serial.println("WiFi connected");
                           Serial.println("IP address: ");
                           Serial.println(WiFi.localIP());
                           rtcData.channel = WiFi.channel();
                           memcpy( rtcData.bssid, WiFi.BSSID(), 6 ); // Copy 6 bytes of BSSID (AP's MAC address)
                           rtcData.crc32 = calculateCRC32( ((uint8_t*)&rtcData) + 4, sizeof( rtcData ) - 4 );
                           ESP.rtcUserMemoryWrite( 0, (uint32_t*)&rtcData, sizeof( rtcData ) );
                          
                          } // end of setup_wifi
                          
                          void callback(char* topic, byte* payload, unsigned int length) {
                          
                           Serial.print("Message arrived [");
                           Serial.print(topic);
                           Serial.print("] ");
                           for (int i = 0; i < length; i++) {
                             Serial.print((char)payload[i]);
                           }
                           String payloadname = String((char*)topic);
                           if (payloadname == "Sensoren/Sensor03/Intervall") {
                             payload[length] = '\0';
                             String s = String((char*)payload);
                             Minuten = s.toInt();
                             if (Minuten == 0) {
                               Minuten = 30; 
                             }
                             if (Minuten > 60) {
                               Minuten = 60; 
                             }
                             Serial.println(Minuten);
                           }
                          
                          } // end of callback
                          
                          uint32_t calculateCRC32( const uint8_t *data, size_t length ) {
                           uint32_t crc = 0xffffffff;
                           while( length-- ) {
                             uint8_t c = *data++;
                             for( uint32_t i = 0x80; i > 0; i >>= 1 ) {
                               bool bit = crc & 0x80000000;
                               if( c & i ) {
                                 bit = !bit;
                               }
                          
                               crc <<= 1;
                               if( bit ) {
                                 crc ^= 0x04c11db7;
                               }
                             }
                           }
                          
                           return crc;
                          }
                          
                          void setup()
                          {
                          // Disable the WiFi persistence.  The ESP8266 will not load and save WiFi settings in the flash memory.
                           WiFi.persistent( false );
                           delay(1);  
                          
                          // turn off wifi to conserve power  
                           WiFi.mode( WIFI_OFF );
                           WiFi.forceSleepBegin();
                           delay( 1 );
                          
                           Serial.begin(74880);
                           Serial.println("Truebner SMT50 Soil moisture sensor");
                          
                           // Power up moisture sensor
                           pinMode (D7, OUTPUT); // D7 switches the relay
                           digitalWrite (D7, HIGH);
                           int16_t adc0, adc1;
                           ads.begin();
                           ads.setGain(GAIN_ONE);  // 1 bit = 0.125mV in this mode
                          
                           // Temperatur und Feuchtigkeit abholen und seriell ausgeben    
                           delay(400); // Truebner requires 300ms before the sensor data is stable. Using 400mV to allow for tolerances.
                           adc0 = ads.readADC_SingleEnded(0);
                           adc1 = ads.readADC_SingleEnded(1);
                             
                           Serial.print("ADC0: ");
                           Serial.println(adc0);
                           Serial.print("ADC1: ");
                           Serial.println(adc1);
                          
                           Serial.print("Time after reading sensor: ");
                           Serial.println(millis());
                          
                           // turn off moisture sensor
                           digitalWrite (D7, LOW);
                          
                           // turn on wifi
                           setup_wifi();
                          
                           Serial.print("Time after connecting wifi: ");
                           Serial.println(millis());
                          
                           // convert sensor data and send it to server 
                           // adc*0.125 is the signal voltage in millivolt. *0.050/3 is the conversion formula to volumetric humidity
                          
                           float humd=float(int((adc0*0.125)*0.050/3*100+0.5))/100;
                          
                           // adc*0.125 is the signal voltage in millivolt. (mV/1000 - 0.5)*100 is the formula to calculate the temperature
                           
                           float temp=adc1*0.125; // Sensor in millivolt
                           temp=(temp/1000-0.5)*100;  // Millivolt in Temperatur
                           temp=float( int(temp*10+0.5)) /10;
                          
                           //mqtt Server ansprechen
                           
                           client.setServer(mqtt_server, 1883);
                           Serial.print("Attempting MQTT connection...");
                           String clientId = "Sensor03";
                           
                           // Attempt to connect
                           if (client.connect(clientId.c_str()))
                           {
                             Serial.println("connected");
                           } else {
                             Serial.print("failed, rc=");
                             Serial.print(client.state());
                             Serial.println(" try again in 5 minutes");
                             ESP.deepSleep(5 * DS_Intervall);  
                             delay(100);
                           // remember: After deep sleep, the program terminates
                           }
                          // send data to the server via MQTT  
                           String msg="";
                           char MsgFeuch[25];
                           char MsgTemp[25];
                           char Msgvcc[25];
                           char Msgmillis[25];
                          
                           msg=humd;
                           msg.toCharArray(MsgFeuch,25);
                           client.publish("Sensoren/Sensor03/Feuchtigkeit",MsgFeuch);
                           Serial.print("Feuchtigkeit an MQTT: ");
                           Serial.println(MsgFeuch);
                           
                           msg=temp;
                           msg.toCharArray(MsgTemp,25);
                           client.publish("Sensoren/Sensor03/Temperatur",MsgTemp);
                           Serial.print("Temperatur an MQTT: ");
                           Serial.println(MsgTemp);
                           
                           msg= ESP.getVcc();
                           msg.toCharArray(Msgvcc,25);
                           client.publish("Sensoren/Sensor03/Spannung",Msgvcc);
                           
                           msg= millis();
                           msg.toCharArray(Msgmillis,25);
                           client.publish("Sensoren/Sensor03/Laufzeit",Msgmillis);
                          
                          // set callback for MQTT
                           client.setCallback(callback); 
                           client.subscribe("Sensoren/Sensor03/Intervall",1);
                          
                           Serial.print("Time after sending data: ");
                           Serial.println(millis());
                             
                           Serial.println("300ms pause to make sure the server has responded to MQTT subscription");
                           delay(300);
                             
                          //hope for MQTT-callback
                           client.loop();
                          
                          // MQTT disconnect
                           client.disconnect();  
                          
                          // no wait because we have 100ms further down
                           Serial.print(".");
                           Serial.print("Jetzt Deep Sleep ");
                           Serial.print(Minuten);
                           WiFi.disconnect( true );
                           delay( 10 );
                           ESP.deepSleep(Minuten * DS_Intervall, WAKE_RF_DISABLED);  
                           delay(100);
                          }
                          
                          void loop()
                          {
                          }
                          

                          wenn ich das richtig verstanden habe muss man das hinterher noch über platform.io auf den Wemos flashen?

                          S 1 Reply Last reply Reply Quote 0
                          • S
                            saeft_2003 Most Active @htrecksler last edited by

                            @htrecksler

                            Das weiß ich nicht sicher, ich habe mit atom nur die normale tasmota mit aktivierten ads Wandler geflasht.

                            htrecksler H 2 Replies Last reply Reply Quote 1
                            • htrecksler
                              htrecksler Forum Testing @saeft_2003 last edited by

                              @saeft_2003
                              ok, danke dir

                              M 1 Reply Last reply Reply Quote 0
                              • M
                                maz @htrecksler last edited by maz

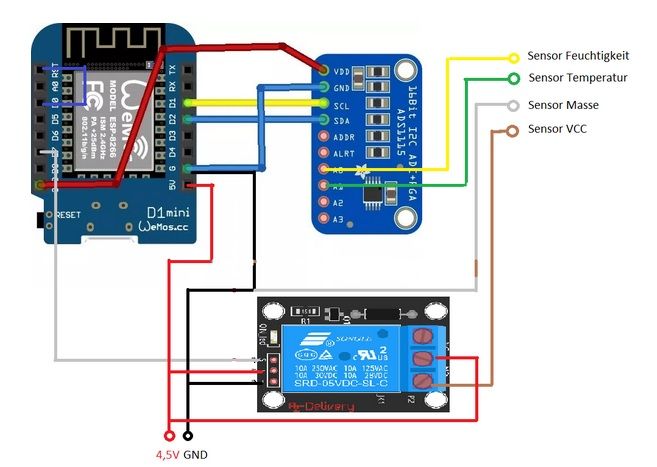
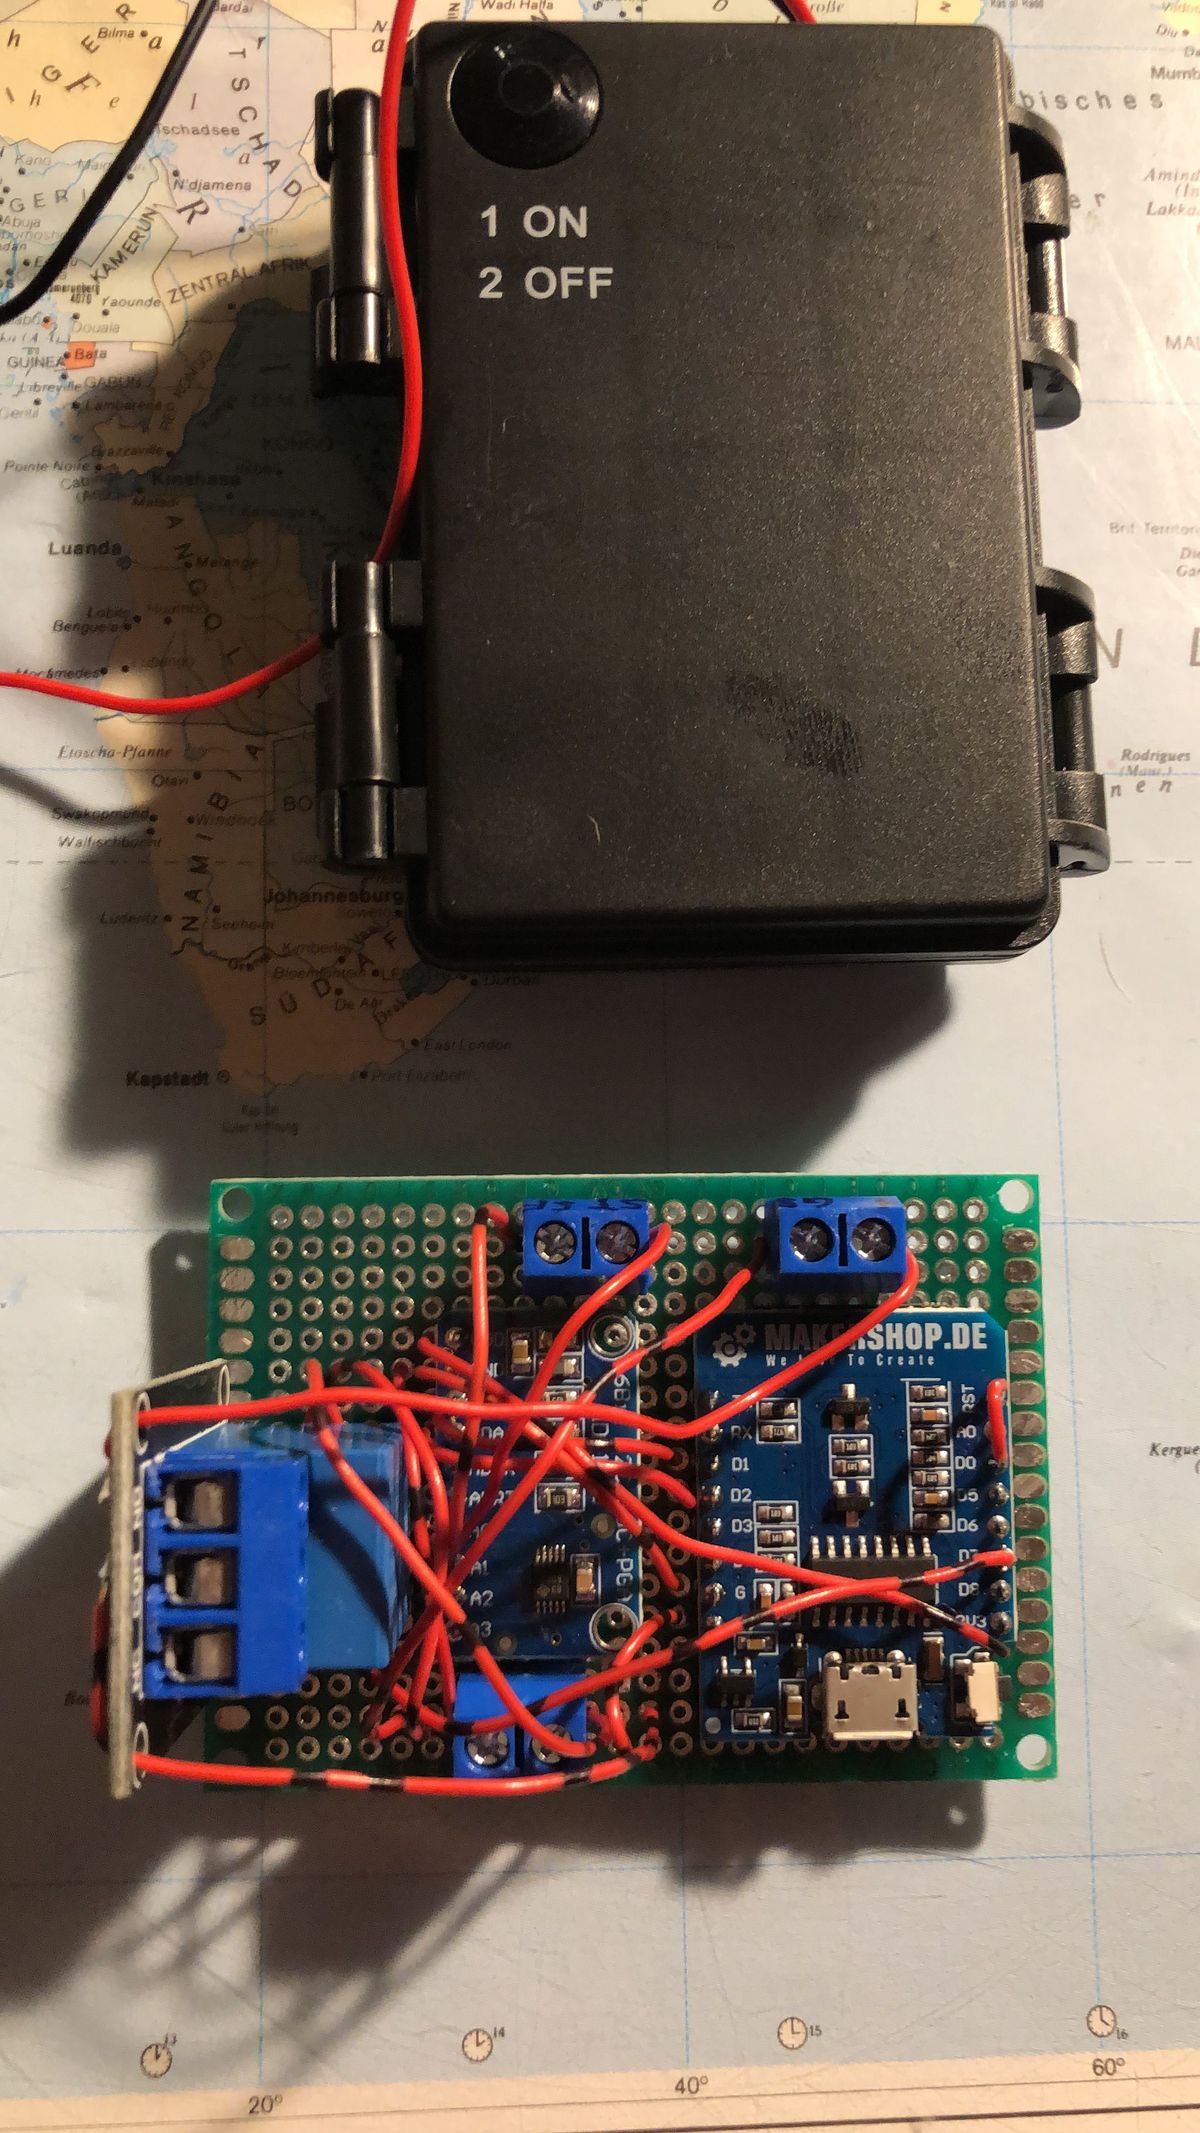
                                Ich habe die Sensor-Schaltung nach Vorbild von topgun bzw. saeft_2003 nachgebaut, die Messung von Temperatur und Feuchte funktioniert einwandfrei. Vielen Dank für die gute Vorarbeit!!
                                Die Messung scheint auch tatsächlich recht genau zu sein. Als Firmware habe ich Tasmota geflasht und vorher den ADS1115 im Quellcode aktiviert. Die Stromversorgung erfolgt bei mir über drei AA-Batterien. Um den Stromverbrauch zu minimieren, nutze ich die DeepSleep Funktion in Tasmota und schalte den Wemos nur zur vollen Stunde ein Mal kurz für 30s ein. Sensor und AD-Wandler sind über ein Relais geschaltet und werden entsprechend ebenfalls nur kurz mit Strom versorgt. Mal sehen wie lange er dann mit einer Batterieladung durchhält. Aufgefallen ist mir beim DeepSleep, dass die RTC recht ungenau geht: Mal wacht der Wemos zur vollen Stunden auf, mal 3 min. zu früh, mal 4 min. zu früh. Ist an sich kein großes Problem, hat mich aber gewundert.
                                Eine Frage hätte ich noch: Wie rechnet ihr mit dem Bodenfeuchte-Wert (vol. Wassergehalt 0-50%) weiter? Hier kann man nachlesen, dass man bewässern sollten, wenn im Boden 40-50% der nutzbaren Feldkapazität unterschritten werden. Das ist eigentlich ein sehr praxistauglicher Ansatz, weil man damit über eine lineare Funktion die Bewässerungsdauer bzw. -menge festlegen könnte.
                                B80B1D44-9DBD-4644-A10E-2B0283D4B098.jpeg

                                S H 3 Replies Last reply Reply Quote 0
                                • S
                                  saeft_2003 Most Active @maz last edited by

                                  @maz

                                  Ab wie viel Prozent man gießen muss hängt extrem davon ab was für einen Boden man hat.

                                  Ich habe es über den Sommer so gehandhabt das ich bei unter 20% bewässert habe. Über den Sommer hat er ein paar braune Stellen bekommen (da wo auch wenig Wasser hinkommt) aber nach feuchterer Witterung waren diese sehr schnell wieder weg.

                                  Im großen und Ganzen bin ich mit dieser Taktik gut über den Sommer gekommen, weil ich habe auch nicht unendlich viel Wasser/Geld zu Verfügung.

                                  1 Reply Last reply Reply Quote 0
                                  • S
                                    saeft_2003 Most Active @maz last edited by

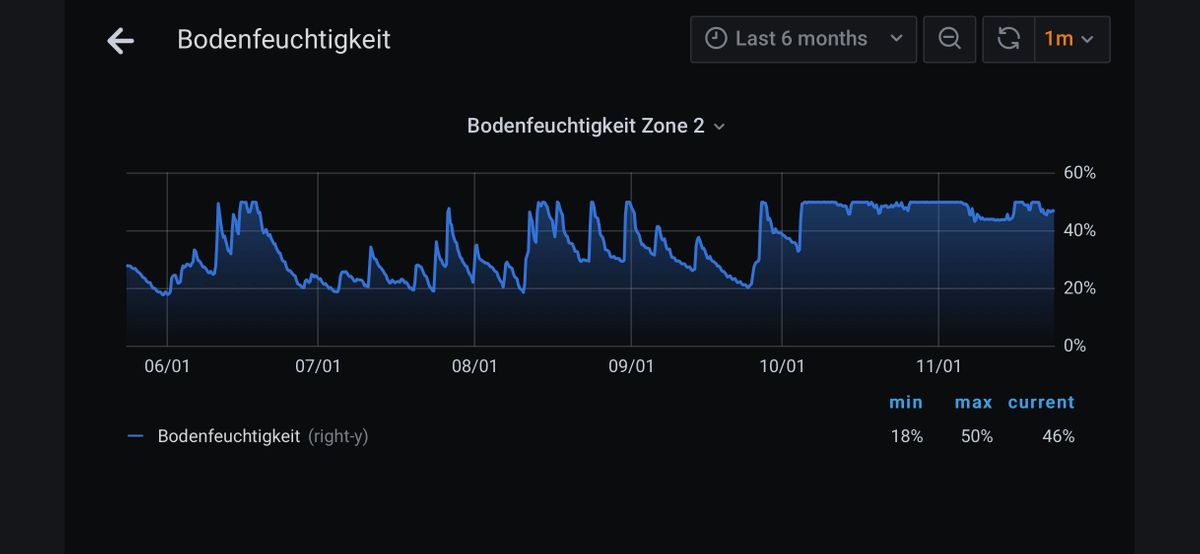
                                    @maz

                                    So sieht bei mir die Bodenfeuchte über 6 Monate aus.

                                    D5B8313A-A20B-4204-8DB5-DE7E7EA90299.jpeg

                                    1 Reply Last reply Reply Quote 0
                                    • H
                                      Hundefreund @saeft_2003 last edited by

                                      @saeft_2003
                                      wie aktiviere ich den ADS 4415 vor dem flashen?🤔
                                      Ich benutze den Tasmotizer.exe in Windows?

                                      S 1 Reply Last reply Reply Quote 0
                                      • S
                                        saeft_2003 Most Active @Hundefreund last edited by

                                        @Hundefreund

                                        Kann ich leider nicht weiter helfen da ich mit atom flashe.

                                        1 Reply Last reply Reply Quote 0
                                        • H
                                          Hundefreund @htrecksler last edited by

                                          @htrecksler ,
                                          wie genau geht das mit der Aktivierung des ADS1115 vor dem Flashen der Tasmota Firmware ?😧
                                          Oder kannst du mir deine fertigen kompiliert Version mit dem ADS als bin file zuschicken?

                                          htrecksler 2 Replies Last reply Reply Quote 0
                                          • htrecksler
                                            htrecksler Forum Testing @Hundefreund last edited by htrecksler

                                            @Hundefreund
                                            ich kann dir leider auch nicht helfen, ich hab das Projekt damals erstmal auf Eis gelegt, weil ich keine Zeit mehr hatte mich damit zu beschäftigen. Das Ganze Tasmota und flashen und und und sind "Böhmische Dörfer".
                                            Ich weiß noch, das es tausende Anleitungen gab, aber keine hat funktioniert.
                                            Dann hab ich es irgendwann aufgegeben. Ich bewunder die Leute bei denen sowas klappt. 🙂
                                            Beim Lesen klingt das immer alles total einfach, aber dann 🙂
                                            Das hab ich noch gefunden. Aber ist von Mai...keine Ahnung ob das das richtige ist...
                                            firmwareTreADS.bin

                                            1 Reply Last reply Reply Quote 0
                                            • First post
                                              Last post

                                            Support us

                                            ioBroker
                                            Community Adapters
                                            Donate
                                            FAQ Cloud / IOT
                                            HowTo: Node.js-Update
                                            HowTo: Backup/Restore
                                            Downloads
                                            BLOG

                                            429
                                            Online

                                            31.9k
                                            Users

                                            80.1k
                                            Topics

                                            1.3m
                                            Posts

                                            smt50
                                            8
                                            41
                                            4693
                                            Loading More Posts
                                            • Oldest to Newest
                                            • Newest to Oldest
                                            • Most Votes
                                            Reply
                                            • Reply as topic
                                            Log in to reply
                                            Community
                                            Impressum | Datenschutz-Bestimmungen | Nutzungsbedingungen
                                            The ioBroker Community 2014-2023
                                            logo