NEWS
Test Adapter lovelace v1.2.x
-
-
@schienw said in Test Adapter lovelace v1.2.x:
nutz jemand die Home_mod Funktion mit Device?
Was ist das? Hast du einen Link?
Ansonsten gibt es aktuell keinen Weg den View vom ioBroker aus zu ändern.
Meine Versuche das mit browser_mod hinzubekommen sind bisher nicht erfolgreich... da fehlt noch irgendwas im Adapter, aber ich habe noch nicht verstanden was.

-
@garfonso said in Test Adapter lovelace v1.2.x:
Home_mod Funktion mit Device
https://github.com/thomasloven/hass-browser_mod
hier steht:
Example uses
Make the camera feed from your front door pop up on the tablet in your kitchen when someone rings the doorbell.
Have a message pop up on every screen in the house when it's bedtime.
Make the browser on your workstation switch to a specific tab when the kitchen light is on after midnight
Play a TTS message on your work computer when the traffic sensor tells you it's time to go home.
Display a full screen clock on your screen if no one's touched it for five minutes
For more usage examples, see the cookbook. -
und noch dies:
Devices
The most important concept of browser_mod is the device.A device is a machine-browser combination identified by a unique deviceID. The deviceID is randomly generated and may look like ded3b4dc-abedd098.
Chrome on your desktop and Chrome on your laptop are two different devices.
Chrome on your laptop and Safari on your laptop are two different devices.
Two tabs in Firefox on the same computer is one device.
Two windows in Edge on the same computer is one device.
In the two latter cases, the last loaded tab/window will be the active one.Note: Incognito mode will generate a new deviceID and thus a new device every time it's started.
-
Schau mal ins Kochbuch - da ist ein Beispiel:
https://github.com/thomasloven/hass-browser_mod/wiki/Cookbook
Würde mich auch interessieren

-
@nukleuz
wüsste nicht, wo ich das eintragen sollte.Unter VIS mache ich es so:
setState("vis.0.control.data","Wetter");wie und wo kann ich solch ein Scipt im ioBroker eingeben?
test_popup:
sequence:
- service: browser_mod.popup
data_template:
deviceID: "{{ deviceID }}"
title: Testing script
card:
type: entities
entities:
- light.bed_light -
Versuch es mal im Konfigurationseditor zu finden oben rechts im Bearbeitungsmodus - die drei Punkte.
Beachte, dass du auf jeden Fall die richtigen Entitäten hast und auch die ID vom Device.
Kann gerade nicht genauer drauf eingehen - steht aber alles auf der BrowserMod GitHub Seite der Card…
-
Hallo,
ich habe zwei Fragen:- Wie kann man einen Taster in Lovelace realisieren? D.h. nach dem Drücken des Button wechselt der Wert automatisch wieder zu "false".
- Was ist der Unterschied, ob man eine Entität vom Typ "input_Boolean" oder "switch" für eine boolean Variable erstellt? Gibt es bei einem Typen Vorteile?

Danke & Gruß
-
Zu 1. -> Ich nutze dafür Blockly (Trigger auf den zu schaltenden Datenpunkt, wenn true und dann steuere nach x Sekunden wieder auf false zurück)
Zu 2. Bin ich mir gerade nicht mehr sicher - ggf. nur eine Darstellungssache... Mhhh - ähhhh - vielleicht wer anders

-
Hallo,
kann man in einer entity filter noch irgendwie eine Navigation unterbringen?
Das hier zeigt eingeschaltete Lichter an. Wäre doch schön, wenn man zu dem entsprechenden Raum navigieren könnte, per extra-icon daneben oder Doppelklick oder so.type: entity-filter entities: - entity: switch.esph8_switch name: Light Living Room - entity: switch.esph9_switch name: Light Bedroom state_filter: - 'on' card: type: entities title: lights on show_header_toggle: falseHab schon diverses versucht mit tap_action und so, aber kriegs nicht hin.
Danke schon mal! -
@nukleuz
Danke für den Hinweis, hab ich gefunden.
Das Beispiel mit den Popup funktioniert schon mal.
Leider komme ich mit m einem Problem nicht weiter.
Eigentlich sollte ja laut Anleitung hier was installiert werden:Entities
Once browser_mod is installed, loading up your Home Assistant frontend on a new device will create three to five new devices.sensor.<device>
media_player.<device>
light.<device>
If you've enabled it: camera.<device>
If you're using Fully Kiosk Browser: binary_sensor.<device>
<device> here will be the deviceID of the device but with the dash (-) replaced by an underscore (_). If you've defined an alias, it will be that instead.E.g: Connecting your phone with deviceID: ded3b4dc-abedd098 will create the entities sensor.ded3b4dc_abedd098, media_player.ded3b4dc_abedd098 and light.ded3b4dc_abedd098. Connecting with the computer named Arrakis above with deviceID: 99980b13-dabc9563 will create the entities sensor.arrakis, media_player.arrakis and light.arrakis.
Ich finde diese Einträge nicht.
-
Relativ einfach erklärt: Diese Entitäten werden nicht erzeugt. Das funktioniert nur in HomeAssistant. Es wird nur die GUI von HA mit den Entitäten emuliert im ioBroker. Das ganze Backend natürlich nicht.
So wird man immer wieder auf Dinge stoßen, die nicht funktionieren werden.
@garfonso macht schon viel möglich - alles wird technisch nicht funktionieren.

-
schau dir mal die Banner Card an
geht dann in etwa so.
type: custom:banner-card heading: Vorgarten link: /lovelace/vorgarten entities: - entity: light.Licht_Haustuer name: Hautür - entity: light.Steckdosen_Schaltaktor_1 name: Vorgarten - entity: light.Licht_Mauer name: Mauer -
@xbit Danke, das sieht vielversprechend aus. Nach der Arbeit gleich mal ausprobieren!
-
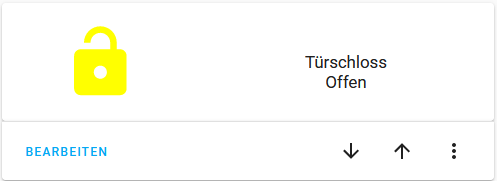
ich versuche gerade eine button-card einzufügen, die mir einerseits den status meines Homematic-Schlosses anzeigt, und über das ich ver-/entriegeln kann:

Status klappt schonmal...nur das öffnen/schließen klappt nicht, sondern er zeigt mir beim klick immer den history-verkauf an..
Wie muss ich den state (input_select) korrekt ansteuern?type: custom:button-card color_type: icon entity: sensor.002A1D898B73E3_1_LOCK_STATE name: Türschloss layout: icon_state_name2nd show_label: true state: - value: UNLOCKED icon: mdi:lock-open color: yellow label: Offen tap_action: action: call-service service: input_select.select_option service_data: entity_id: input_select.002A1D898B73E3_1_LOCK_TARGET_LEVEL option: LOCKED - value: LOCKED icon: mdi:lock color: red label: Verriegelt tap_action: action: call-service service: input_select.select_option service_data: entity_id: input_select.002A1D898B73E3_1_LOCK_TARGET_LEVEL option: UNLOCKED -
-
hat beides nicht geklappt....
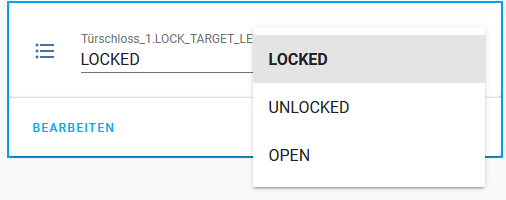
so sieht die entity aus, wenn ich sie normal einfüge....
es scheint tatsächlich so zu sein, dass "tap-action" gar nicht unterhalb von "state > value" verwendet werde kann....!?
wenn ich es so mache, kann ich zumindest einen status setzen - leider aber nicht abhängig vom "value";(
habt ihr noch eine Idee, wie ich das in einem button hinbekomme > sonst müsste ich ja zwei machen...type: custom:button-card color_type: icon entity: sensor.002A1D898B73E3_1_LOCK_STATE name: Türschloss layout: icon_state_name2nd show_label: true tap_action: action: call-service service: input_select.select_option service_data: entity_id: input_select.002A1D898B73E3_1_LOCK_TARGET_LEVEL option: LOCKED state: - value: UNLOCKED icon: mdi:lock-open color: yellow label: Offen - value: LOCKED icon: mdi:lock color: red label: Verriegelt -
nur mal für mich...
man kann doch in dem Popup die zustände ändern (bei tap_action)... reicht dir das nicht oder möchtest du es anders angezeigt bekommen? -
@xbit said in Test Adapter lovelace v1.2.x:
type: custom:banner-card
heading: BannerCard
link: /lovelace/tor-garage/0
entities:
  - entity: switch.esph8_switch
    name: Licht1
    when: 'on'
  - entity: switch.esph9_switch
    name: Licht2
    when: 'on'
Geht, aber macht nicht was ich gerne hätte. Ich hätte gerne filterbare Karte, wo ich in einer entity neben dem Schalter noch einen Navigationslink unterbringen kann, z.B. als double click.
-
auf die schnelle wenn dir reicht mit "doppel klick" oder " langes drücken" schau dir mal die button-card an.
double_tap_action:
  action: navigate
  navigation_path: /lovelace/tor-garage/0
hold_action:
  action: navigate
  navigation_path: /lovelace/tor-garage/0
