

[gelöst]CC2531 an proxmox an LXC durchreichen scheitert...
-
@XxJooO sagte in CC2531 an proxmox an LXC durchreichen scheitert...:
lxc.mount.entry: /dev/bus/usb/001/003 dev/bus/usb/001/003 none bind,optional,create=file
Ich habe diese Zeile jetzt mal geändert in
lxc.mount.entry: /dev/ttyACM0 dev/ttyACM0 none bind,optional,create=fileSomit bekomme ich im LXC bei einem
root@ioBrokerDebian10:~# ls -l /dev/tty*
crw-rw-rw- 1 nobody nogroup   5, 0 Feb  4 15:55 /dev/tty
crw------- 1 jo     tty     136, 0 Feb  4  2020 /dev/tty1
crw--w---- 1 root   tty     136, 1 Feb  4 15:54 /dev/tty2
crw-rw---- 1 nobody nogroup 166, 0 Feb  4 15:40 /dev/ttyACM0
Demnach wäre jetzt dem LXC ein Device /dev/ttyACM0 bekannt.
Das führt dazu, dass ich im ioBroker jetzt auch das angezeigt bekomme
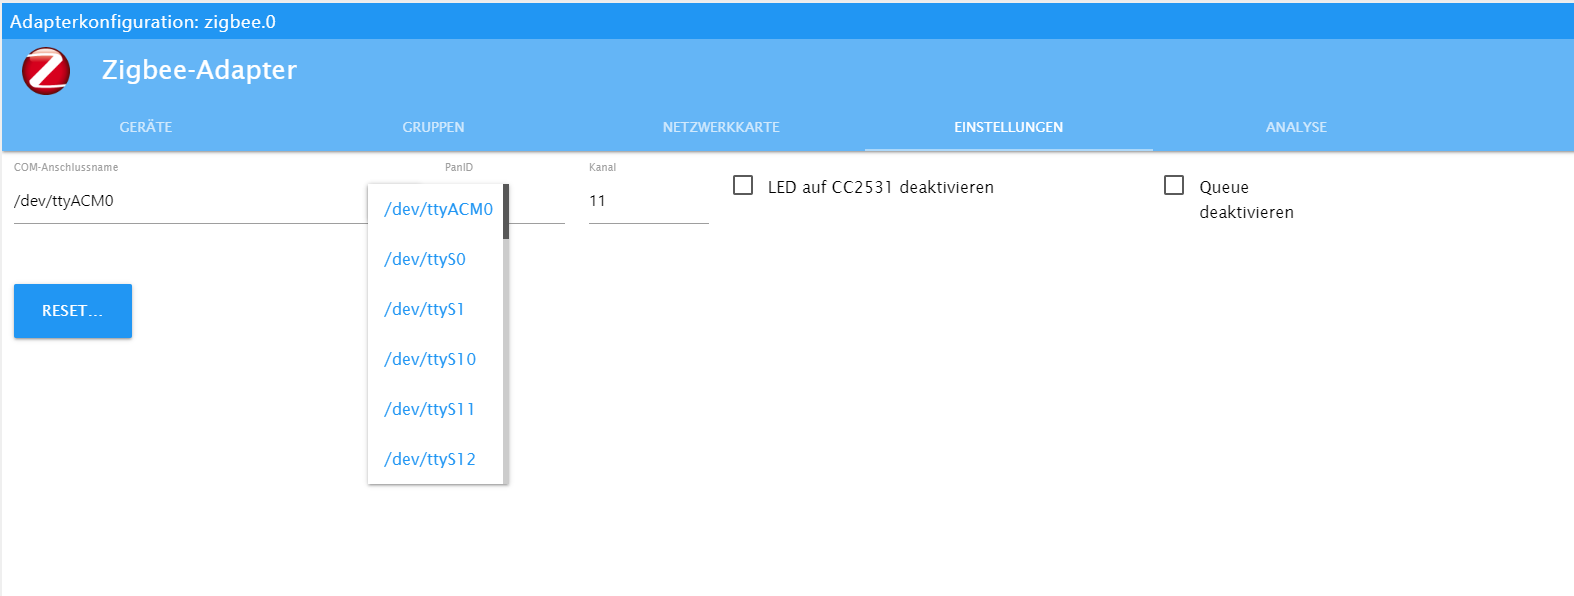
Ich kann also /dev/ttyACM0 auswählen. Allerdings ändert sich das Log nicht
zigbee.0 2020-02-04 16:06:01.746 error (847) Error while starting zigbee-shepherd!. Error: Error: Permission denied, cannot open /dev/ttyACM0, die Instanz bleibt gelb. Was ich nicht verstehe ist: "Permission denied." Ich interpretiere das als ein Rechteproblem. Allerdings weist doch
crw-rw---- 1 nobody nogroup 166, 0 Feb 4 15:40 /dev/ttyACM0darauf hin, dass der LXC die Rechte hätte...
Was mich noch irritiert ist die Anzeige in dem Bild aus ioBroker oben. Auf dem NUC 1 sieht das ganz anders aus.
@XxJooO sagte in CC2531 an proxmox an LXC durchreichen scheitert...:
Was mich noch irritiert ist die Anzeige in dem Bild aus ioBroker oben. Auf dem NUC 1 sieht das ganz anders aus.
Das hat sich in diesem Moment erledigt, jetzt sieht es wieder so aus wie auf NUC 1. Hab in einem anderen thread gesehen, dass @arteck die Benamsung auf git korrigiert hat.
-
Mmmmhhh,
nachdem @arteck die Benamsung korrigiert hat wurde der Adapter neu installiert. Auf NUC 2 sieht die Oberfläche jetzt wieder wie die auf NUC 1 aus.
Auch hat sich das Log jetzt komplett geändert:
zigbee.0	2020-02-04 16:38:02.353	error	(1204) Error: Error while opening serialport 'Error: Error: Permission denied, cannot open /dev/ttyACM0' at Znp.<anonymous> (/opt/iobroker/node_modules/zigbee-herdsman/dist/adapter/z-stack/znp/znp
zigbee.0	2020-02-04 16:38:02.352	error	(1204) Failed to start Zigbee
Da steht noch viel mehr

-
Hallo Leute,
ich habe die Lösung gefunden!
Folgendes muss gemacht werden:
root@pve:~# lsusb
Bus 002 Device 001: ID 1d6b:0003 Linux Foundation 3.0 root hub
Bus 001 Device 004: ID 8087:0aaa Intel Corp.
Bus 001 Device 003: ID 0451:16a8 Texas Instruments, Inc.
Bus 001 Device 002: ID 046d:c52b Logitech, Inc. Unifying Receiver
Bus 001 Device 001: ID 1d6b:0002 Linux Foundation 2.0 root hub
root@pve:~# ls -l /dev/ttyACM0
crw-rw-rw- 1 root dialout 166, 0 Feb  5 09:35 /dev/ttyACM0
root@pve:~# ls -l /dev/bus/usb/001/003
crw-rw-r-- 1 root root 189, 2 Feb  5 08:05 /dev/bus/usb/001/003
Man sieht also den Stick an Bus 001 Device 003.
Dies ergibt die ID 189:2.
Der Stick wird als ttyACM0 angelegt und der hat die ID 166:0
Man muss einfach beides in die .conf-Datei des LXC eintragen, das sieht dann so aus:arch: amd64 cores: 4 features: keyctl=1,nesting=1 hostname: ioBrokerDebian10 memory: 8192 net0: name=eth0,bridge=vmbr0,firewall=1,gw=192.168.178.1,hwaddr=2E:81:9B:26:E3:3A,ip=192.168.178.6/24,type=veth onboot: 1 ostype: debian rootfs: local-lvm:vm-202-disk-1,size=20G swap: 0 unprivileged: 1 lxc.cgroup.devices.allow: c 189:* rwm lxc.mount.entry: /dev/bus/usb/001/003 dev/bus/usb/001/003 none bind,optional,create=file lxc.cgroup.devices.allow: c 166:* rwm lxc.mount.entry: /dev/ttyACM0 dev/ttyACM0 none bind,optional,create=fileDanach noch ein
chmod o+rw /dev/ttyACM0Danach wird der Container neu gestartet und die Instanz wird grün...
ioBroker auf Intel NUC - Homematic CCU3/pivCCU auf Raspi 3B+
-
Ergänzung:
im letzten Post ist das
chmod o+rw /dev/ttyACM0der entscheidende Schritt, aber nicht alleine, da das zum Einen einen Reboot des proxmox-Host nicht übersteht und zum Anderen noch etwas fehlt.
Ich habe mich deshalb schlau gemacht, wie man unter Debian 10 rc.local wieder reaktiviert und dann eine rc.local mit folgendem Inhalt erstellt:
#!/bin/sh -e
#
# rc.local
#
# This script is executed at the end of each multiuser runlevel.
# Make sure that the script will "exit 0" on success or any other
# value on error.
#
# In order to enable or disable this script just change the execution
# bits.
#
# By default this script does nothing.

chmod o+rw /dev/ttyACM0
chmod o+rw /dev/bus/usb/001/003
exit 0
jetzt wird der ganze Eingriff persistent und übersteht problemlos einen Host-Reboot!
ioBroker auf Intel NUC - Homematic CCU3/pivCCU auf Raspi 3B+
-
Hi,
danke für die umfängliche Anleitung. ich habe nur noch nicht verstanden wo ich die rc.local finde/erstelle. kannst du das auch noch mal näher erklären?Was mir an der ganzen Sache aber auch schon aufgefallen ist und bei mir zu Problemen geführt hat, ist: wenn man den Stick abzieht und wieder in dieselbe Buchse steckt, bekommt der immer eine neue Device Nummer. Muss ich dann jedes Mal trotzdem alles neu machen?
mfg
-
Ergänzung:
im letzten Post ist das
chmod o+rw /dev/ttyACM0der entscheidende Schritt, aber nicht alleine, da das zum Einen einen Reboot des proxmox-Host nicht übersteht und zum Anderen noch etwas fehlt.
Ich habe mich deshalb schlau gemacht, wie man unter Debian 10 rc.local wieder reaktiviert und dann eine rc.local mit folgendem Inhalt erstellt:
#!/bin/sh -e
#
# rc.local
#
# This script is executed at the end of each multiuser runlevel.
# Make sure that the script will "exit 0" on success or any other
# value on error.
#
# In order to enable or disable this script just change the execution
# bits.
#
# By default this script does nothing.

chmod o+rw /dev/ttyACM0
chmod o+rw /dev/bus/usb/001/003
exit 0
jetzt wird der ganze Eingriff persistent und übersteht problemlos einen Host-Reboot!
@hoktar
wenn Du dem rc.local-Link folgst, dann werden da die Verzeichnisse gezeigt, in denen die Files erstellt werden. In dem Link wird allerdings der Inhalt über den Befehlcaterzeugt. Das hat bei mir auch nicht funktioniert. Ich habe die Dateien dann mit
nanoerstellt und dann ging es. Auf Deine letzte Frage kann ich Dir leider keine Antwort geben. Allerdings verstehe ich gar nicht, warum dazu die Notwendigkeit besteht. Seitdem ich meinen Stick eingesteckt habe, hat er den NUC nicht mehr verlassen...
Grüße -
@hoktar
wenn Du dem rc.local-Link folgst, dann werden da die Verzeichnisse gezeigt, in denen die Files erstellt werden. In dem Link wird allerdings der Inhalt über den Befehlcaterzeugt. Das hat bei mir auch nicht funktioniert. Ich habe die Dateien dann mit
nanoerstellt und dann ging es. Auf Deine letzte Frage kann ich Dir leider keine Antwort geben. Allerdings verstehe ich gar nicht, warum dazu die Notwendigkeit besteht. Seitdem ich meinen Stick eingesteckt habe, hat er den NUC nicht mehr verlassen...
Grüße@XxJooO Dank Dir!! Hat sehr gut funktioniert. Es läuft iobroker bei mir auch im Container mit dem CC2531.


-
Hallo Leute,
ich habe die Lösung gefunden!
Folgendes muss gemacht werden:
root@pve:~# lsusb
Bus 002 Device 001: ID 1d6b:0003 Linux Foundation 3.0 root hub
Bus 001 Device 004: ID 8087:0aaa Intel Corp.
Bus 001 Device 003: ID 0451:16a8 Texas Instruments, Inc.
Bus 001 Device 002: ID 046d:c52b Logitech, Inc. Unifying Receiver
Bus 001 Device 001: ID 1d6b:0002 Linux Foundation 2.0 root hub
root@pve:~# ls -l /dev/ttyACM0
crw-rw-rw- 1 root dialout 166, 0 Feb  5 09:35 /dev/ttyACM0
root@pve:~# ls -l /dev/bus/usb/001/003
crw-rw-r-- 1 root root 189, 2 Feb  5 08:05 /dev/bus/usb/001/003
Man sieht also den Stick an Bus 001 Device 003.
Dies ergibt die ID 189:2.
Der Stick wird als ttyACM0 angelegt und der hat die ID 166:0
Man muss einfach beides in die .conf-Datei des LXC eintragen, das sieht dann so aus:arch: amd64 cores: 4 features: keyctl=1,nesting=1 hostname: ioBrokerDebian10 memory: 8192 net0: name=eth0,bridge=vmbr0,firewall=1,gw=192.168.178.1,hwaddr=2E:81:9B:26:E3:3A,ip=192.168.178.6/24,type=veth onboot: 1 ostype: debian rootfs: local-lvm:vm-202-disk-1,size=20G swap: 0 unprivileged: 1 lxc.cgroup.devices.allow: c 189:* rwm lxc.mount.entry: /dev/bus/usb/001/003 dev/bus/usb/001/003 none bind,optional,create=file lxc.cgroup.devices.allow: c 166:* rwm lxc.mount.entry: /dev/ttyACM0 dev/ttyACM0 none bind,optional,create=fileDanach noch ein
chmod o+rw /dev/ttyACM0Danach wird der Container neu gestartet und die Instanz wird grün...
@XxJooO sagte in [gelöst]CC2531 an proxmox an LXC durchreichen scheitert...:
ich habe die Lösung gefunden!
Folgendes muss gemacht werden:Servus!
Irgendetwas mache ich falsch, du empfiehlst:root@pve:~# lsusb Bus 002 Device 001: ID 1d6b:0003 Linux Foundation 3.0 root hub Bus 001 Device 004: ID 8087:0aaa Intel Corp. Bus 001 Device 003: ID 0451:16a8 Texas Instruments, Inc. Bus 001 Device 002: ID 046d:c52b Logitech, Inc. Unifying Receiver Bus 001 Device 001: ID 1d6b:0002 Linux Foundation 2.0 root hubIch mache das auch dirket am NUC in Proxmox:
root@proxmox:~# lsusb
Bus 002 Device 001: ID 1d6b:0003 Linux Foundation 3.0 root hub
Bus 001 Device 003: ID 8087:0aa7 Intel Corp.
Bus 001 Device 005: ID 051d:0002 American Power Conversion Uninterruptible Power Supply
Bus 001 Device 002: ID 0451:16c8 Texas Instruments, Inc.
Bus 001 Device 001: ID 1d6b:0002 Linux Foundation 2.0 root hub
In meinem Fall geht es um das Durchreichen des USV USB Anschlusses Bus 001 Device 005. Gebe ich jetzt deinen nächsten Befehl ein:
root@proxmox:~# ls -l /dev/ttyACM0
ls: cannot access '/dev/ttyACM0': No such file or directory
Kanst du mir bitte weiterhelfen?
LG aus Wien, mxa -
@metaxa sagte in [gelöst]CC2531 an proxmox an LXC durchreichen scheitert...:
American Power Conversion Uninterruptible Power Supply
Hallo @metaxa,
bei dem Gerät handelt es sich um ein USV. Ich bin absolut kein Linux-Kenner... es wird aber am ehesten damit zu tun haben, dass das Gerät unter Linux eben keines aus /dev/ttyACM0 sein wird. Leider kannst Du da nur weiter googeln.
z.B. Link Text
Grüße
Jo -
@XxJooO sagte in [gelöst]CC2531 an proxmox an LXC durchreichen scheitert...:
ich habe die Lösung gefunden!
Folgendes muss gemacht werden:Servus!
Irgendetwas mache ich falsch, du empfiehlst:root@pve:~# lsusb Bus 002 Device 001: ID 1d6b:0003 Linux Foundation 3.0 root hub Bus 001 Device 004: ID 8087:0aaa Intel Corp. Bus 001 Device 003: ID 0451:16a8 Texas Instruments, Inc. Bus 001 Device 002: ID 046d:c52b Logitech, Inc. Unifying Receiver Bus 001 Device 001: ID 1d6b:0002 Linux Foundation 2.0 root hubIch mache das auch dirket am NUC in Proxmox:
root@proxmox:~# lsusb
Bus 002 Device 001: ID 1d6b:0003 Linux Foundation 3.0 root hub
Bus 001 Device 003: ID 8087:0aa7 Intel Corp.
Bus 001 Device 005: ID 051d:0002 American Power Conversion Uninterruptible Power Supply
Bus 001 Device 002: ID 0451:16c8 Texas Instruments, Inc.
Bus 001 Device 001: ID 1d6b:0002 Linux Foundation 2.0 root hub
In meinem Fall geht es um das Durchreichen des USV USB Anschlusses Bus 001 Device 005. Gebe ich jetzt deinen nächsten Befehl ein:
root@proxmox:~# ls -l /dev/ttyACM0
ls: cannot access '/dev/ttyACM0': No such file or directory
Kanst du mir bitte weiterhelfen?
LG aus Wien, mxa@metaxa Warum macht Ihr das nicht über den Proxmox WEBGUI?
Ich habe das gestern noch für meine USV gemacht.
Dauerte keine 5 Minuten.
P.S. Bin Proxmox Anfänger.
Bitte keine Fragen per PN, die gehören ins Forum!
Benutzt das Voting rechts unten im Beitrag wenn er euch geholfen hat.
-
@metaxa Warum macht Ihr das nicht über den Proxmox WEBGUI?
Ich habe das gestern noch für meine USV gemacht.
Dauerte keine 5 Minuten.
P.S. Bin Proxmox Anfänger.
@wendy2702 sagte in [gelöst]CC2531 an proxmox an LXC durchreichen scheitert...:
Warum macht Ihr das nicht über den Proxmox WEBGUI?
Bin mir nicht sicher dich richtig zu verstehen, den USB zu einer VM durchzureichen = machbar über die Proxmox Oberfläche. Bei einem Container geht das meiner Meinung nach nicht.
-
ich habe kein USV. Allerdings ist es doch so, dass nicht der Container, in dem der ioBroker läuft, mit dem USV kommunizieren muss, sondern Proxmox selbst, da Proxmox die VMs und LXC herunterfahren muss, wenn der Strom weg geht. Siehe die Diskussion in dem von mir verlinkten Beitrag im Proxmox-Forum.
ioBroker auf Intel NUC - Homematic CCU3/pivCCU auf Raspi 3B+
-
@wendy2702 sagte in [gelöst]CC2531 an proxmox an LXC durchreichen scheitert...:
Warum macht Ihr das nicht über den Proxmox WEBGUI?
Bin mir nicht sicher dich richtig zu verstehen, den USB zu einer VM durchzureichen = machbar über die Proxmox Oberfläche. Bei einem Container geht das meiner Meinung nach nicht.
-
@XxJooO Du hast vollkommen recht mit "dirket unter Proxmox", da traue ich mich aber nicht drüber.
@wendy2702 Dennoch lieben Dank für deine Rückmeldung.
Ich habs fürs Erste aufgegeben und den NUT Dienst lt. dieser Anleitung in der VM des ioBroker gemacht. USB durchgereicht und läuft auch schon im ioBroker Adapter. Jetzt muss ich mich mal mit den gelieferten Daten beschäftigen, aufs Erste habe ich noch keinen DP "wie lange tät die Batterie bei Netzausfall aushalten" gefunden.
LG, mxa -
ich habe kein USV. Allerdings ist es doch so, dass nicht der Container, in dem der ioBroker läuft, mit dem USV kommunizieren muss, sondern Proxmox selbst, da Proxmox die VMs und LXC herunterfahren muss, wenn der Strom weg geht. Siehe die Diskussion in dem von mir verlinkten Beitrag im Proxmox-Forum.
@XxJooO Danke für deine Anleitungen. Ich bekomme es nicht gebacken! Ich will nur einen Lesekopf für Smartmeter durchreichen...!
root@pve:~# lsusb
Bus 001 Device 002: ID 8087:8000 Intel Corp.
Bus 001 Device 001: ID 1d6b:0002 Linux Foundation 2.0 root hub
Bus 003 Device 001: ID 1d6b:0003 Linux Foundation 3.0 root hub
Bus 002 Device 005: ID 0403:6015 Future Technology Devices International, Ltd Bridge(I2C/SPI/UART/FIFO)
Bus 002 Device 001: ID 1d6b:0002 Linux Foundation 2.0 root hub
root@pve:~# ls -l /dev/tty* crw-rw-rw- 1 root tty 5, 0 Oct 5 00:19 /dev/tty crw--w---- 1 root tty 4, 0 Oct 4 00:59 /dev/tty0 crw--w---- 1 root tty 4, 1 Oct 4 00:59 /dev/tty1 crw--w---- 1 root tty 4, 10 Oct 4 00:59 /dev/tty10 crw--w---- 1 root tty 4, 11 Oct 4 00:59 /dev/tty11 crw--w---- 1 root tty 4, 12 Oct 4 00:59 /dev/tty12 crw--w---- 1 root tty 4, 13 Oct 4 00:59 /dev/tty13 crw--w---- 1 root tty 4, 14 Oct 4 00:59 /dev/tty14 crw--w---- 1 root tty 4, 15 Oct 4 00:59 /dev/tty15 crw--w---- 1 root tty 4, 16 Oct 4 00:59 /dev/tty16 crw--w---- 1 root tty 4, 17 Oct 4 00:59 /dev/tty17 crw--w---- 1 root tty 4, 18 Oct 4 00:59 /dev/tty18 crw--w---- 1 root tty 4, 19 Oct 4 00:59 /dev/tty19 crw--w---- 1 root tty 4, 2 Oct 4 00:59 /dev/tty2 crw--w---- 1 root tty 4, 20 Oct 4 00:59 /dev/tty20 crw--w---- 1 root tty 4, 21 Oct 4 00:59 /dev/tty21 crw--w---- 1 root tty 4, 22 Oct 4 00:59 /dev/tty22 crw--w---- 1 root tty 4, 23 Oct 4 00:59 /dev/tty23 crw--w---- 1 root tty 4, 24 Oct 4 00:59 /dev/tty24 crw--w---- 1 root tty 4, 25 Oct 4 00:59 /dev/tty25 crw--w---- 1 root tty 4, 26 Oct 4 00:59 /dev/tty26 crw--w---- 1 root tty 4, 27 Oct 4 00:59 /dev/tty27 crw--w---- 1 root tty 4, 28 Oct 4 00:59 /dev/tty28 crw--w---- 1 root tty 4, 29 Oct 4 00:59 /dev/tty29 crw--w---- 1 root tty 4, 3 Oct 4 00:59 /dev/tty3 crw--w---- 1 root tty 4, 30 Oct 4 00:59 /dev/tty30 crw--w---- 1 root tty 4, 31 Oct 4 00:59 /dev/tty31 crw--w---- 1 root tty 4, 32 Oct 4 00:59 /dev/tty32 crw--w---- 1 root tty 4, 33 Oct 4 00:59 /dev/tty33 crw--w---- 1 root tty 4, 34 Oct 4 00:59 /dev/tty34 crw--w---- 1 root tty 4, 35 Oct 4 00:59 /dev/tty35 crw--w---- 1 root tty 4, 36 Oct 4 00:59 /dev/tty36 crw--w---- 1 root tty 4, 37 Oct 4 00:59 /dev/tty37 crw--w---- 1 root tty 4, 38 Oct 4 00:59 /dev/tty38 crw--w---- 1 root tty 4, 39 Oct 4 00:59 /dev/tty39 crw--w---- 1 root tty 4, 4 Oct 4 00:59 /dev/tty4 crw--w---- 1 root tty 4, 40 Oct 4 00:59 /dev/tty40 crw--w---- 1 root tty 4, 41 Oct 4 00:59 /dev/tty41 crw--w---- 1 root tty 4, 42 Oct 4 00:59 /dev/tty42 crw--w---- 1 root tty 4, 43 Oct 4 00:59 /dev/tty43 crw--w---- 1 root tty 4, 44 Oct 4 00:59 /dev/tty44 crw--w---- 1 root tty 4, 45 Oct 4 00:59 /dev/tty45 crw--w---- 1 root tty 4, 46 Oct 4 00:59 /dev/tty46 crw--w---- 1 root tty 4, 47 Oct 4 00:59 /dev/tty47 crw--w---- 1 root tty 4, 48 Oct 4 00:59 /dev/tty48 crw--w---- 1 root tty 4, 49 Oct 4 00:59 /dev/tty49 crw--w---- 1 root tty 4, 5 Oct 4 00:59 /dev/tty5 crw--w---- 1 root tty 4, 50 Oct 4 00:59 /dev/tty50 crw--w---- 1 root tty 4, 51 Oct 4 00:59 /dev/tty51 crw--w---- 1 root tty 4, 52 Oct 4 00:59 /dev/tty52 crw--w---- 1 root tty 4, 53 Oct 4 00:59 /dev/tty53 crw--w---- 1 root tty 4, 54 Oct 4 00:59 /dev/tty54 crw--w---- 1 root tty 4, 55 Oct 4 00:59 /dev/tty55 crw--w---- 1 root tty 4, 56 Oct 4 00:59 /dev/tty56 crw--w---- 1 root tty 4, 57 Oct 4 00:59 /dev/tty57 crw--w---- 1 root tty 4, 58 Oct 4 00:59 /dev/tty58 crw--w---- 1 root tty 4, 59 Oct 4 00:59 /dev/tty59 crw--w---- 1 root tty 4, 6 Oct 4 00:59 /dev/tty6 crw--w---- 1 root tty 4, 60 Oct 4 00:59 /dev/tty60 crw--w---- 1 root tty 4, 61 Oct 4 00:59 /dev/tty61 crw--w---- 1 root tty 4, 62 Oct 4 00:59 /dev/tty62 crw--w---- 1 root tty 4, 63 Oct 4 00:59 /dev/tty63 crw--w---- 1 root tty 4, 7 Oct 4 00:59 /dev/tty7 crw--w---- 1 root tty 4, 8 Oct 4 00:59 /dev/tty8 crw--w---- 1 root tty 4, 9 Oct 4 00:59 /dev/tty9 crw------- 1 root root 5, 3 Oct 4 00:59 /dev/ttyprintk crw-rw---- 1 root dialout 4, 64 Oct 4 00:59 /dev/ttyS0 crw-rw---- 1 root dialout 4, 65 Oct 4 00:59 /dev/ttyS1 crw-rw---- 1 root dialout 4, 74 Oct 4 00:59 /dev/ttyS10 crw-rw---- 1 root dialout 4, 75 Oct 4 00:59 /dev/ttyS11 crw-rw---- 1 root dialout 4, 76 Oct 4 00:59 /dev/ttyS12 crw-rw---- 1 root dialout 4, 77 Oct 4 00:59 /dev/ttyS13 crw-rw---- 1 root dialout 4, 78 Oct 4 00:59 /dev/ttyS14 crw-rw---- 1 root dialout 4, 79 Oct 4 00:59 /dev/ttyS15 crw-rw---- 1 root dialout 4, 80 Oct 4 00:59 /dev/ttyS16 crw-rw---- 1 root dialout 4, 81 Oct 4 00:59 /dev/ttyS17 crw-rw---- 1 root dialout 4, 82 Oct 4 00:59 /dev/ttyS18 crw-rw---- 1 root dialout 4, 83 Oct 4 00:59 /dev/ttyS19 crw-rw---- 1 root dialout 4, 66 Oct 4 00:59 /dev/ttyS2 crw-rw---- 1 root dialout 4, 84 Oct 4 00:59 /dev/ttyS20 crw-rw---- 1 root dialout 4, 85 Oct 4 00:59 /dev/ttyS21 crw-rw---- 1 root dialout 4, 86 Oct 4 00:59 /dev/ttyS22 crw-rw---- 1 root dialout 4, 87 Oct 4 00:59 /dev/ttyS23 crw-rw---- 1 root dialout 4, 88 Oct 4 00:59 /dev/ttyS24 crw-rw---- 1 root dialout 4, 89 Oct 4 00:59 /dev/ttyS25 crw-rw---- 1 root dialout 4, 90 Oct 4 00:59 /dev/ttyS26 crw-rw---- 1 root dialout 4, 91 Oct 4 00:59 /dev/ttyS27 crw-rw---- 1 root dialout 4, 92 Oct 4 00:59 /dev/ttyS28 crw-rw---- 1 root dialout 4, 93 Oct 4 00:59 /dev/ttyS29 crw-rw---- 1 root dialout 4, 67 Oct 4 00:59 /dev/ttyS3 crw-rw---- 1 root dialout 4, 94 Oct 4 00:59 /dev/ttyS30 crw-rw---- 1 root dialout 4, 95 Oct 4 00:59 /dev/ttyS31 crw-rw---- 1 root dialout 4, 68 Oct 4 00:59 /dev/ttyS4 crw-rw---- 1 root dialout 4, 69 Oct 4 00:59 /dev/ttyS5 crw-rw---- 1 root dialout 4, 70 Oct 4 00:59 /dev/ttyS6 crw-rw---- 1 root dialout 4, 71 Oct 4 00:59 /dev/ttyS7 crw-rw---- 1 root dialout 4, 72 Oct 4 00:59 /dev/ttyS8 crw-rw---- 1 root dialout 4, 73 Oct 4 00:59 /dev/ttyS9 crw-rw-rw- 1 root dialout 188, 0 Oct 5 23:13 /dev/ttyUSB0root@pve:~# ls -l /dev/bus/usb/002/005 crw-rw-r-- 1 root root 189, 132 Oct 5 23:13 /dev/bus/usb/002/005arch: amd64 cores: 2 hostname: iobroker memory: 3072 net0: name=eth0,bridge=vmbr0,firewall=1,hwaddr=7A:8D:76:2A:03:3B,ip=dhcp,ip6=auto,type=veth onboot: 1 ostype: debian rootfs: local-lvm:vm-101-disk-0,size=15G swap: 512 lxc.cgroup.devices.allow: c 189:* rwm lxc.mount.entry: /dev/bus/usb/002/005 dev/bus/usb/002/005 none bind,optional,create=file lxc.cgroup.devices.allow: c 189:* rwm lxc.mount.entry: /dev/ttyUSB0 /dev/ttyUSB0 none bind,optional,create=fileroot@pve:~# chmod o+rw /dev/ttyUSB0 -
@XxJooO Danke für deine Anleitungen. Ich bekomme es nicht gebacken! Ich will nur einen Lesekopf für Smartmeter durchreichen...!
root@pve:~# lsusb Bus 001 Device 002: ID 8087:8000 Intel Corp. Bus 001 Device 001: ID 1d6b:0002 Linux Foundation 2.0 root hub Bus 003 Device 001: ID 1d6b:0003 Linux Foundation 3.0 root hub Bus 002 Device 005: ID 0403:6015 Future Technology Devices International, Ltd Bridge(I2C/SPI/UART/FIFO) Bus 002 Device 001: ID 1d6b:0002 Linux Foundation 2.0 root hubroot@pve:~# ls -l /dev/tty* crw-rw-rw- 1 root tty 5, 0 Oct 5 00:19 /dev/tty crw--w---- 1 root tty 4, 0 Oct 4 00:59 /dev/tty0 crw--w---- 1 root tty 4, 1 Oct 4 00:59 /dev/tty1 crw--w---- 1 root tty 4, 10 Oct 4 00:59 /dev/tty10 crw--w---- 1 root tty 4, 11 Oct 4 00:59 /dev/tty11 crw--w---- 1 root tty 4, 12 Oct 4 00:59 /dev/tty12 crw--w---- 1 root tty 4, 13 Oct 4 00:59 /dev/tty13 crw--w---- 1 root tty 4, 14 Oct 4 00:59 /dev/tty14 crw--w---- 1 root tty 4, 15 Oct 4 00:59 /dev/tty15 crw--w---- 1 root tty 4, 16 Oct 4 00:59 /dev/tty16 crw--w---- 1 root tty 4, 17 Oct 4 00:59 /dev/tty17 crw--w---- 1 root tty 4, 18 Oct 4 00:59 /dev/tty18 crw--w---- 1 root tty 4, 19 Oct 4 00:59 /dev/tty19 crw--w---- 1 root tty 4, 2 Oct 4 00:59 /dev/tty2 crw--w---- 1 root tty 4, 20 Oct 4 00:59 /dev/tty20 crw--w---- 1 root tty 4, 21 Oct 4 00:59 /dev/tty21 crw--w---- 1 root tty 4, 22 Oct 4 00:59 /dev/tty22 crw--w---- 1 root tty 4, 23 Oct 4 00:59 /dev/tty23 crw--w---- 1 root tty 4, 24 Oct 4 00:59 /dev/tty24 crw--w---- 1 root tty 4, 25 Oct 4 00:59 /dev/tty25 crw--w---- 1 root tty 4, 26 Oct 4 00:59 /dev/tty26 crw--w---- 1 root tty 4, 27 Oct 4 00:59 /dev/tty27 crw--w---- 1 root tty 4, 28 Oct 4 00:59 /dev/tty28 crw--w---- 1 root tty 4, 29 Oct 4 00:59 /dev/tty29 crw--w---- 1 root tty 4, 3 Oct 4 00:59 /dev/tty3 crw--w---- 1 root tty 4, 30 Oct 4 00:59 /dev/tty30 crw--w---- 1 root tty 4, 31 Oct 4 00:59 /dev/tty31 crw--w---- 1 root tty 4, 32 Oct 4 00:59 /dev/tty32 crw--w---- 1 root tty 4, 33 Oct 4 00:59 /dev/tty33 crw--w---- 1 root tty 4, 34 Oct 4 00:59 /dev/tty34 crw--w---- 1 root tty 4, 35 Oct 4 00:59 /dev/tty35 crw--w---- 1 root tty 4, 36 Oct 4 00:59 /dev/tty36 crw--w---- 1 root tty 4, 37 Oct 4 00:59 /dev/tty37 crw--w---- 1 root tty 4, 38 Oct 4 00:59 /dev/tty38 crw--w---- 1 root tty 4, 39 Oct 4 00:59 /dev/tty39 crw--w---- 1 root tty 4, 4 Oct 4 00:59 /dev/tty4 crw--w---- 1 root tty 4, 40 Oct 4 00:59 /dev/tty40 crw--w---- 1 root tty 4, 41 Oct 4 00:59 /dev/tty41 crw--w---- 1 root tty 4, 42 Oct 4 00:59 /dev/tty42 crw--w---- 1 root tty 4, 43 Oct 4 00:59 /dev/tty43 crw--w---- 1 root tty 4, 44 Oct 4 00:59 /dev/tty44 crw--w---- 1 root tty 4, 45 Oct 4 00:59 /dev/tty45 crw--w---- 1 root tty 4, 46 Oct 4 00:59 /dev/tty46 crw--w---- 1 root tty 4, 47 Oct 4 00:59 /dev/tty47 crw--w---- 1 root tty 4, 48 Oct 4 00:59 /dev/tty48 crw--w---- 1 root tty 4, 49 Oct 4 00:59 /dev/tty49 crw--w---- 1 root tty 4, 5 Oct 4 00:59 /dev/tty5 crw--w---- 1 root tty 4, 50 Oct 4 00:59 /dev/tty50 crw--w---- 1 root tty 4, 51 Oct 4 00:59 /dev/tty51 crw--w---- 1 root tty 4, 52 Oct 4 00:59 /dev/tty52 crw--w---- 1 root tty 4, 53 Oct 4 00:59 /dev/tty53 crw--w---- 1 root tty 4, 54 Oct 4 00:59 /dev/tty54 crw--w---- 1 root tty 4, 55 Oct 4 00:59 /dev/tty55 crw--w---- 1 root tty 4, 56 Oct 4 00:59 /dev/tty56 crw--w---- 1 root tty 4, 57 Oct 4 00:59 /dev/tty57 crw--w---- 1 root tty 4, 58 Oct 4 00:59 /dev/tty58 crw--w---- 1 root tty 4, 59 Oct 4 00:59 /dev/tty59 crw--w---- 1 root tty 4, 6 Oct 4 00:59 /dev/tty6 crw--w---- 1 root tty 4, 60 Oct 4 00:59 /dev/tty60 crw--w---- 1 root tty 4, 61 Oct 4 00:59 /dev/tty61 crw--w---- 1 root tty 4, 62 Oct 4 00:59 /dev/tty62 crw--w---- 1 root tty 4, 63 Oct 4 00:59 /dev/tty63 crw--w---- 1 root tty 4, 7 Oct 4 00:59 /dev/tty7 crw--w---- 1 root tty 4, 8 Oct 4 00:59 /dev/tty8 crw--w---- 1 root tty 4, 9 Oct 4 00:59 /dev/tty9 crw------- 1 root root 5, 3 Oct 4 00:59 /dev/ttyprintk crw-rw---- 1 root dialout 4, 64 Oct 4 00:59 /dev/ttyS0 crw-rw---- 1 root dialout 4, 65 Oct 4 00:59 /dev/ttyS1 crw-rw---- 1 root dialout 4, 74 Oct 4 00:59 /dev/ttyS10 crw-rw---- 1 root dialout 4, 75 Oct 4 00:59 /dev/ttyS11 crw-rw---- 1 root dialout 4, 76 Oct 4 00:59 /dev/ttyS12 crw-rw---- 1 root dialout 4, 77 Oct 4 00:59 /dev/ttyS13 crw-rw---- 1 root dialout 4, 78 Oct 4 00:59 /dev/ttyS14 crw-rw---- 1 root dialout 4, 79 Oct 4 00:59 /dev/ttyS15 crw-rw---- 1 root dialout 4, 80 Oct 4 00:59 /dev/ttyS16 crw-rw---- 1 root dialout 4, 81 Oct 4 00:59 /dev/ttyS17 crw-rw---- 1 root dialout 4, 82 Oct 4 00:59 /dev/ttyS18 crw-rw---- 1 root dialout 4, 83 Oct 4 00:59 /dev/ttyS19 crw-rw---- 1 root dialout 4, 66 Oct 4 00:59 /dev/ttyS2 crw-rw---- 1 root dialout 4, 84 Oct 4 00:59 /dev/ttyS20 crw-rw---- 1 root dialout 4, 85 Oct 4 00:59 /dev/ttyS21 crw-rw---- 1 root dialout 4, 86 Oct 4 00:59 /dev/ttyS22 crw-rw---- 1 root dialout 4, 87 Oct 4 00:59 /dev/ttyS23 crw-rw---- 1 root dialout 4, 88 Oct 4 00:59 /dev/ttyS24 crw-rw---- 1 root dialout 4, 89 Oct 4 00:59 /dev/ttyS25 crw-rw---- 1 root dialout 4, 90 Oct 4 00:59 /dev/ttyS26 crw-rw---- 1 root dialout 4, 91 Oct 4 00:59 /dev/ttyS27 crw-rw---- 1 root dialout 4, 92 Oct 4 00:59 /dev/ttyS28 crw-rw---- 1 root dialout 4, 93 Oct 4 00:59 /dev/ttyS29 crw-rw---- 1 root dialout 4, 67 Oct 4 00:59 /dev/ttyS3 crw-rw---- 1 root dialout 4, 94 Oct 4 00:59 /dev/ttyS30 crw-rw---- 1 root dialout 4, 95 Oct 4 00:59 /dev/ttyS31 crw-rw---- 1 root dialout 4, 68 Oct 4 00:59 /dev/ttyS4 crw-rw---- 1 root dialout 4, 69 Oct 4 00:59 /dev/ttyS5 crw-rw---- 1 root dialout 4, 70 Oct 4 00:59 /dev/ttyS6 crw-rw---- 1 root dialout 4, 71 Oct 4 00:59 /dev/ttyS7 crw-rw---- 1 root dialout 4, 72 Oct 4 00:59 /dev/ttyS8 crw-rw---- 1 root dialout 4, 73 Oct 4 00:59 /dev/ttyS9 crw-rw-rw- 1 root dialout 188, 0 Oct 5 23:13 /dev/ttyUSB0root@pve:~# ls -l /dev/bus/usb/002/005 crw-rw-r-- 1 root root 189, 132 Oct 5 23:13 /dev/bus/usb/002/005arch: amd64 cores: 2 hostname: iobroker memory: 3072 net0: name=eth0,bridge=vmbr0,firewall=1,hwaddr=7A:8D:76:2A:03:3B,ip=dhcp,ip6=auto,type=veth onboot: 1 ostype: debian rootfs: local-lvm:vm-101-disk-0,size=15G swap: 512 lxc.cgroup.devices.allow: c 189:* rwm lxc.mount.entry: /dev/bus/usb/002/005 dev/bus/usb/002/005 none bind,optional,create=file lxc.cgroup.devices.allow: c 189:* rwm lxc.mount.entry: /dev/ttyUSB0 /dev/ttyUSB0 none bind,optional,create=fileroot@pve:~# chmod o+rw /dev/ttyUSB0Ich antworte mir mal selber...das hier gefunden und es funzt:
https://forum.proxmox.com/threads/werde-wahnsinnig-lxc-passthough.56632/Meine Config sieht nun so aus...Muss das nochmal anpassen. Entweder versehetlich die 188 mit der 189 verwechselt oder die Zeile 15 hats gebracht.
arch: amd64 cores: 2 hostname: iobroker memory: 3072 net0: name=eth0,bridge=vmbr0,firewall=1,hwaddr=7A:8D:76:2A:03:3B,ip=dhcp,ip6=auto,type=veth onboot: 1 ostype: debian rootfs: local-lvm:vm-101-disk-0,size=15G swap: 512 lxc.cgroup.devices.allow: c 189:* rwm lxc.mount.entry: /dev/bus/usb/002/005 dev/bus/usb/002/005 none bind,optional,create=file lxc.cgroup.devices.allow: c 189:* rwm lxc.mount.entry: /dev/ttyUSB0 /dev/ttyUSB0 none bind,optional,create=file lxc.cgroup.devices.allow: c 188:* rwm lxc.cgroup.devices.allow: c 10:200 rwm lxc.mount.entry: /dev/ttyUSB0 dev/ttyUSB0 none bind,optional,create=file -
Ich antworte mir mal selber...das hier gefunden und es funzt:
https://forum.proxmox.com/threads/werde-wahnsinnig-lxc-passthough.56632/Meine Config sieht nun so aus...Muss das nochmal anpassen. Entweder versehetlich die 188 mit der 189 verwechselt oder die Zeile 15 hats gebracht.
arch: amd64 cores: 2 hostname: iobroker memory: 3072 net0: name=eth0,bridge=vmbr0,firewall=1,hwaddr=7A:8D:76:2A:03:3B,ip=dhcp,ip6=auto,type=veth onboot: 1 ostype: debian rootfs: local-lvm:vm-101-disk-0,size=15G swap: 512 lxc.cgroup.devices.allow: c 189:* rwm lxc.mount.entry: /dev/bus/usb/002/005 dev/bus/usb/002/005 none bind,optional,create=file lxc.cgroup.devices.allow: c 189:* rwm lxc.mount.entry: /dev/ttyUSB0 /dev/ttyUSB0 none bind,optional,create=file lxc.cgroup.devices.allow: c 188:* rwm lxc.cgroup.devices.allow: c 10:200 rwm lxc.mount.entry: /dev/ttyUSB0 dev/ttyUSB0 none bind,optional,create=file@oberfragger würde lieber dev/serial/by-id durchreichen, im Falles eines reboots sicherer.
lxc.mount.entry: /dev/serial/by-id/xxx dev/serial/by-id/xxx none bind,optional,create=file

chmod o+rw /dev/serial/by-id/xxx
Hey! Du scheinst an dieser Unterhaltung interessiert zu sein, hast aber noch kein Konto.
Hast du es satt, bei jedem Besuch durch die gleichen Beiträge zu scrollen? Wenn du dich für ein Konto anmeldest, kommst du immer genau dorthin zurück, wo du zuvor warst, und kannst dich über neue Antworten benachrichtigen lassen (entweder per E-Mail oder Push-Benachrichtigung). Du kannst auch Lesezeichen speichern und Beiträge positiv bewerten, um anderen Community-Mitgliedern deine Wertschätzung zu zeigen.
Mit deinem Input könnte dieser Beitrag noch besser werden 💗
Registrieren Anmelden283
Online33.0k
Benutzer83.5k
Themen1.3m
Beiträge