NEWS

[HowTo] USV: NUT Server auf SBC installieren
[HowTo] USV: NUT Server auf SBC installieren
-
@digi-bit sagte in [HowTo] USV: NUT Server auf SBC installieren:
also das mit den 2 Instanzen ist mi8 klar die habe ich such für ups1 und ups2
das ist aber der client! nicht der Server
@homoran sagte in [HowTo] USV: NUT Server auf SBC installieren:
@digi-bit sagte in [HowTo] USV: NUT Server auf SBC installieren:
also das mit den 2 Instanzen ist mi8 klar die habe ich such für ups1 und ups2
das ist aber der client! nicht der Server
naja, das bezieht sich aber auf die den punkt mit den
"Wäre es ioBroker müsste man 2 Instanzen nehmen."und da habe ich eine NUT.0 und NUT.1
oder reden wir hier aneinander vorbei ?
mfg
-
@homoran hab gerade mal gegoogelt und folgendes gefunden, was zu meinen Vorstellungen pass5
Diese Datei beschreibt die angeschlossene USV. Also wie sie heißt und was für ein Treiber genutzt wird um mit dieser zu sprechen. Theoretisch könnten hier natürlich mehrere Einträge enthalten sein.
Quelle: https://haus-automatisierung.com/projekt/2018/06/03/projekt-nut-server.html
Aber Achtung! ist nicht gerade aktuell.Vielleicht hat @haus-automatisierung jedoch eine Idee
@homoran sagte in [HowTo] USV: NUT Server auf SBC installieren:
@homoran hab gerade mal gegoogelt und folgendes gefunden, was zu meinen Vorstellungen pass5
Diese Datei beschreibt die angeschlossene USV. Also wie sie heißt und was für ein Treiber genutzt wird um mit dieser zu sprechen. Theoretisch könnten hier natürlich mehrere Einträge enthalten sein.
Quelle: https://haus-automatisierung.com/projekt/2018/06/03/projekt-nut-server.html
Aber Achtung! ist nicht gerade aktuell.Vielleicht hat @haus-automatisierung jedoch eine Idee
grins.....
von dem habe ich schon so viele Videos gesehen, also was andere Themen betreffen wie Mysql und IOB installieren ...., wenn ich was suche und von ihm ein Video bei ist dann schau ich mir die immer zuerst an der kann das gut erklären wenigsten !
wenn er da eine Idee hat gerne !
mfg
Router: Ubiquiti UniFi Dream Machine Pro|Iobroker I.NUCi5/Debian, 6 x Switche, 3 x APs, 3 x Cam, 2 x Nas(Qnap 4 & 8 Bay's)
7 x Echos, 76 x Tasmota, 58 x ZigBee, Homatic Ip, 2 x USV -
@homoran sagte in [HowTo] USV: NUT Server auf SBC installieren:
@homoran hab gerade mal gegoogelt und folgendes gefunden, was zu meinen Vorstellungen pass5
Diese Datei beschreibt die angeschlossene USV. Also wie sie heißt und was für ein Treiber genutzt wird um mit dieser zu sprechen. Theoretisch könnten hier natürlich mehrere Einträge enthalten sein.
Quelle: https://haus-automatisierung.com/projekt/2018/06/03/projekt-nut-server.html
Aber Achtung! ist nicht gerade aktuell.Vielleicht hat @haus-automatisierung jedoch eine Idee
grins.....
von dem habe ich schon so viele Videos gesehen, also was andere Themen betreffen wie Mysql und IOB installieren ...., wenn ich was suche und von ihm ein Video bei ist dann schau ich mir die immer zuerst an der kann das gut erklären wenigsten !
wenn er da eine Idee hat gerne !
mfg
-
@homoran sagte in [HowTo] USV: NUT Server auf SBC installieren:
@digi-bit sagte in [HowTo] USV: NUT Server auf SBC installieren:
also das mit den 2 Instanzen ist mi8 klar die habe ich such für ups1 und ups2
das ist aber der client! nicht der Server
naja, das bezieht sich aber auf die den punkt mit den
"Wäre es ioBroker müsste man 2 Instanzen nehmen."und da habe ich eine NUT.0 und NUT.1
oder reden wir hier aneinander vorbei ?
mfg
@digi-bit sagte in [HowTo] USV: NUT Server auf SBC installieren:
oder reden wir hier aneinander vorbei ?
jepp!
war nur ganz allgemein als Möglichkeit 2 identische "Programme" laufen zu lassen gemeint
-
Kann es an den fehlenden Anführungszeichen liegen !?
[ups1]
driver = blazer_usb
port = /dev/ttyS0
desc = "CyberPower1"
pollinterval = 30Vorlage :
[ups] driver = "usbhid-ups" port = "auto" desc = "CyberPower" pollinterval = 30@glasfaser sagte in [HowTo] USV: NUT Server auf SBC installieren:
Kann es an den fehlenden Anführungszeichen liegen !?
[ups1]
driver = blazer_usb
port = /dev/ttyS0
desc = "CyberPower1"
pollinterval = 30Vorlage :
[ups] driver = "usbhid-ups" port = "auto" desc = "CyberPower" pollinterval = 30äh, ne, habe ich auch ausprobiert, die weg zu lassen war aus der Anleitung aus der datei selber
da sind auch keine angegeben und deswegen habe ich die mal weg genommen aber es ändert sich nix.....
mfg
-
@homoran sagte in [HowTo] USV: NUT Server auf SBC installieren:
@digi-bit ich hab da keine tiefergehende Ahnung. Aber du stellst doch in der Konfiguration des NUT Servers die für die USV notwendigen Parameter wie Anschluss ind Treiber ein.
Wie soll das für 2 unterschiedliche Geräte gehen.
Wäre es ioBroker müsste man 2 Instanzen nehmen.
Ob man 2 Server, oder wenigstens 2 Konfigurationen parallel betreiben kann, habe ich noch nie gelesen.also das mit den 2 Instanzen ist mi8 klar die habe ich such für ups1 und ups2
mfg
@digi-bit sagte in [HowTo] USV: NUT Server auf SBC installieren:
@homoran sagte in [HowTo] USV: NUT Server auf SBC installieren:
@digi-bit ich hab da keine tiefergehende Ahnung. Aber du stellst doch in der Konfiguration des NUT Servers die für die USV notwendigen Parameter wie Anschluss ind Treiber ein.
Ob man 2 Server, oder wenigstens 2 Konfigurationen parallel betreiben kann, habe ich noch nie gelesen.
Das wäre auch eine Idee aber ob man den Server auf dem NUC 2 x installieren kann bezweifle ich....
ausser dem wäre da dann wieder die frage welches USB gerät nimmt er wenn ich das nicht genau zuweisen kann

mfg
Router: Ubiquiti UniFi Dream Machine Pro|Iobroker I.NUCi5/Debian, 6 x Switche, 3 x APs, 3 x Cam, 2 x Nas(Qnap 4 & 8 Bay's)
7 x Echos, 76 x Tasmota, 58 x ZigBee, Homatic Ip, 2 x USV -
@digi-bit sagte in [HowTo] USV: NUT Server auf SBC installieren:
@homoran sagte in [HowTo] USV: NUT Server auf SBC installieren:
@digi-bit ich hab da keine tiefergehende Ahnung. Aber du stellst doch in der Konfiguration des NUT Servers die für die USV notwendigen Parameter wie Anschluss ind Treiber ein.
Ob man 2 Server, oder wenigstens 2 Konfigurationen parallel betreiben kann, habe ich noch nie gelesen.
Das wäre auch eine Idee aber ob man den Server auf dem NUC 2 x installieren kann bezweifle ich....
ausser dem wäre da dann wieder die frage welches USB gerät nimmt er wenn ich das nicht genau zuweisen kann
mfg
@digi-bit wie kommen denn die Infos von den beiden ups bei Abrage über localhost?
-
@digi-bit sagte in [HowTo] USV: NUT Server auf SBC installieren:
@homoran sagte in [HowTo] USV: NUT Server auf SBC installieren:
@digi-bit ich hab da keine tiefergehende Ahnung. Aber du stellst doch in der Konfiguration des NUT Servers die für die USV notwendigen Parameter wie Anschluss ind Treiber ein.
Ob man 2 Server, oder wenigstens 2 Konfigurationen parallel betreiben kann, habe ich noch nie gelesen.
Das wäre auch eine Idee aber ob man den Server auf dem NUC 2 x installieren kann bezweifle ich....
ausser dem wäre da dann wieder die frage welches USB gerät nimmt er wenn ich das nicht genau zuweisen kann
mfg
Leider wiess ich auch nicht wie der Nuc die USB teile verwaltet
mit
digibit@debianIOB1:~$ ls -l /dev/serial/by-id/
insgesamt 0
lrwxrwxrwx 1 root root 13 27. Okt 18:13 usb-Texas_Instruments_XDS110__03.00.00.20__Embed_with_CMSIS-DAP_L430047T-if00 -> ../../ttyACM0
lrwxrwxrwx 1 root root 13 27. Okt 18:13 usb-Texas_Instruments_XDS110__03.00.00.20__Embed_with_CMSIS-DAP_L430047T-if03 -> ../../ttyACM1das ist der Zigbee kasten.... keine USV
mit ls -l /dev/* kommt eine liste
die frage ist ob einer der Dinger zu der USV geht und wen welcher
muss doch möglich sein das teil mittelst dem " port " zu zuweisen ....
leider gibt der upsc ups1@localhost auch nicht so viele unterschiedliche daten her das man die an denen unterscheiden kann
sonst hat keiner weiter eine idee wie man das machen kann ?
mfg
Digi-Bit
Router: Ubiquiti UniFi Dream Machine Pro|Iobroker I.NUCi5/Debian, 6 x Switche, 3 x APs, 3 x Cam, 2 x Nas(Qnap 4 & 8 Bay's)
7 x Echos, 76 x Tasmota, 58 x ZigBee, Homatic Ip, 2 x USV -
Leider wiess ich auch nicht wie der Nuc die USB teile verwaltet
mit
digibit@debianIOB1:~$ ls -l /dev/serial/by-id/
insgesamt 0
lrwxrwxrwx 1 root root 13 27. Okt 18:13 usb-Texas_Instruments_XDS110__03.00.00.20__Embed_with_CMSIS-DAP_L430047T-if00 -> ../../ttyACM0
lrwxrwxrwx 1 root root 13 27. Okt 18:13 usb-Texas_Instruments_XDS110__03.00.00.20__Embed_with_CMSIS-DAP_L430047T-if03 -> ../../ttyACM1das ist der Zigbee kasten.... keine USV
mit ls -l /dev/* kommt eine liste
die frage ist ob einer der Dinger zu der USV geht und wen welcher
muss doch möglich sein das teil mittelst dem " port " zu zuweisen ....
leider gibt der upsc ups1@localhost auch nicht so viele unterschiedliche daten her das man die an denen unterscheiden kann
sonst hat keiner weiter eine idee wie man das machen kann ?
mfg
Digi-Bit
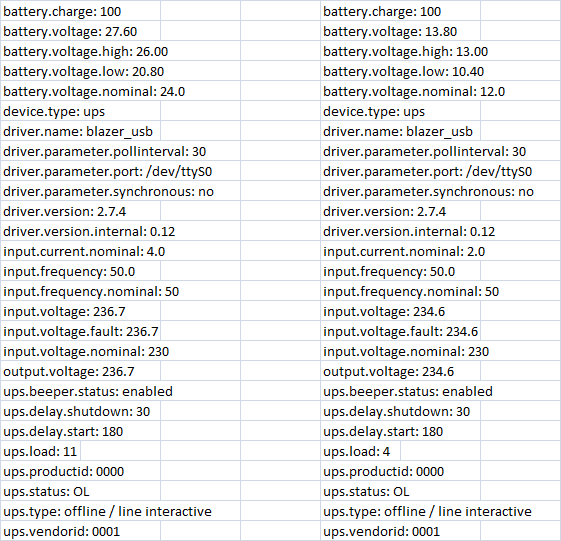
@digi-bit werden denn beide offiziell von nut unterstützt?
hat eine wirklich eine 24V Batterie
-
@digi-bit werden denn beide offiziell von nut unterstützt?
hat eine wirklich eine 24V Batterie
@homoran sagte in [HowTo] USV: NUT Server auf SBC installieren:
@digi-bit werden denn beide offiziell von nut unterstützt?
hat eine wirklich eine 24V Batterie
uff....
2 x 12 steht da....
ist die hier
https://www.amazon.de/gp/product/B08RZWD82L?psc=1
mfg
Router: Ubiquiti UniFi Dream Machine Pro|Iobroker I.NUCi5/Debian, 6 x Switche, 3 x APs, 3 x Cam, 2 x Nas(Qnap 4 & 8 Bay's)
7 x Echos, 76 x Tasmota, 58 x ZigBee, Homatic Ip, 2 x USV -
@homoran sagte in [HowTo] USV: NUT Server auf SBC installieren:
@digi-bit werden denn beide offiziell von nut unterstützt?
hat eine wirklich eine 24V Batterie
uff....
2 x 12 steht da....
ist die hier
https://www.amazon.de/gp/product/B08RZWD82L?psc=1
mfg
ich habe dies hier noch gefunden
ich weiss aber nicht ob man damit was anfangen kann oder wie
digibit@debianIOB1:~$ nut-scanner -U
SNMP library not found. SNMP search disabled.
Neon library not found. XML search disabled.
IPMI library not found. IPMI search disabled.
Scanning USB bus.
[nutdev1]
driver = "nutdrv_atcl_usb"
port = "auto"
vendorid = "0001"
productid = "0000"
bus = "003"
[nutdev2]
driver = "nutdrv_atcl_usb"
port = "auto"
vendorid = "0001"
productid = "0000"
bus = "003"
digibit@debianIOB1:~$nur das [nutdev1] unterscheide sich, aber kann man das in der cfg irgend wie angeben ?
mfg
Router: Ubiquiti UniFi Dream Machine Pro|Iobroker I.NUCi5/Debian, 6 x Switche, 3 x APs, 3 x Cam, 2 x Nas(Qnap 4 & 8 Bay's)
7 x Echos, 76 x Tasmota, 58 x ZigBee, Homatic Ip, 2 x USV -
ich habe dies hier noch gefunden
ich weiss aber nicht ob man damit was anfangen kann oder wie
digibit@debianIOB1:~$ nut-scanner -U
SNMP library not found. SNMP search disabled.
Neon library not found. XML search disabled.
IPMI library not found. IPMI search disabled.
Scanning USB bus.
[nutdev1]
driver = "nutdrv_atcl_usb"
port = "auto"
vendorid = "0001"
productid = "0000"
bus = "003"
[nutdev2]
driver = "nutdrv_atcl_usb"
port = "auto"
vendorid = "0001"
productid = "0000"
bus = "003"
digibit@debianIOB1:~$nur das [nutdev1] unterscheide sich, aber kann man das in der cfg irgend wie angeben ?
mfg
@digi-bit sagte in [HowTo] USV: NUT Server auf SBC installieren:
nur das [nutdev1] unterscheide sich, aber kann man das in der cfg irgend wie angeben ?
???
Natürlich, das ist der Name für das Gerät, frei wählbar.
bei dir ist das ups1 und ups2
-
@homoran sagte in [HowTo] USV: NUT Server auf SBC installieren:
@digi-bit werden denn beide offiziell von nut unterstützt?
hat eine wirklich eine 24V Batterie
uff....
2 x 12 steht da....
ist die hier
https://www.amazon.de/gp/product/B08RZWD82L?psc=1
mfg
@digi-bit sagte in [HowTo] USV: NUT Server auf SBC installieren:
ist die hier
https://www.amazon.de/gp/product/B08RZWD82L?psc=1die finde ich schon mal nicht bei nut in der Kompatibilitätsliste
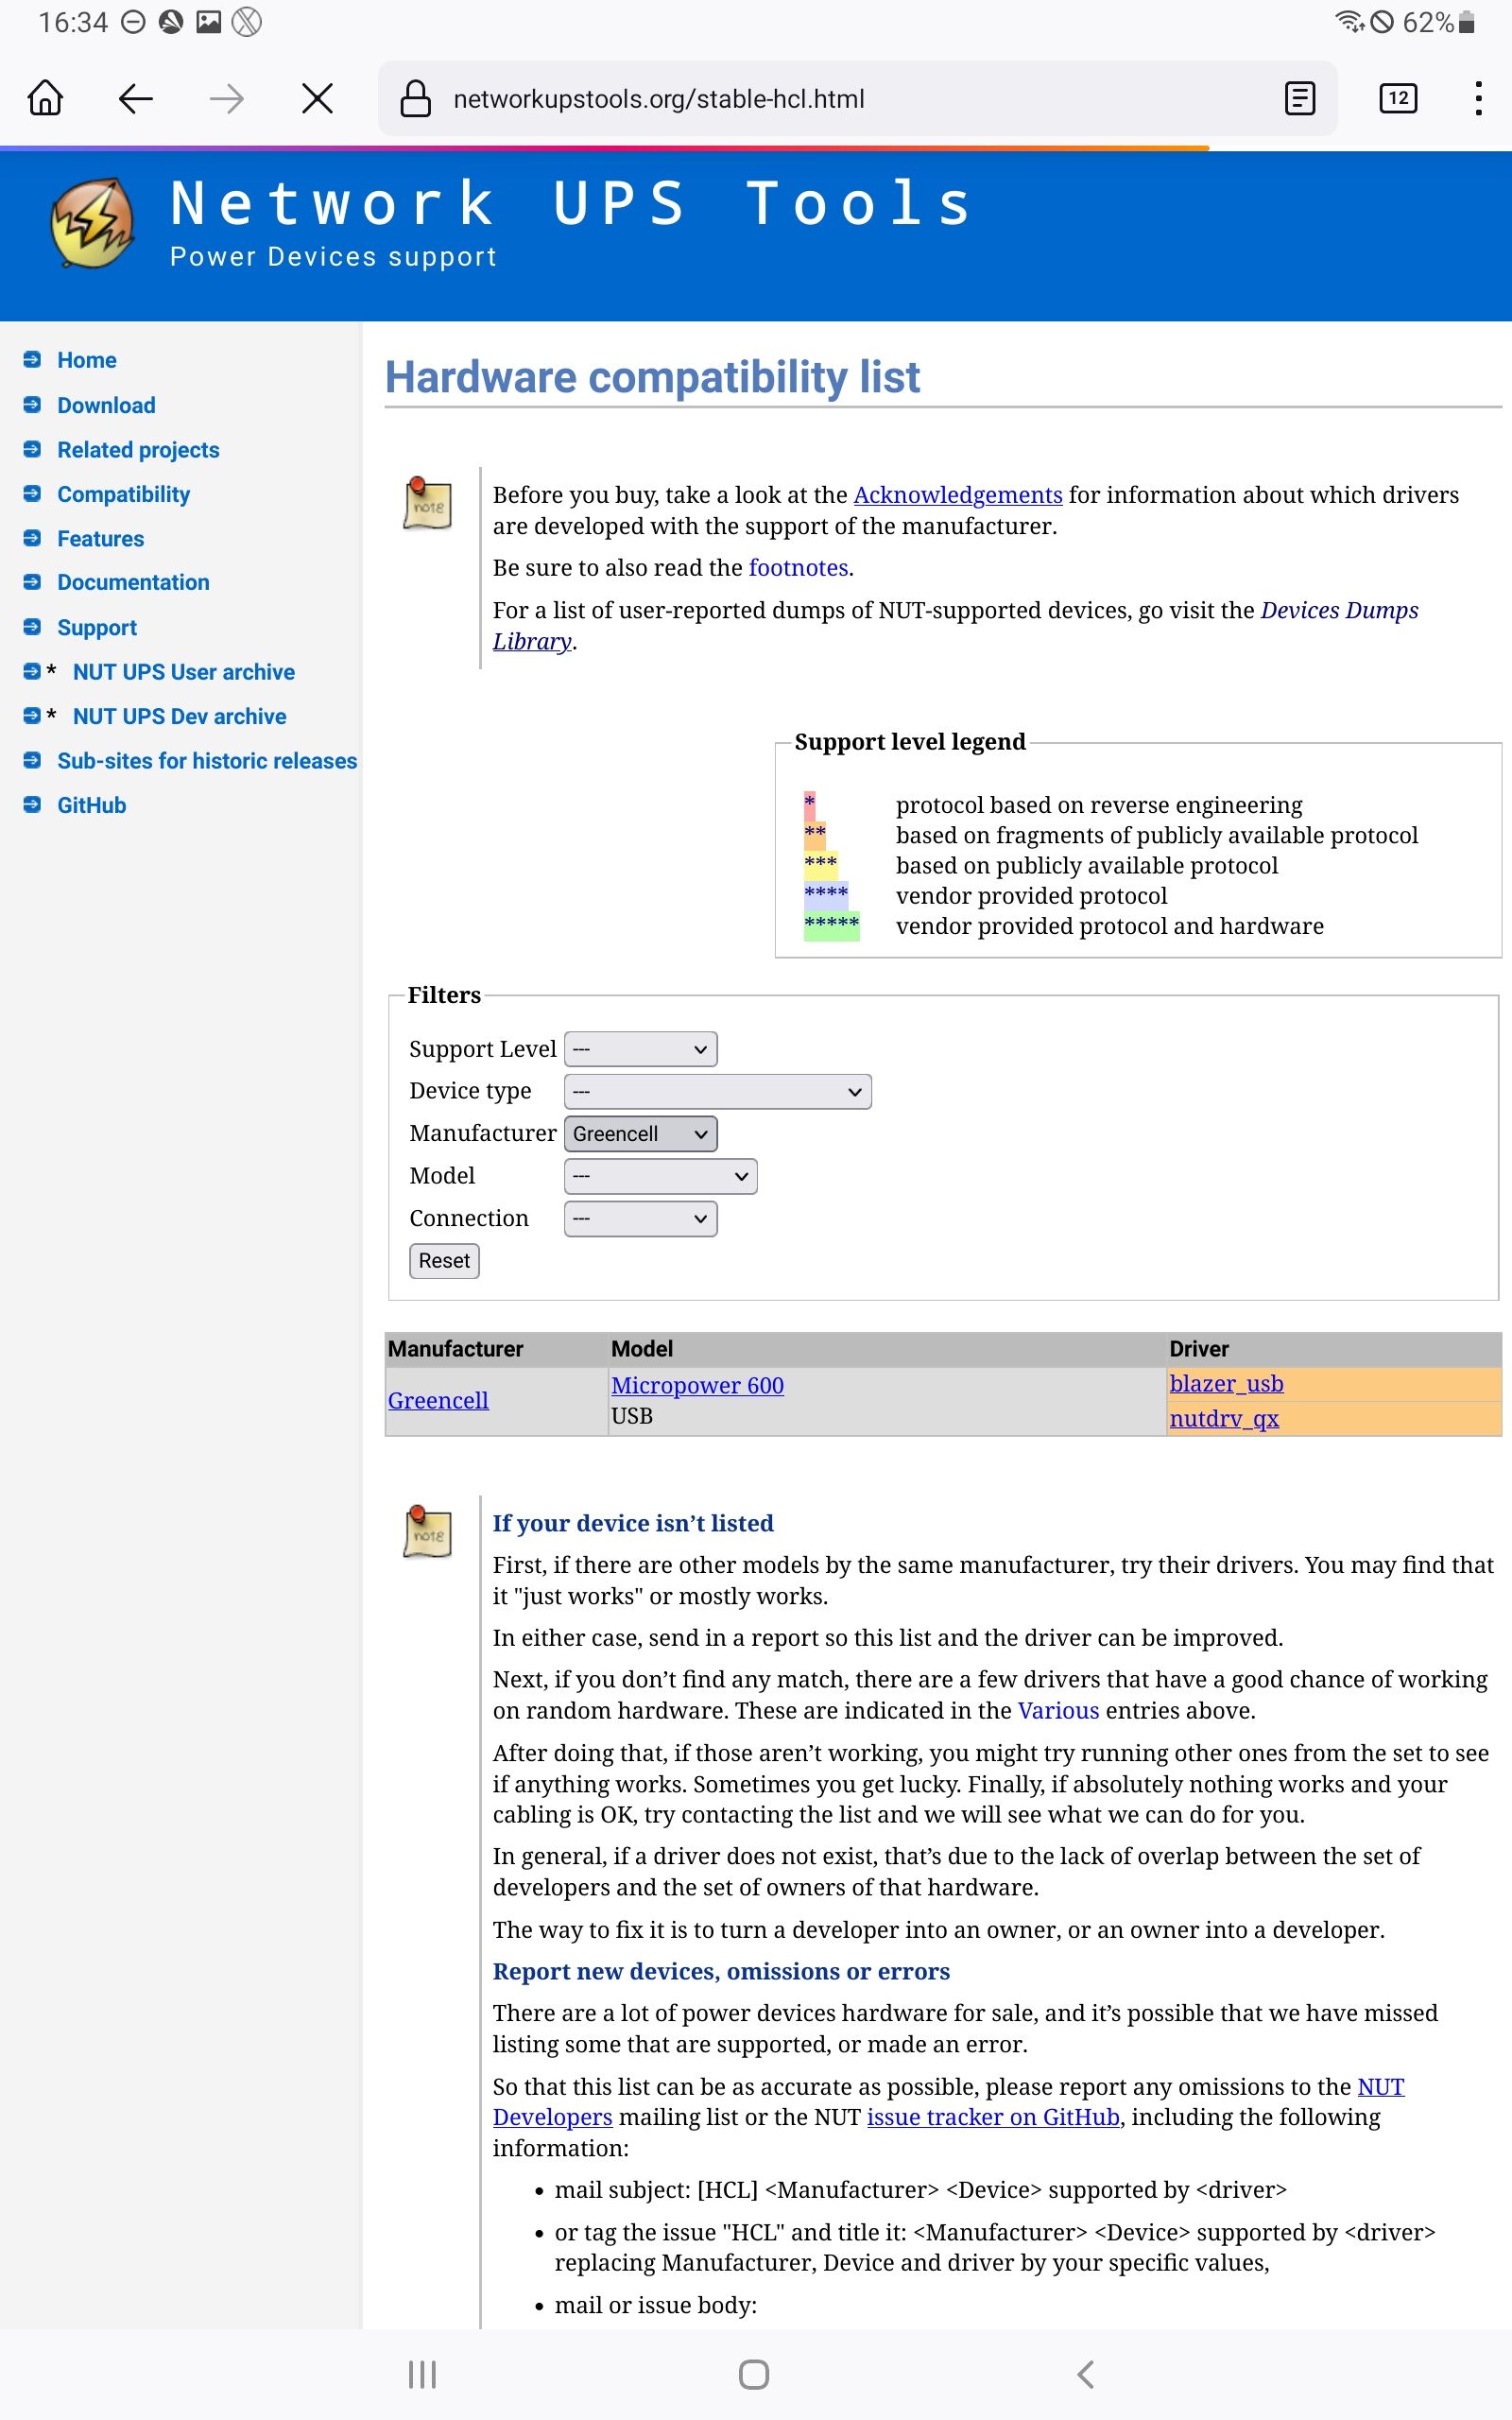
falls der USB Treiber allgemin gilt hast du eine vollkommen falsche Konfiguration
-
@digi-bit sagte in [HowTo] USV: NUT Server auf SBC installieren:
nur das [nutdev1] unterscheide sich, aber kann man das in der cfg irgend wie angeben ?
???
Natürlich, das ist der Name für das Gerät, frei wählbar.
bei dir ist das ups1 und ups2
@homoran sagte in [HowTo] USV: NUT Server auf SBC installieren:
@digi-bit sagte in [HowTo] USV: NUT Server auf SBC installieren:
nur das [nutdev1] unterscheide sich, aber kann man das in der cfg irgend wie angeben ?
???
Natürlich, das ist der Name für das Gerät, frei wählbar.
bei dir ist das ups1 und ups2
naja, nur habe ich sowas nie eingegeben, das ist ja die Ausgabe von diesem Scanner da !
und wieso heißen die dann bei dem nutdev1 ?
mfg
Router: Ubiquiti UniFi Dream Machine Pro|Iobroker I.NUCi5/Debian, 6 x Switche, 3 x APs, 3 x Cam, 2 x Nas(Qnap 4 & 8 Bay's)
7 x Echos, 76 x Tasmota, 58 x ZigBee, Homatic Ip, 2 x USV -
@homoran sagte in [HowTo] USV: NUT Server auf SBC installieren:
@digi-bit sagte in [HowTo] USV: NUT Server auf SBC installieren:
nur das [nutdev1] unterscheide sich, aber kann man das in der cfg irgend wie angeben ?
???
Natürlich, das ist der Name für das Gerät, frei wählbar.
bei dir ist das ups1 und ups2
naja, nur habe ich sowas nie eingegeben, das ist ja die Ausgabe von diesem Scanner da !
und wieso heißen die dann bei dem nutdev1 ?
mfg
@digi-bit sagte in [HowTo] USV: NUT Server auf SBC installieren:
das ist ja die Ausgabe von diesem Scanner da !
und wieso heißen die dann bei dem nutdev1 ?weil der Scanner sie als Nut Device durchnummeriert.
aber möglicherweise nur deine Konfig ausliest, wobei es anscheinend aber doch andere Driver sindich würde mal mit den drivern spielen.
zu dem von deinem Scanner genannten, gibt es hier Info
https://networkupstools.org/docs/man/nutdrv_atcl_usb.html -
@klassisch sagte in [HowTo] USV: NUT Server auf SBC installieren:
NUT-Server auf einem Kleinrechner (SBC)
In meinem Fall ist der SBC ein Orange Pi Plus 2e, der für diese Aufgabe zwar viel zu groß ist, aber durch Migration von ioBoker auf einen Windows Rechner frei wurde.Ich habe gemäß dieser Anleitung einen NUT-Server auf einem Kleinrechner (RPI) eingerichtet. Das hat auf Anhieb funktioniert und IOB erkennt den Server auch.
Aber : Synology klappt nicht.
Habe hier SNMP USV Verbindung gewählt und erhalte:
Verbindung zum Netzwerk-USV-Server nicht möglich. -
@klassisch sagte in [HowTo] USV: NUT Server auf SBC installieren:
NUT-Server auf einem Kleinrechner (SBC)
In meinem Fall ist der SBC ein Orange Pi Plus 2e, der für diese Aufgabe zwar viel zu groß ist, aber durch Migration von ioBoker auf einen Windows Rechner frei wurde.Ich habe gemäß dieser Anleitung einen NUT-Server auf einem Kleinrechner (RPI) eingerichtet. Das hat auf Anhieb funktioniert und IOB erkennt den Server auch.
Aber : Synology klappt nicht.
Habe hier SNMP USV Verbindung gewählt und erhalte:
Verbindung zum Netzwerk-USV-Server nicht möglich.@yunakato Wieso SNMP-Server? Bei mir läuft's unter "Synology USV-Server". Dann noch die IP des NUT-Servers rein und gut ist's.
Wenn was nicht funktioniert, kannst du wertvolle Infos [hier]https://www.synology-forum.de/threads/usv-mit-serieller-schnittstelle-moeglich.114545/page-2#post-988107) bekommen.
Wenn immer noch nicht läuft musst Du mal Deine NUT-Config-Dateien zeigen.
Master: Intel NUC10i5-32GB-1TB_SSD - Proxmox 8.3 - LXC Debian 11
Slave1: RPi3B - ZigBee CC2652P - 10x DS18B20
Slave2: RPi3B - ZigBee CC2538+CC2592
node.js 20.18.1 / NPM 10.8.2 / js-controller 7.0.3 -
@yunakato Wieso SNMP-Server? Bei mir läuft's unter "Synology USV-Server". Dann noch die IP des NUT-Servers rein und gut ist's.
Wenn was nicht funktioniert, kannst du wertvolle Infos [hier]https://www.synology-forum.de/threads/usv-mit-serieller-schnittstelle-moeglich.114545/page-2#post-988107) bekommen.
Wenn immer noch nicht läuft musst Du mal Deine NUT-Config-Dateien zeigen.
@josh sagte in [HowTo] USV: NUT Server auf SBC installieren:
Wieso SNMP-Server? Bei mir läuft's unter "Synology USV-Server".
so, vielen Dank - leider komme ich erst jetzt zum antworten - Corona hatte sich relativ heftig festgesetzt.
Der Begriff Synology USV-Server hatte mich auf die falsche Bahn geführt. Aber damit funktioniert es auf Anhieb.
vielen Dank !
-
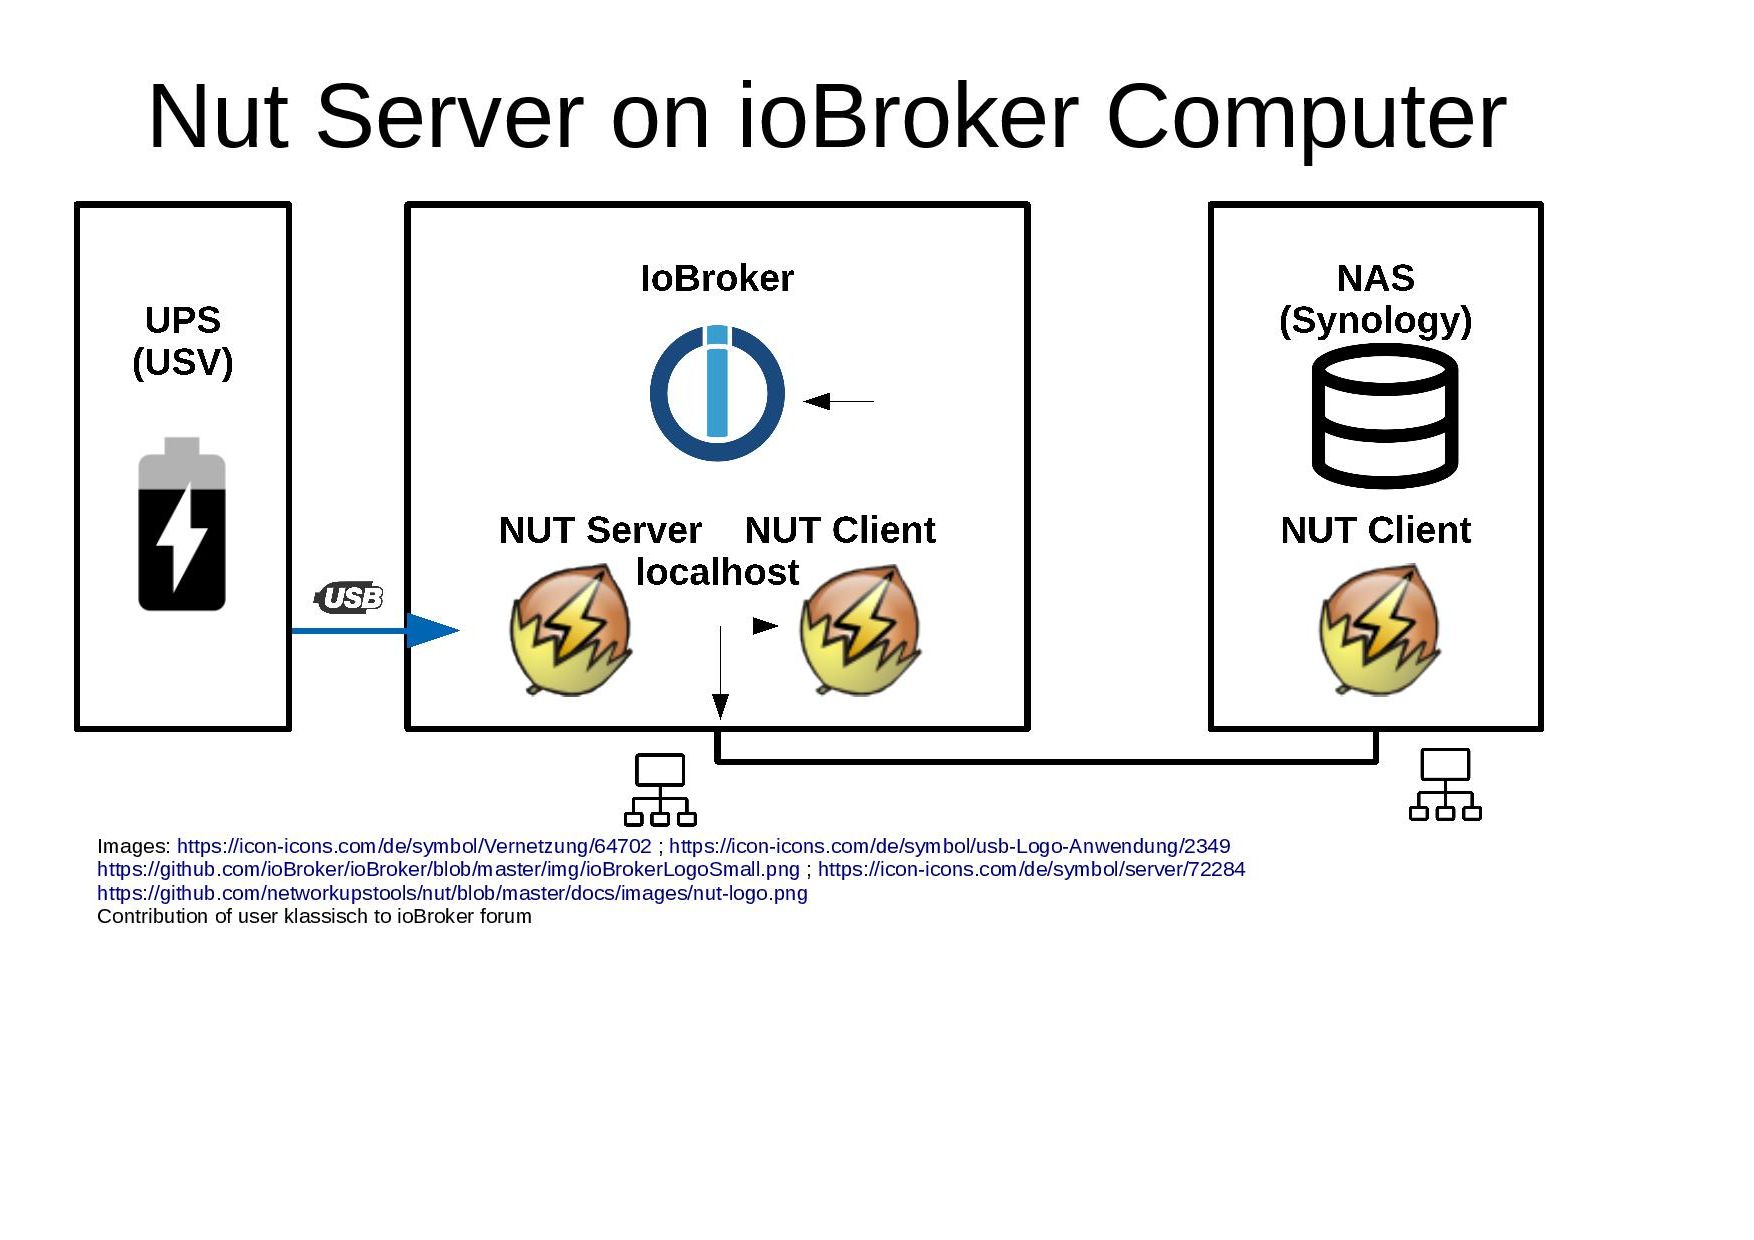
Was macht NUT?
Mit NUT (Network UPS Tools) kann man eine unterbrechungsfreie Stromversorgung (USV, UPS) mit Computern verbinden und Daten von den UPS bekommen.
Für ioBroker gibt es den nut Adapter von @Apollon77, Github und ioBrokerForum . Dieser Adapter stellt einen NUT-Cient bereit und legt eine Datenstruktur im Objektbereich an.
Ich nutze den Adapter hauptsächlich zum mitloggen der Daten wie verbleibende Akuulaufzeit und zur Detektion von Netzspannungsausfällen.Geeignete UPS (USV)
Die meisten UPS unterstützen diesen Datenaustausch. Entweder per serieller Schnittstelle (nur noch selten anzutreffen), meist per USB oder die edleren direkt über Ethernet.
Luxus: UPS mit eingebauter Netzwerkkarte
Die Luxuslösung sieht dann so aus:
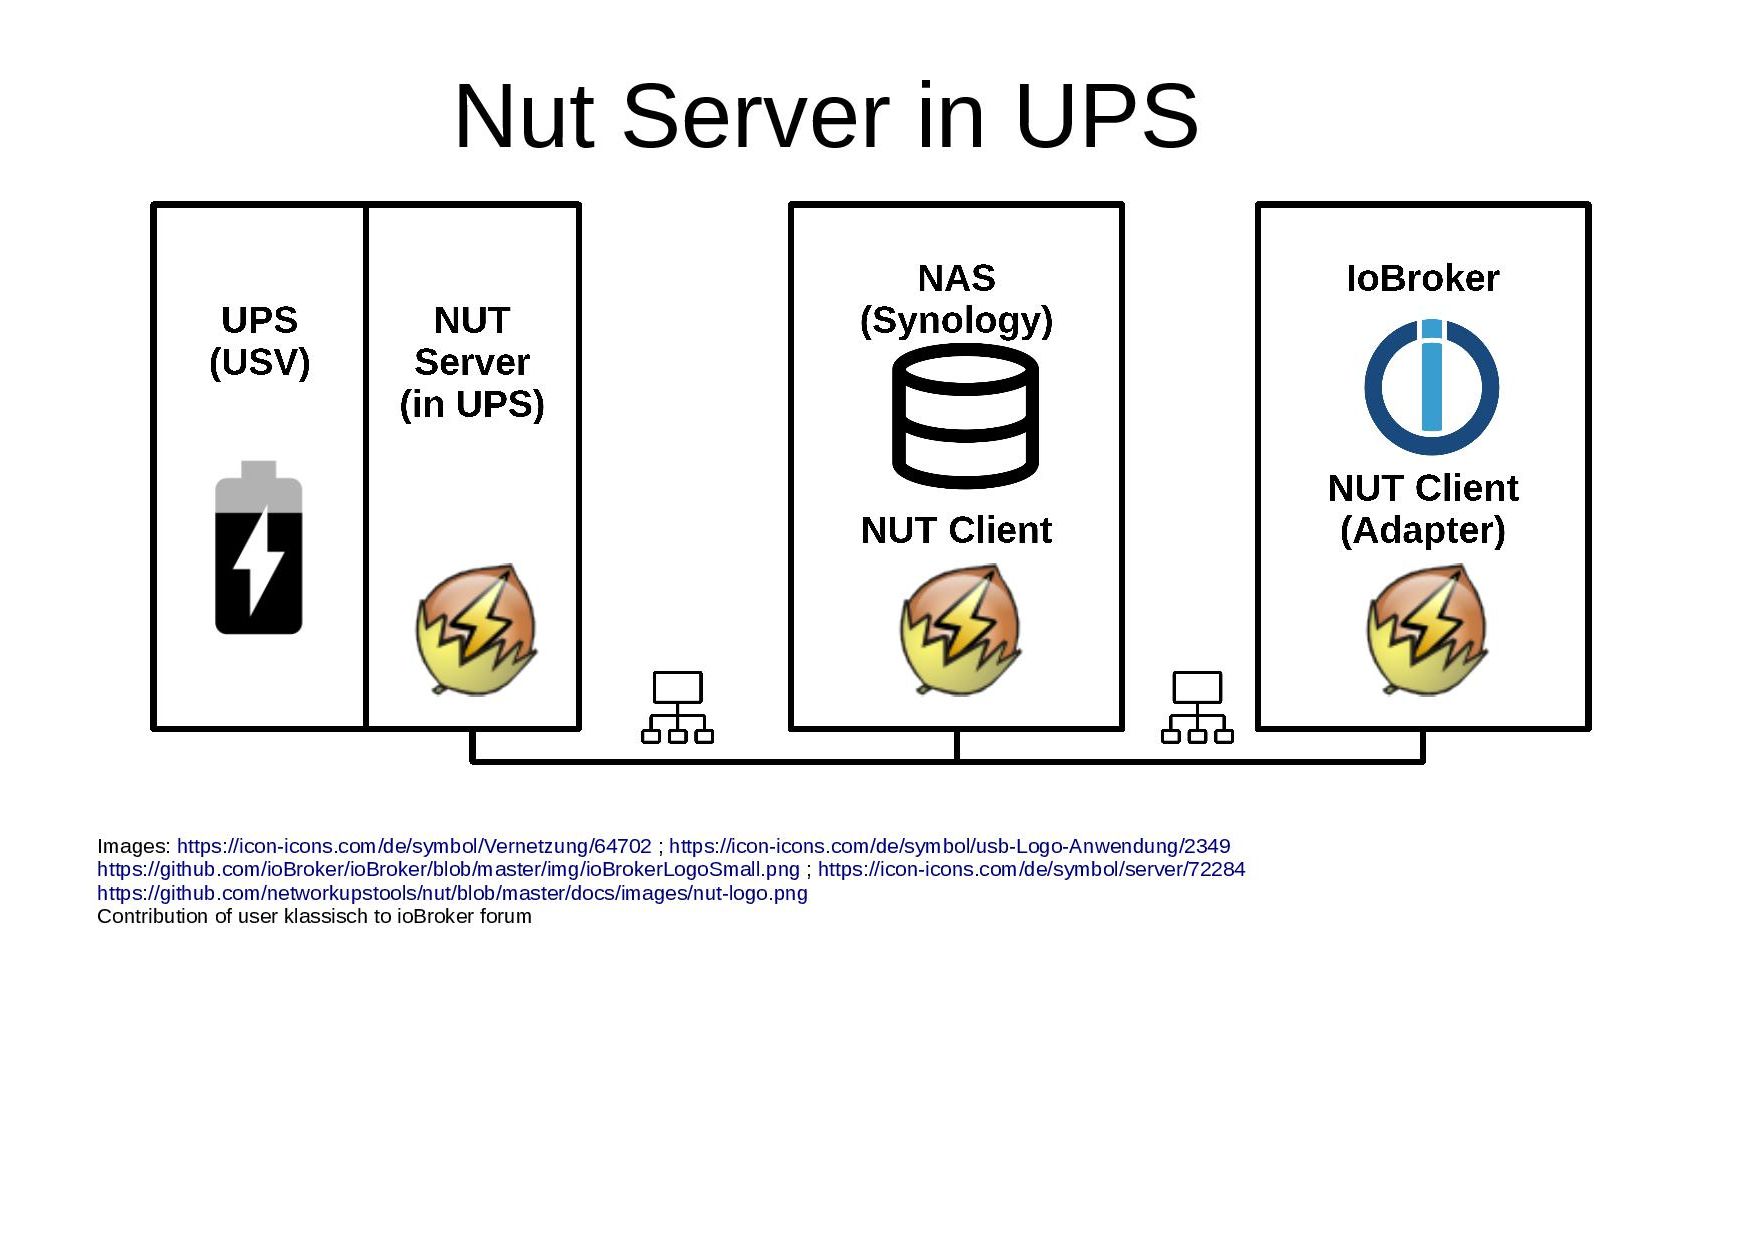
Man kann dann z.B. den NAS einige Minuten nach einem Spannungsausfall herunterfahren und die anderen Geräte wie ioBroker, Router, Switches, Homematic weiter betreiben.
Im ioBroker nut-Adapter trägt man die IP-Adresse der Netzwerkkarte der UPS, deren Port (i.d.R 3493), den Namen der UPS sowie Benutzernamen und Passwort, die auf der Netzwerkkarte der UPS festgelegt sind.
Ein konkretes Beispiel kann ich hier leider nicht geben, da ich leider eine andere Lösung habe.Einfache Lösung mit Haken: NAS als NUT-Server
Wer über ein geeignetes NAS-Gerät verfügt - in meinem Beispiel Synology - kann das USB-Kabel der UPS direkt dort einstecken und den eingebauten NAS-Server nutzen.
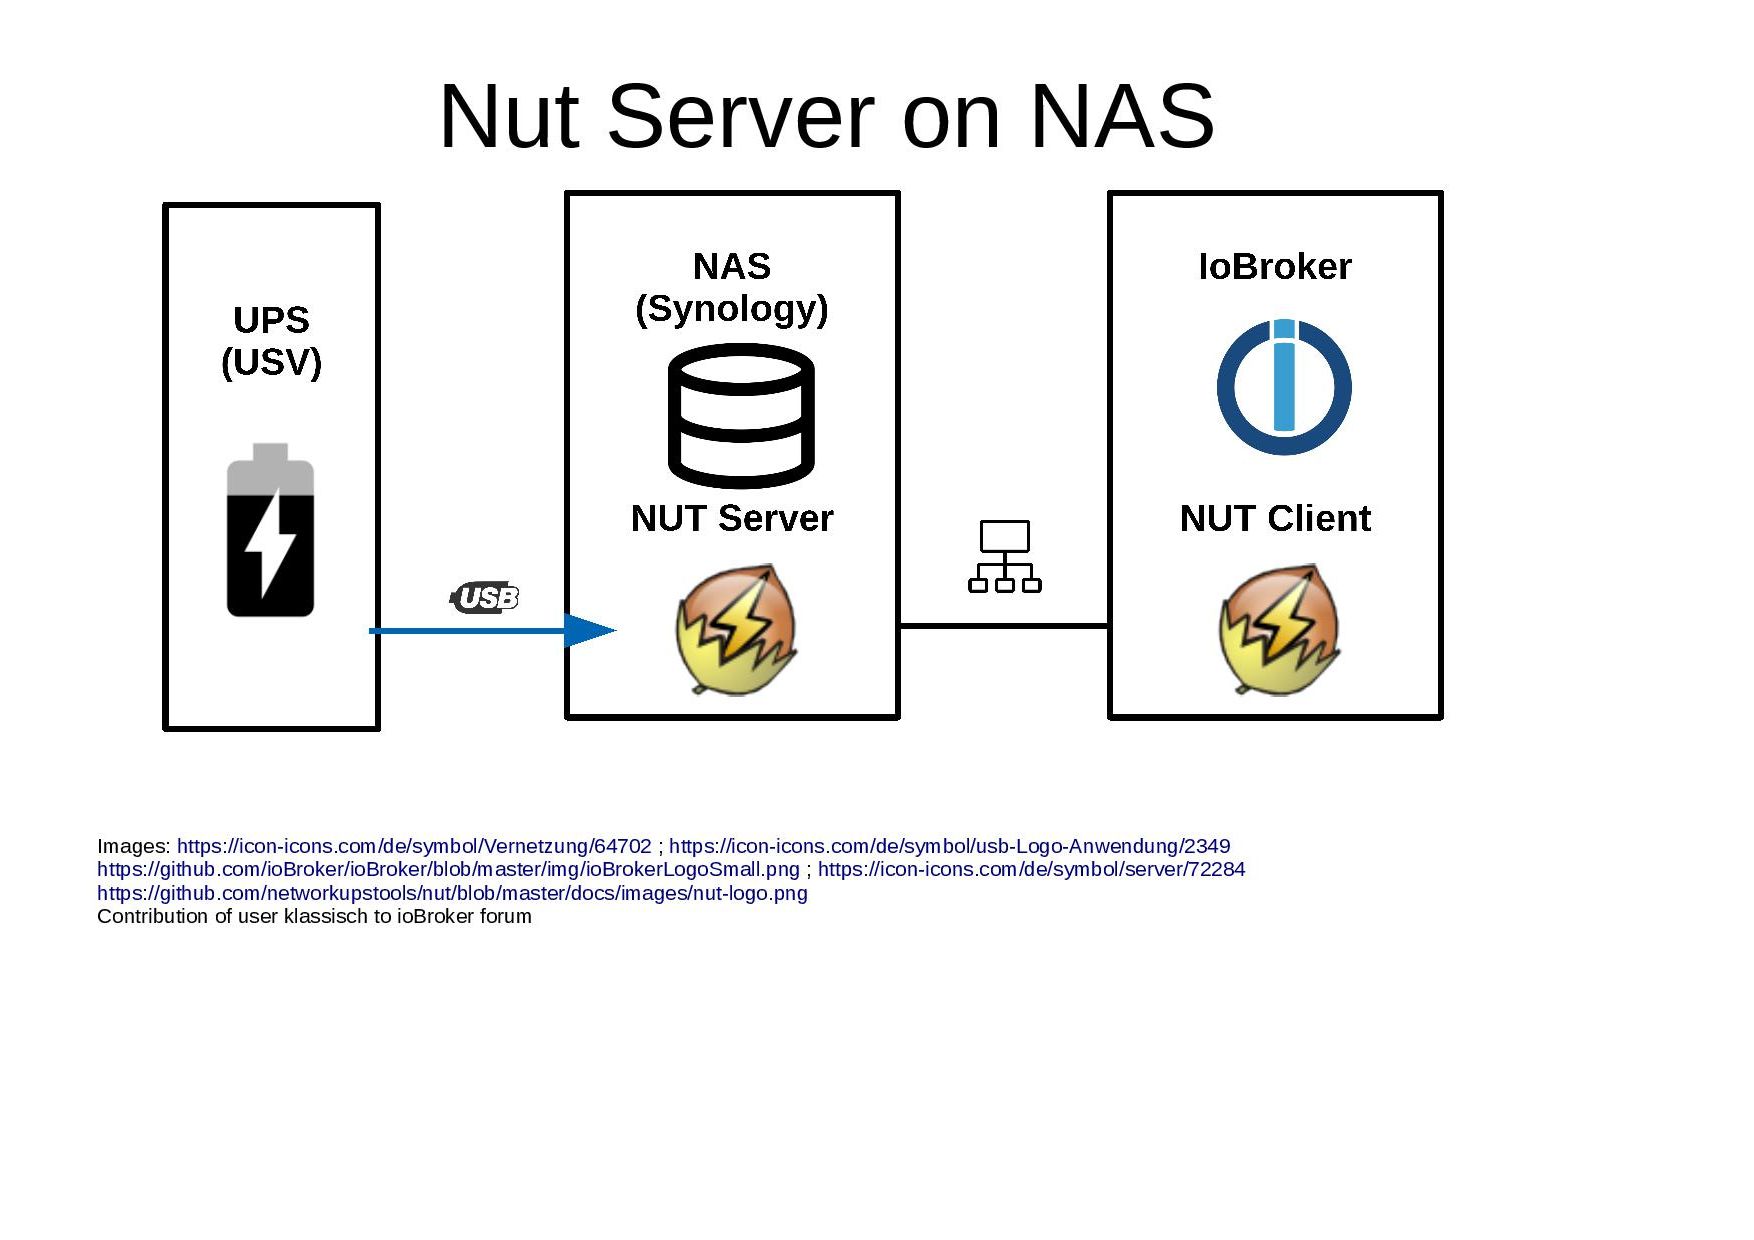
In diesem Fall detektiert die Synology die angeschlossene UPS. Im Menue Hardware & Energie, Tab USV kann man den NUT Server aktivieren und die IP-Adressen der Clients - also auch des ioBroker-Rechners - einstellen.
Im ioBroker Adapter gibt man die IP Adresse der Synology an, sowie wieder Port 3493. Bei Synology muß der Name der UPS sowie dessen Benutzername ups lauten und das password secret .
Das funktioniert recht problemlos und stabil, hat aber einen Haken. Wenn die Synology bei einem Stromausfall heruntergefahren wird, stellt auch deren NUT Server den Dienst ein und der ioBroker wird nicht mehr mit den Daten der UPS versorgt. Also gerade dann, wenn es eigentlich am interessantesten ist.
Um das zu vermeiden, kann man den NUT-Server auf einem (eigenen) Kleinrechner betreiben. Alle anderen Geräte werden dann als Cient betrieben.NUT-Server auf einem Kleinrechner (SBC)
In meinem Fall ist der SBC ein Orange Pi Plus 2e, der für diese Aufgabe zwar viel zu groß ist, aber durch Migration von ioBoker auf einen Windows Rechner frei wurde.
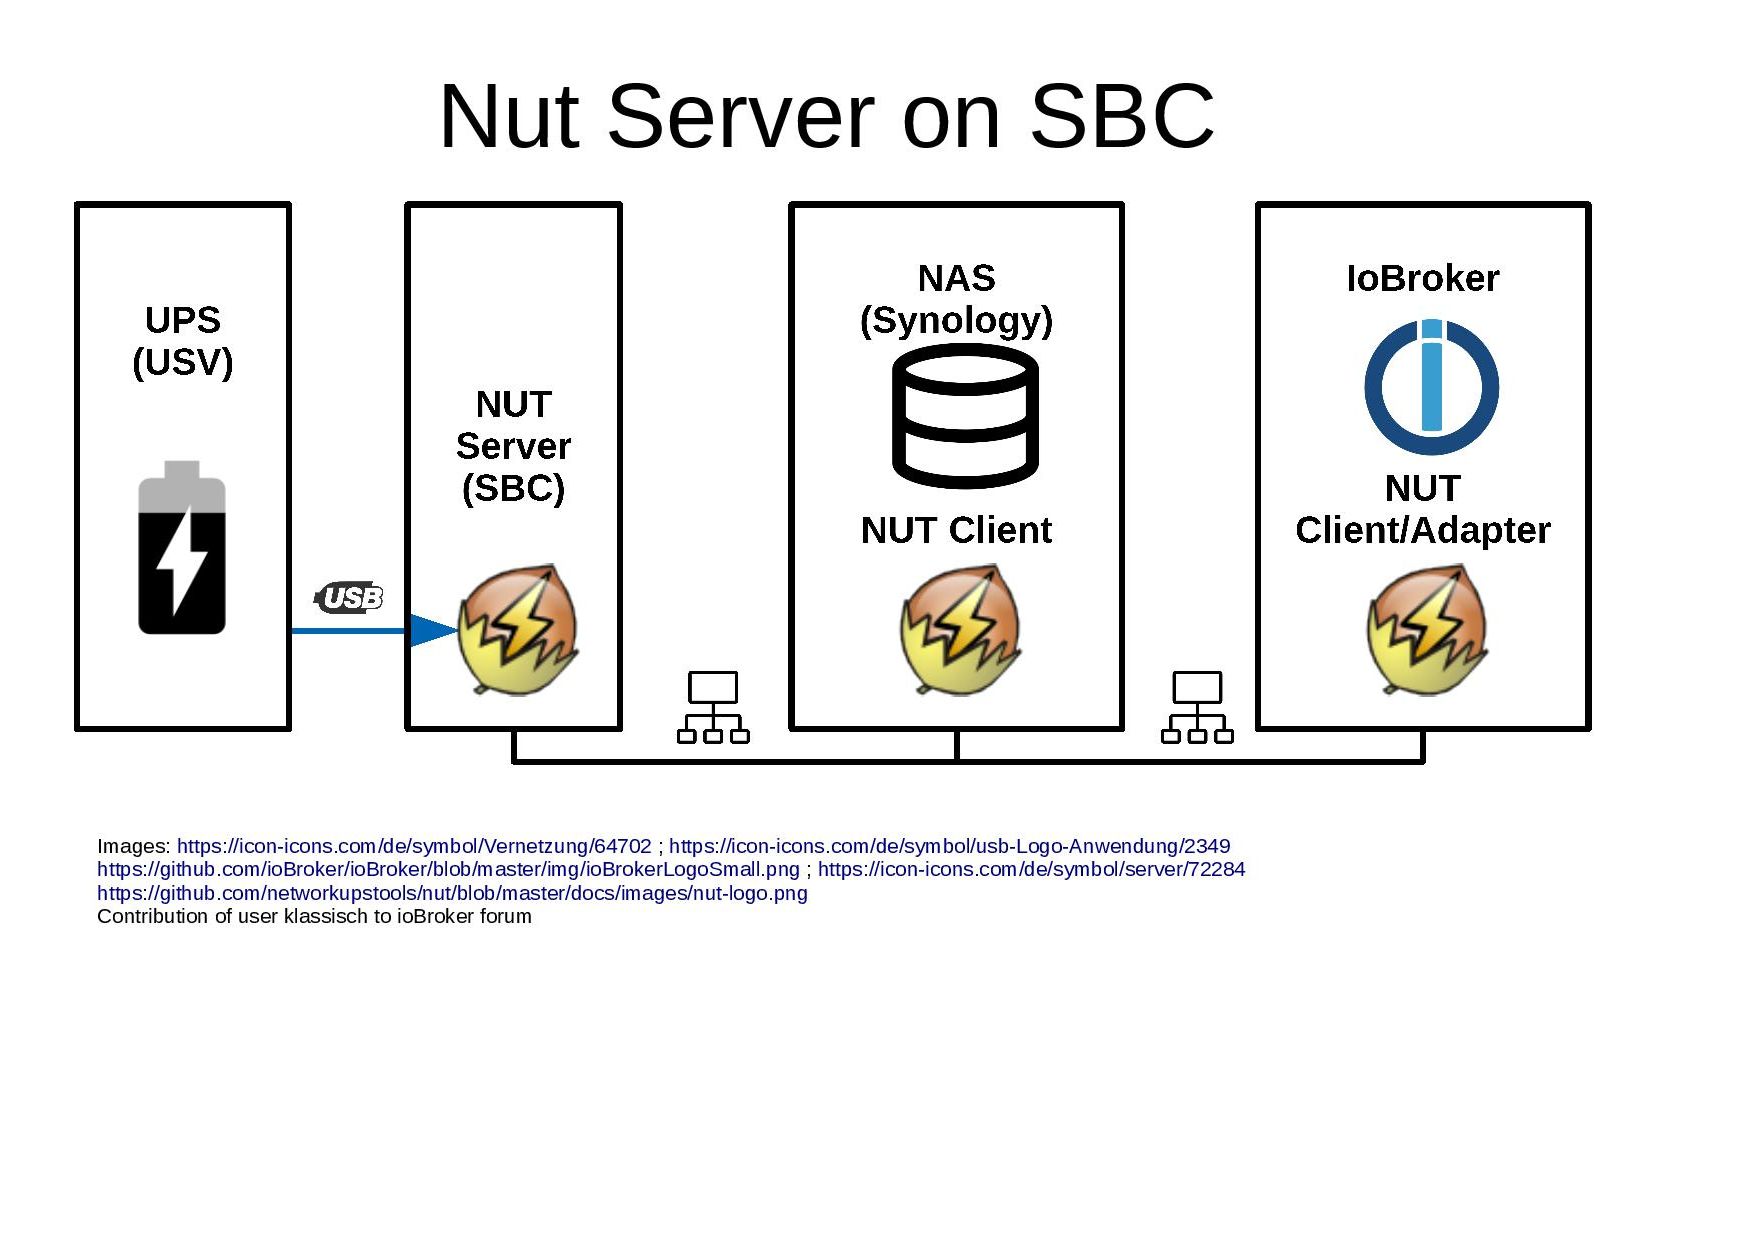
Das Aufsetzen des NUT-Server erfolgt auf den Spuren von Haus-Automatisierung und Wiki Ubuntuusers
Zuerst System aktualisieren bzw. neu aufsetzen mit µSD Karteapt update apt upgradeEdit: Den NUT-Rechner mit der USV per USB verbinden. Darauf hat @Homoran hingewiesen.
Nut installation:sudo apt install nut usbutilsBei älteren Systemen sudo apt-get install nut usbutils
sudo nano /etc/nut/ups.confEinfügen:
[ups] driver = "usbhid-ups" port = "auto" desc = "CyberPower" pollinterval = 30Bei Verwendung einer Synology muß [ups] verwendet werden.
Sudo rebootsudo upsdrvctl start sudo cp /lib/udev/rules.d/62-nut-usbups.rules /etc/udev/rules.d/ sudo rebootsudo upsdrvctl start sudo nano /etc/nut/nut.confEintragen:
MODE=netserverDanach den Dienst starten:
sudo upsdWenn alles funktioniert hat, kann man jetzt Daten ausgeben:
sudo upsc ups@localhostHier muss eine sinnvolle Liste gelistet werden: Beispiel:
root@opi2e_reserve:~# sudo upsc ups@localhost
Init SSL without certificate database
battery.charge: 100
battery.charge.low: 10
battery.charge.warning: 20
battery.mfr.date: CPS
battery.runtime: 6690
battery.runtime.low: 300
battery.type: PbAcid
battery.voltage: 24.0
battery.voltage.nominal: 24
device.mfr: CPS
device.model: CP1500EPFCLCD
device.serial: CRABCD12345678
device.type: ups
driver.name: usbhid-ups
driver.parameter.pollfreq: 30
driver.parameter.pollinterval: 30
driver.parameter.port: auto
driver.parameter.synchronous: no
driver.version: 2.7.4
driver.version.data: CyberPower HID 0.4
driver.version.internal: 0.41
input.transfer.high: 260
input.transfer.low: 170
input.voltage: 235.0
input.voltage.nominal: 230
output.voltage: 267.0
ups.beeper.status: enabled
ups.delay.shutdown: 20
ups.delay.start: 30
ups.load: 5
ups.mfr: CPS
ups.model: CP1500EPFCLCD
ups.productid: 0501
ups.realpower.nominal: 900
ups.serial: CRABCD12345678
ups.status: OL
ups.test.result: No test initiated
ups.timer.shutdown: -60
ups.timer.start: -60
ups.vendorid: 0764
root@opi2e_reserve:~#
Weiter gehts
sudo nano /etc/nut/upsd.confEintragen:
LISTEN 127.0.0.1 3493
LISTEN 192.168.178.123 3493
Also IP-Adresse der eigenen (Nut-Server) Eth Schnittstelle
Starten und stoppen, damit das conf-file wieder eingelesen wirdsudo upsd -c stop sudo upsdJetzt werden Benutzerkonten angelegt, unter denen man von anderen Geräten auf den NUT-Server zugreifen kann. In meinem Beispiel:
Drei user werden erstellt
- upsmaster für den Administrator, der damit aber nichts macht
- monuser für die Synology
- upsmon_remote für den ioBrokerDazu:
sudo nano /etc/nut/upsd.usersEintragen:
[upsmaster] password = irgendwasabergutmerken actions = SET instcmds = ALL upsmon master [monuser] password = secret upsmon slave [upsmon_remote] password = secret upsmon slaveWieder übernehmen
sudo upsd -c stop
sudo upsd
Jetzt müssen wir das Ganze auch noch reboot-fest machen.
Bei neueren Linux-Systemen geschieht das über systemd. @Thomas-Braun und @David-G haben diese Anpassung dankenswerterweise ausgearbeitet und getestet (siehe dort mit Nutzung dieser Fundstelle):
Zuerst mitcat /etc/systemd/system/multi-user.target.wants/nut-server.serviceprüfen, ob diese Datei vorhanden ist und nut bereits die Vorkehrungen für systemd getroffen hat.
Falls diese Datei existiert, Mit nano öffnen:sudo nano /etc/systemd/system/multi-user.target.wants/nut-server.serviceDiese Datei sieht dann erst mal so aus:
[Unit]
Description=Network UPS Tools - power devices information server
After=local-fs.target network.target nut-driver.service
# We don't Require drivers to be successfully started! This would be
# a change of behavior compared to init SysV, and could prevent from
# accessing successfully started, at least to audit a system.
Wants=nut-driver.service
Before=nut-monitor.service

[Service]
ExecStart=/sbin/upsd
Type=forking

[Install]
WantedBy=multi-user.target
Damit genügend Zeit zur Installation der USB Treiber bleibt, nach der Zeile [Service] noch die Verzögerung
ExecStartPre=/bin/sleep 30eintragen und die geänderte Datei abspeichern.
Die Datei sollte nun so aussehen[Unit] Description=Network UPS Tools - power devices information server After=local-fs.target network.target nut-driver.service # We don't Require drivers to be successfully started! This would be # a change of behavior compared to init SysV, and could prevent from # accessing successfully started, at least to audit a system. Wants=nut-driver.service Before=nut-monitor.service [Service] ExecStartPre=/bin/sleep 30 ExecStart=/sbin/upsd Type=forking [Install] WantedBy=multi-user.target{
Hier die Methode für alte Systeme, bei denen die Datei /etc/systemd/system/multi-user.target.wants/nut-server.service nicht existiert. Darf nicht verwendet werden, wenn diese Datei vorhanden ist und die vorherigen Schritte schon ausgeführt wurdensudo nano /etc/rc.localHier VOR exit=0 einfügen
#additions  for nut server
upsdrvctl start
upsd
#end additions for nut server
} Ende der Einstellungen für Altsysteme. Bei neueren Sytsemen nicht mehr verwenden]
Jetzt wird noch der ioBroker Adapter eingestellt. Beispiel
IP des NUT Servers: 192.168.178.123 #Beispiel
Port des NUT Servers: 3493
NUT Name der UPS: ups
Aktualisierungsintervall 300s
Username der UPS: upsmon_remote
Passwort der UPS: secret
Bei der Synology wird eingestellt (Hardware & Energie, Tab USV):
Anhaken: USV-Unterstützung aktivieren
Netzwerk-USV-Typ: Synology USV Server
Netzwerk-USV-Server-IP: 192.168.178.123 #BeispielDie Zeit einstellen, nach der die Synology heruntergefahren werden soll + anhaken.
NUT-Server und ioBroker auf einem Rechner
Diese Konfiguration hatte ich nie in Betrieb. Sie müßte aber mit den o.g. Installationsschritten möglich sein. Als IP-Adresse des NUT Servers kann innerhalb des Host Rechners dann localhost oder 127.0.0.1 verwendet werden.
Edit:
Welcher Treiber passt zu meiner USV?
Auswahltabelle Treiber auf der Seite des NUT-Projekts@klassisch danke für diese super Anleitung. Kann ich diese auch nehmen, wenn meine USV direkt per USB angeschlossen ist ? ich sehe in der Anleitung, dass er auf IP Adressen hört. Ich bin jetzt nicht so der Profi in diesen Dingen.
Danke
135
Online32.4k
Users81.3k
Topics1.3m
Posts