

[gelöst]Klarstein Klimaanlage einbinden
-
Das ist eine sehr gute Frage^^
Also Momentan hab ich iobroker und omv in einer vm, influxdb und grafana jeweils in einem Container. Was würde denn mehr Sinn machen? Ich glaube die seperat zu halten könnte Sinn ergeben, vielleicht gibt es ja irgendwann mal einen Adapter der dies kann und dann lässt sich die Bridge einfacher entfernen, oder was meinst du? Es gibt sogar schon einen Adapter für Iobroker, der funktioniert aber leider nur so halb (Ich kann die Klimaanlage an und aus machen und die Temperatur einstellen, die anderen Funktionen gingen nicht so richtig). Sollte ich die Sachen dann eher in einer VM oder in einem Container installieren?
@Dominik-F Da kann ich Sie auch schlecht raten - aber ich würde den mqtt broker auch mehr in die Kategorie iobroker - sprich in die allgemeinen Server behandeln und die Bridge seperat. Die Bridge würde ich wahrscheinlich in eine VM machen - Du musst dort wie ich das verstanden habe - über Environmentvariablen Deinen MQTT- Server bekannt geben - das finde ich eher nicht so prickelnd
Jeder Flow bzw. jedes Script, das ich hier poste implementiert jeder auf eigene Gefahr. Flows und Scripts können Fehler aufweisen und weder der Seitenbetreiber noch ich persönlich können hierfür haftbar gemacht werden. Das gleiche gilt für Empfehlungen aller Art.
-
@Dominik-F Da kann ich Sie auch schlecht raten - aber ich würde den mqtt broker auch mehr in die Kategorie iobroker - sprich in die allgemeinen Server behandeln und die Bridge seperat. Die Bridge würde ich wahrscheinlich in eine VM machen - Du musst dort wie ich das verstanden habe - über Environmentvariablen Deinen MQTT- Server bekannt geben - das finde ich eher nicht so prickelnd
Alles klar. ICh werde heute Abend dann Mosquitto installieren und eine VM für die Bridge erstellen. Danach melde ich mich wieder.
-
@Dominik-F Da kann ich Sie auch schlecht raten - aber ich würde den mqtt broker auch mehr in die Kategorie iobroker - sprich in die allgemeinen Server behandeln und die Bridge seperat. Die Bridge würde ich wahrscheinlich in eine VM machen - Du musst dort wie ich das verstanden habe - über Environmentvariablen Deinen MQTT- Server bekannt geben - das finde ich eher nicht so prickelnd
So, ich bin nun dabei mosquitto zu installieren. Ich scheitere gerade an dem Punkt :Installiere und führe Certbot für Let’s Encrypt Zertifikate aus. Ich bin mir aber auch nicht sicher wie genau mein DNSDomainname heisst
Bekomme folgendes:
thebermud@mosquitto:~$ sudo certbot certonly --standalone --preferred-challenges http-01 -d mosquitto Saving debug log to /var/log/letsencrypt/letsencrypt.log Plugins selected: Authenticator standalone, Installer None Enter email address (used for urgent renewal and security notices) (Enter 'c' to cancel): platzhalter@gmail.com - - - - - - - - - - - - - - - - - - - - - - - - - - - - - - - - - - - - - - - - Please read the Terms of Service at https://letsencrypt.org/documents/LE-SA-v1.2-November-15-2017.pdf. You must agree in order to register with the ACME server at https://acme-v02.api.letsencrypt.org/directory - - - - - - - - - - - - - - - - - - - - - - - - - - - - - - - - - - - - - - - - (A)gree/(C)ancel: A - - - - - - - - - - - - - - - - - - - - - - - - - - - - - - - - - - - - - - - - Would you be willing to share your email address with the Electronic Frontier Foundation, a founding partner of the Let's Encrypt project and the non-profit organization that develops Certbot? We'd like to send you email about our work encrypting the web, EFF news, campaigns, and ways to support digital freedom. - - - - - - - - - - - - - - - - - - - - - - - - - - - - - - - - - - - - - - - - (Y)es/(N)o: N Obtaining a new certificate An unexpected error occurred: The server will not issue certificates for the identifier :: Error creating new order :: Cannot issue for "mosquit to": Domain name needs at least one dot Please see the logfiles in /var/log/letsencrypt for more details. IMPORTANT NOTES: - Your account credentials have been saved in your Certbot configuration directory at /etc/letsencrypt. You should make a secure backup of this folder now. This configuration directory will also contain certificates and private keys obtained by Certbot so making regular backups of this folder is ideal. thebermud@mosquitto:~$ sudo certbot certonly --standalone --preferred-challenges http-01 -d mosquitto. Saving debug log to /var/log/letsencrypt/letsencrypt.log Plugins selected: Authenticator standalone, Installer None Obtaining a new certificate An unexpected error occurred: The server will not issue certificates for the identifier :: Error creating new order :: Cannot issue for "mosquit to": Domain name needs at least one dot Please see the logfiles in /var/log/letsencrypt for more details. thebermud@mosquitto:~$ certbot certonly --standalone --preferred-challenges http-01 -d mosquitto.fritz.box. The following error was encountered: [Errno 13] Permission denied: '/var/log/letsencrypt/.certbot.lock' Either run as root, or set --config-dir, --work-dir, and --logs-dir to writeable paths. thebermud@mosquitto:~$ sudo certbot certonly --standalone --preferred-challenges http-01 -d mosquitto.fritz.box. Saving debug log to /var/log/letsencrypt/letsencrypt.log Plugins selected: Authenticator standalone, Installer None Obtaining a new certificate Performing the following challenges: http-01 challenge for mosquitto.fritz.box Waiting for verification... Challenge failed for domain mosquitto.fritz.box http-01 challenge for mosquitto.fritz.box Cleaning up challenges Some challenges have failed. IMPORTANT NOTES: - The following errors were reported by the server: Domain: mosquitto.fritz.box Type: dns Detail: DNS problem: NXDOMAIN looking up A for mosquitto.fritz.box - check that a DNS record exists for this domain thebermud@mosquitto:~$ -
So, ich bin nun dabei mosquitto zu installieren. Ich scheitere gerade an dem Punkt :Installiere und führe Certbot für Let’s Encrypt Zertifikate aus. Ich bin mir aber auch nicht sicher wie genau mein DNSDomainname heisst
Bekomme folgendes:
thebermud@mosquitto:~$ sudo certbot certonly --standalone --preferred-challenges http-01 -d mosquitto Saving debug log to /var/log/letsencrypt/letsencrypt.log Plugins selected: Authenticator standalone, Installer None Enter email address (used for urgent renewal and security notices) (Enter 'c' to cancel): platzhalter@gmail.com - - - - - - - - - - - - - - - - - - - - - - - - - - - - - - - - - - - - - - - - Please read the Terms of Service at https://letsencrypt.org/documents/LE-SA-v1.2-November-15-2017.pdf. You must agree in order to register with the ACME server at https://acme-v02.api.letsencrypt.org/directory - - - - - - - - - - - - - - - - - - - - - - - - - - - - - - - - - - - - - - - - (A)gree/(C)ancel: A - - - - - - - - - - - - - - - - - - - - - - - - - - - - - - - - - - - - - - - - Would you be willing to share your email address with the Electronic Frontier Foundation, a founding partner of the Let's Encrypt project and the non-profit organization that develops Certbot? We'd like to send you email about our work encrypting the web, EFF news, campaigns, and ways to support digital freedom. - - - - - - - - - - - - - - - - - - - - - - - - - - - - - - - - - - - - - - - - (Y)es/(N)o: N Obtaining a new certificate An unexpected error occurred: The server will not issue certificates for the identifier :: Error creating new order :: Cannot issue for "mosquit to": Domain name needs at least one dot Please see the logfiles in /var/log/letsencrypt for more details. IMPORTANT NOTES: - Your account credentials have been saved in your Certbot configuration directory at /etc/letsencrypt. You should make a secure backup of this folder now. This configuration directory will also contain certificates and private keys obtained by Certbot so making regular backups of this folder is ideal. thebermud@mosquitto:~$ sudo certbot certonly --standalone --preferred-challenges http-01 -d mosquitto. Saving debug log to /var/log/letsencrypt/letsencrypt.log Plugins selected: Authenticator standalone, Installer None Obtaining a new certificate An unexpected error occurred: The server will not issue certificates for the identifier :: Error creating new order :: Cannot issue for "mosquit to": Domain name needs at least one dot Please see the logfiles in /var/log/letsencrypt for more details. thebermud@mosquitto:~$ certbot certonly --standalone --preferred-challenges http-01 -d mosquitto.fritz.box. The following error was encountered: [Errno 13] Permission denied: '/var/log/letsencrypt/.certbot.lock' Either run as root, or set --config-dir, --work-dir, and --logs-dir to writeable paths. thebermud@mosquitto:~$ sudo certbot certonly --standalone --preferred-challenges http-01 -d mosquitto.fritz.box. Saving debug log to /var/log/letsencrypt/letsencrypt.log Plugins selected: Authenticator standalone, Installer None Obtaining a new certificate Performing the following challenges: http-01 challenge for mosquitto.fritz.box Waiting for verification... Challenge failed for domain mosquitto.fritz.box http-01 challenge for mosquitto.fritz.box Cleaning up challenges Some challenges have failed. IMPORTANT NOTES: - The following errors were reported by the server: Domain: mosquitto.fritz.box Type: dns Detail: DNS problem: NXDOMAIN looking up A for mosquitto.fritz.box - check that a DNS record exists for this domain thebermud@mosquitto:~$@Dominik-F Ehrlich gesagt verstehe ich nicht - warum Du das machst? Du brauchst für mosquitto keine Zertifikate.
Ich habe Dir doch gesagt - Du brauchst nicht mal die Clients.
Prüfe mit "sudo systemctl status mosquitto" - ob das Ding läuft und gut ist. Hatte ich Dir eigentlich in den ersten Post hier geschrieben. Mit sudo apt-get install mosquitto bist Du erst mal fertig.Jeder Flow bzw. jedes Script, das ich hier poste implementiert jeder auf eigene Gefahr. Flows und Scripts können Fehler aufweisen und weder der Seitenbetreiber noch ich persönlich können hierfür haftbar gemacht werden. Das gleiche gilt für Empfehlungen aller Art.
-
@Dominik-F Ehrlich gesagt verstehe ich nicht - warum Du das machst? Du brauchst für mosquitto keine Zertifikate.
Ich habe Dir doch gesagt - Du brauchst nicht mal die Clients.
Prüfe mit "sudo systemctl status mosquitto" - ob das Ding läuft und gut ist. Hatte ich Dir eigentlich in den ersten Post hier geschrieben. Mit sudo apt-get install mosquitto bist Du erst mal fertig.Da war ich wohl etwas vorschnell^^ ich bringe dann kurz alles auf den richtigen Stand und melde mich wieder
-
@Dominik-F Ehrlich gesagt verstehe ich nicht - warum Du das machst? Du brauchst für mosquitto keine Zertifikate.
Ich habe Dir doch gesagt - Du brauchst nicht mal die Clients.
Prüfe mit "sudo systemctl status mosquitto" - ob das Ding läuft und gut ist. Hatte ich Dir eigentlich in den ersten Post hier geschrieben. Mit sudo apt-get install mosquitto bist Du erst mal fertig.Ab jetzt befolge ich genau deine Schritte. Sorry, ich dachte das diese Dinge alle noch notwendig wären^^
mosquitto.service - Mosquitto MQTT v3.1/v3.1.1 Broker Loaded: loaded (/lib/systemd/system/mosquitto.service; enabled; vendor preset: enabled) Active: active (running) since Tue 2020-07-07 21:28:14 UTC; 1min 3s ago Docs: man:mosquitto.conf(5) man:mosquitto(8) Main PID: 16683 (mosquitto) Tasks: 3 (limit: 2282) Memory: 1.3M CGroup: /system.slice/mosquitto.service └─16683 /usr/sbin/mosquitto -c /etc/mosquitto/mosquitto.conf Jul 07 21:28:14 mosquitto systemd[1]: Starting Mosquitto MQTT v3.1/v3.1.1 Broker... Jul 07 21:28:14 mosquitto mosquitto[16683]: [ 323.069314]~DLT~16683~INFO ~FIFO /tmp/dlt cannot be opened. Retrying later... Jul 07 21:28:14 mosquitto systemd[1]: Started Mosquitto MQTT v3.1/v3.1.1 Broker. -
Ab jetzt befolge ich genau deine Schritte. Sorry, ich dachte das diese Dinge alle noch notwendig wären^^
mosquitto.service - Mosquitto MQTT v3.1/v3.1.1 Broker Loaded: loaded (/lib/systemd/system/mosquitto.service; enabled; vendor preset: enabled) Active: active (running) since Tue 2020-07-07 21:28:14 UTC; 1min 3s ago Docs: man:mosquitto.conf(5) man:mosquitto(8) Main PID: 16683 (mosquitto) Tasks: 3 (limit: 2282) Memory: 1.3M CGroup: /system.slice/mosquitto.service └─16683 /usr/sbin/mosquitto -c /etc/mosquitto/mosquitto.conf Jul 07 21:28:14 mosquitto systemd[1]: Starting Mosquitto MQTT v3.1/v3.1.1 Broker... Jul 07 21:28:14 mosquitto mosquitto[16683]: [ 323.069314]~DLT~16683~INFO ~FIFO /tmp/dlt cannot be opened. Retrying later... Jul 07 21:28:14 mosquitto systemd[1]: Started Mosquitto MQTT v3.1/v3.1.1 Broker.@Dominik-F So das war nämlich schon alles - somit läuft Dein mosquitto server. ;) Als nächstes würde ich dann gleich mal in Deinem iobroker den MQTT-Client installieren. Nimm den Adapter mit Version 2.x - den man als Broker oder als Client installieren kann.
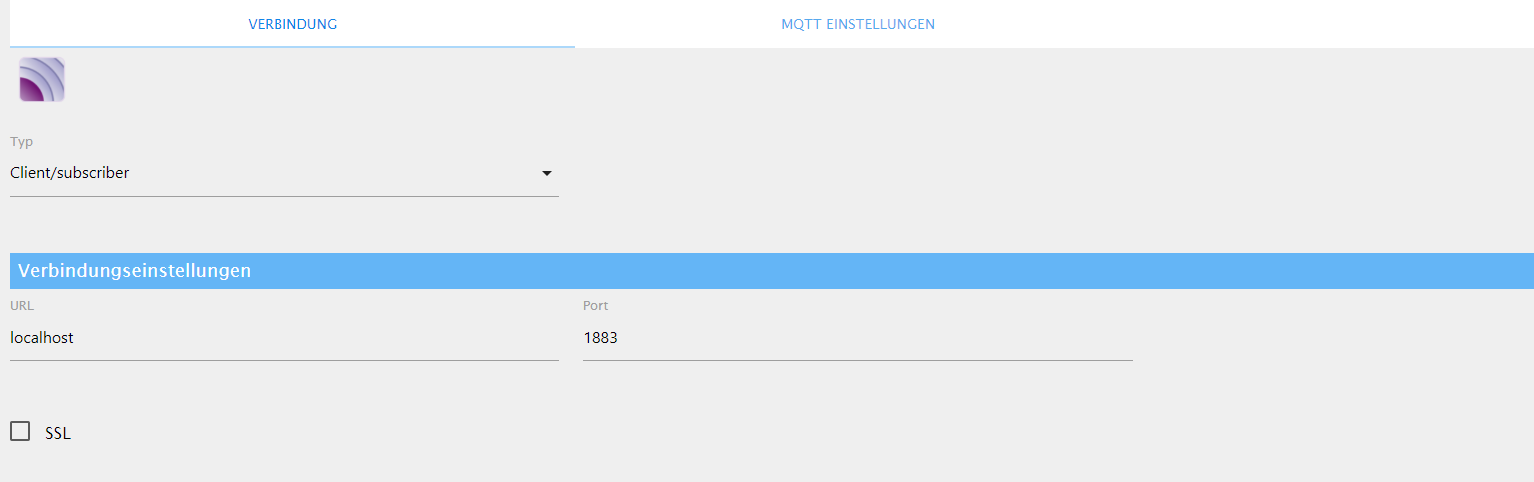
Bei den Verbindungseinstellungen sollte dann statt localhost - die IP-Adresse Deines mosquitto Servers stehen. Als Typ steht dann Client/subscriber
Jeder Flow bzw. jedes Script, das ich hier poste implementiert jeder auf eigene Gefahr. Flows und Scripts können Fehler aufweisen und weder der Seitenbetreiber noch ich persönlich können hierfür haftbar gemacht werden. Das gleiche gilt für Empfehlungen aller Art.
-
@Dominik-F So das war nämlich schon alles - somit läuft Dein mosquitto server. ;) Als nächstes würde ich dann gleich mal in Deinem iobroker den MQTT-Client installieren. Nimm den Adapter mit Version 2.x - den man als Broker oder als Client installieren kann.
Bei den Verbindungseinstellungen sollte dann statt localhost - die IP-Adresse Deines mosquitto Servers stehen. Als Typ steht dann Client/subscriber
Fertig
Es taucht folgendes im Log auf:
mqtt.0 2020-07-07 23:38:46.608 error (12330) uncaughtException: TypeError: Cannot read property 'toString' of undefined mqtt.0 2020-07-07 23:38:46.607 error at processImmediate (internal/timers.js:456:21) mqtt.0 2020-07-07 23:38:46.607 error at Immediate.<anonymous> (/opt/iobroker/node_modules/iobroker.mqtt/lib/client.js:99:36) mqtt.0 2020-07-07 23:38:46.607 error at publishAllStates (/opt/iobroker/node_modules/iobroker.mqtt/lib/client.js:112:46) mqtt.0 2020-07-07 23:38:46.607 error at state2string (/opt/iobroker/node_modules/iobroker.mqtt/lib/common.js:30:77) mqtt.0 2020-07-07 23:38:46.607 error (12330) TypeError: Cannot read property 'toString' of undefined mqtt.0 2020-07-07 23:38:46.607 error (12330) uncaught exception: Cannot read property 'toString' of undefined -
Fertig
Es taucht folgendes im Log auf:
mqtt.0 2020-07-07 23:38:46.608 error (12330) uncaughtException: TypeError: Cannot read property 'toString' of undefined mqtt.0 2020-07-07 23:38:46.607 error at processImmediate (internal/timers.js:456:21) mqtt.0 2020-07-07 23:38:46.607 error at Immediate.<anonymous> (/opt/iobroker/node_modules/iobroker.mqtt/lib/client.js:99:36) mqtt.0 2020-07-07 23:38:46.607 error at publishAllStates (/opt/iobroker/node_modules/iobroker.mqtt/lib/client.js:112:46) mqtt.0 2020-07-07 23:38:46.607 error at state2string (/opt/iobroker/node_modules/iobroker.mqtt/lib/common.js:30:77) mqtt.0 2020-07-07 23:38:46.607 error (12330) TypeError: Cannot read property 'toString' of undefined mqtt.0 2020-07-07 23:38:46.607 error (12330) uncaught exception: Cannot read property 'toString' of undefined@Dominik-F
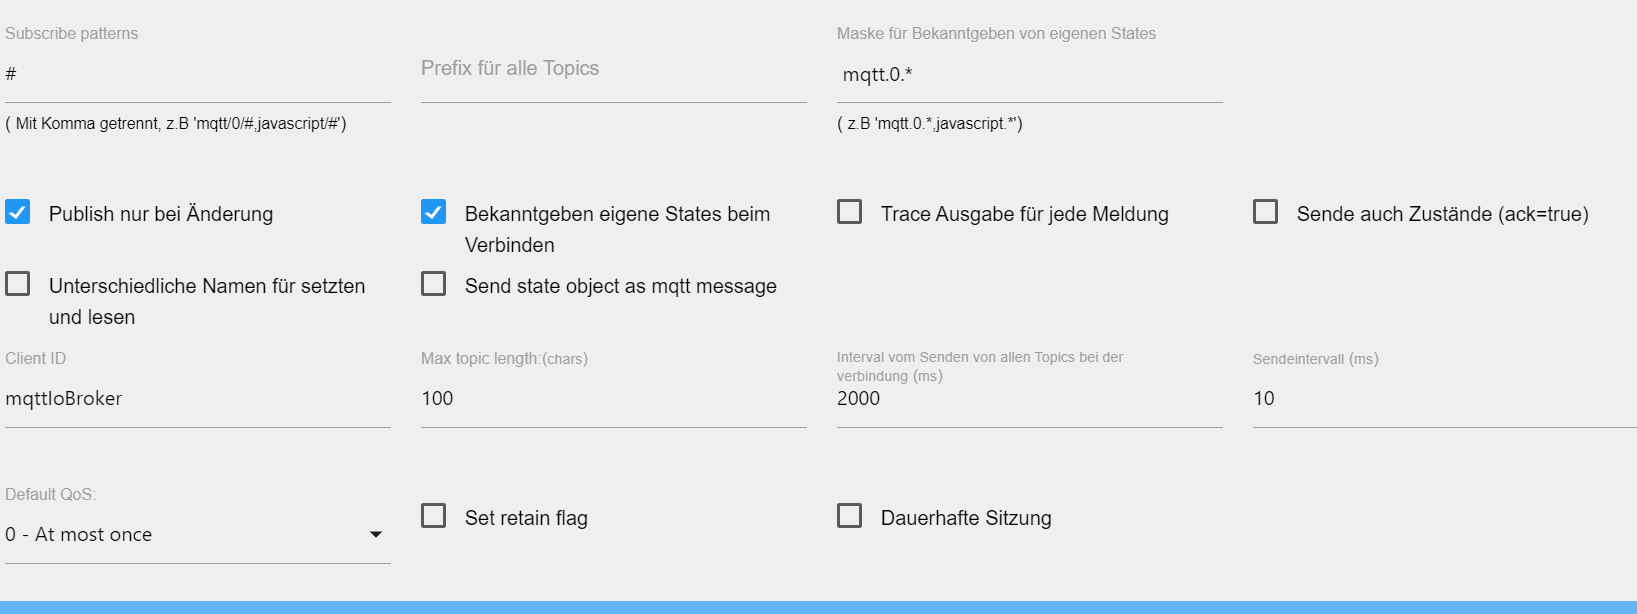
Na im Moment hast Du nur die Verbindung konfiguriert und nicht die MQTT-EInstellungen. Unter den MQTT-Einstellungen bei subscribe pattern einen Hashtag also # eingeben.Unter Maske für eigene states: mqtt.0.*
Unter ClientID - gibst Du Deinem Client einen Namen: z.B. mqttIoBroker - oder was Du willst.
Jeder Flow bzw. jedes Script, das ich hier poste implementiert jeder auf eigene Gefahr. Flows und Scripts können Fehler aufweisen und weder der Seitenbetreiber noch ich persönlich können hierfür haftbar gemacht werden. Das gleiche gilt für Empfehlungen aller Art.
-
@Dominik-F
Na im Moment hast Du nur die Verbindung konfiguriert und nicht die MQTT-EInstellungen. Unter den MQTT-Einstellungen bei subscribe pattern einen Hashtag also # eingeben.Unter Maske für eigene states: mqtt.0.*
Unter ClientID - gibst Du Deinem Client einen Namen: z.B. mqttIoBroker - oder was Du willst.
-
@mickym
fertig:
@Dominik-F Die Haken kannst Du rausnehmen - aber ansonsten sollte der Adapter nun grün sein und keine Fehler mehr im Log auftauchen?
Jeder Flow bzw. jedes Script, das ich hier poste implementiert jeder auf eigene Gefahr. Flows und Scripts können Fehler aufweisen und weder der Seitenbetreiber noch ich persönlich können hierfür haftbar gemacht werden. Das gleiche gilt für Empfehlungen aller Art.
-
@Dominik-F Die Haken kannst Du rausnehmen - aber ansonsten sollte der Adapter nun grün sein und keine Fehler mehr im Log auftauchen?
-
Haken sind raus, Adapter ist Grün und keine Fehler mehr im Log
@Dominik-F Na herzlichen Glückwunsch - dann sollte Deine MQTT Struktur bereits stehen. ;) - Easy.
Man könnte nun einiges testen - aber eigentlich kannst Du nun damit anfangen die VM mit der Bridge Software aufzusetzen und Dich an die Anleitung der EWPE-Smart MQTT Bridge zu installieren. Wenn da allerdings Fehler auftauchen - dann hoffe ich, dass ggf. sonst noch jemand helfen kann.
Jeder Flow bzw. jedes Script, das ich hier poste implementiert jeder auf eigene Gefahr. Flows und Scripts können Fehler aufweisen und weder der Seitenbetreiber noch ich persönlich können hierfür haftbar gemacht werden. Das gleiche gilt für Empfehlungen aller Art.
-
@Dominik-F Na herzlichen Glückwunsch - dann sollte Deine MQTT Struktur bereits stehen. ;) - Easy.
Man könnte nun einiges testen - aber eigentlich kannst Du nun damit anfangen die VM mit der Bridge Software aufzusetzen und Dich an die Anleitung der EWPE-Smart MQTT Bridge zu installieren. Wenn da allerdings Fehler auftauchen - dann hoffe ich, dass ggf. sonst noch jemand helfen kann.
-
Super, ich danke dir schonmal.
Hast du ne Ahnung wie das mit den enviromental variables funktioniert?@Dominik-F Auf der VM machst DU dann die beiden Befehle:
- git clone https://github.com/stas-demydiuk/ewpe-smart-mqtt
- npm install
Dann kommen die Umgebungsvariablen - wie Du ja selbst sagst. Ich bin kein Linux Freak aber habe das schon nachgelesen und müsste so funktionieren:
https://www.serverlab.ca/tutorials/linux/administration-linux/how-to-set-environment-variables-in-linux/Du erstellst mit "sudo nano /etc/profile.d/mqtt.sh" eine neue Textdatei:
Da trägst Du dann mit dem export Befehl die angegeben MQTT Variablen an:
export MQTT_SERVER=mqtt://<IPAdresse Deines Mosquitto Servers>
....usw.
mit set | more -solltest Du dann sehen, ob die Umgebungsvariablen gesetzt werden.Wenn die gesetzt sind - startest Du dann npm start. Das IP Adresse sollten ja die IP Adressen Deiner Klimanlage(n) sein und solltest Du ja mit NETWORK Variablen speichern.
Jeder Flow bzw. jedes Script, das ich hier poste implementiert jeder auf eigene Gefahr. Flows und Scripts können Fehler aufweisen und weder der Seitenbetreiber noch ich persönlich können hierfür haftbar gemacht werden. Das gleiche gilt für Empfehlungen aller Art.
-
@Dominik-F Auf der VM machst DU dann die beiden Befehle:
- git clone https://github.com/stas-demydiuk/ewpe-smart-mqtt
- npm install
Dann kommen die Umgebungsvariablen - wie Du ja selbst sagst. Ich bin kein Linux Freak aber habe das schon nachgelesen und müsste so funktionieren:
https://www.serverlab.ca/tutorials/linux/administration-linux/how-to-set-environment-variables-in-linux/Du erstellst mit "sudo nano /etc/profile.d/mqtt.sh" eine neue Textdatei:
Da trägst Du dann mit dem export Befehl die angegeben MQTT Variablen an:
export MQTT_SERVER=mqtt://<IPAdresse Deines Mosquitto Servers>
....usw.
mit set | more -solltest Du dann sehen, ob die Umgebungsvariablen gesetzt werden.Wenn die gesetzt sind - startest Du dann npm start. Das IP Adresse sollten ja die IP Adressen Deiner Klimanlage(n) sein und solltest Du ja mit NETWORK Variablen speichern.
npm install hat nicht funktioniert, daher hab ich da noch was dran gehangen:
thebermud@ewpebridge:~$ npm install ewpe-smart-mqtt
npm WARN saveError ENOENT: no such file or directory, open '/home/thebermud/package.json'
npm WARN enoent ENOENT: no such file or directory, open '/home/thebermud/package.json'
npm WARN thebermud No description
npm WARN thebermud No repository field.
npm WARN thebermud No README data
npm WARN thebermud No license field.

+ ewpe-smart-mqtt@1.0.4
added 103 packages from 76 contributors and audited 103 packages in 6.213s

1 package is looking for funding
  run `npm fund` for details

found 0 vulnerabilities
Das sollte doch so richtig sein oder was meinst du?
Ich werde mich jetzt an die Variablen setzen -
npm install hat nicht funktioniert, daher hab ich da noch was dran gehangen:
thebermud@ewpebridge:~$ npm install ewpe-smart-mqtt
npm WARN saveError ENOENT: no such file or directory, open '/home/thebermud/package.json'
npm WARN enoent ENOENT: no such file or directory, open '/home/thebermud/package.json'
npm WARN thebermud No description
npm WARN thebermud No repository field.
npm WARN thebermud No README data
npm WARN thebermud No license field.

+ ewpe-smart-mqtt@1.0.4
added 103 packages from 76 contributors and audited 103 packages in 6.213s

1 package is looking for funding
  run `npm fund` for details

found 0 vulnerabilities
Das sollte doch so richtig sein oder was meinst du?
Ich werde mich jetzt an die Variablen setzen@Dominik-F
Nein meines Erachtens musst Du nur den git clone Befehl erst ausführen und dann npm install ohne was - so wie es da drin steht.
Damit das Klonen funktioniert - habe ich gerade gesehen - musst Du git installieren.
Habe ich mit sudo apt install git gemacht.Jeder Flow bzw. jedes Script, das ich hier poste implementiert jeder auf eigene Gefahr. Flows und Scripts können Fehler aufweisen und weder der Seitenbetreiber noch ich persönlich können hierfür haftbar gemacht werden. Das gleiche gilt für Empfehlungen aller Art.
-
@Dominik-F
Nein meines Erachtens musst Du nur den git clone Befehl erst ausführen und dann npm install ohne was - so wie es da drin steht.
Damit das Klonen funktioniert - habe ich gerade gesehen - musst Du git installieren.
Habe ich mit sudo apt install git gemacht.@mickym sagte in Klarstein Klimaanlage einbinden:
sudo apt install git
Alles klar, ich lade dann mal den Snapshot und starte von vorne :)
-
@Dominik-F
Nein meines Erachtens musst Du nur den git clone Befehl erst ausführen und dann npm install ohne was - so wie es da drin steht.
Damit das Klonen funktioniert - habe ich gerade gesehen - musst Du git installieren.
Habe ich mit sudo apt install git gemacht.npm install gibt mir folgendes aus:
thebermud@ewpebridge:~$ npm install
npm WARN saveError ENOENT: no such file or directory, open '/home/thebermud/package.json'
npm notice created a lockfile as package-lock.json. You should commit this file.
npm WARN enoent ENOENT: no such file or directory, open '/home/thebermud/package.json'
npm WARN thebermud No description
npm WARN thebermud No repository field.
npm WARN thebermud No README data
npm WARN thebermud No license field.

up to date in 0.36s
found 0 vulnerabilities
Da scheint nix passiert zu sein.
-
npm install gibt mir folgendes aus:
thebermud@ewpebridge:~$ npm install
npm WARN saveError ENOENT: no such file or directory, open '/home/thebermud/package.json'
npm notice created a lockfile as package-lock.json. You should commit this file.
npm WARN enoent ENOENT: no such file or directory, open '/home/thebermud/package.json'
npm WARN thebermud No description
npm WARN thebermud No repository field.
npm WARN thebermud No README data
npm WARN thebermud No license field.

up to date in 0.36s
found 0 vulnerabilities
Da scheint nix passiert zu sein.
@Dominik-F Ich habe gesehen - dass man auf der virtuellen Maschine auch node installieren muss. Da das npm sonst auch nicht funktioniert.
Ja das liegt - das wohl das Ganze node Zeug auch noch installiert werden muss - bin gerade dabei das alles zu checken - auch wenn ich selbst nicht in diesen Dingen fit bin. Hast Du erst mal git installiert? - Ich vollziehe die Dinge nämlich ebenfalls auf einer VM nach .. um Dir bissi zu helfen
Jeder Flow bzw. jedes Script, das ich hier poste implementiert jeder auf eigene Gefahr. Flows und Scripts können Fehler aufweisen und weder der Seitenbetreiber noch ich persönlich können hierfür haftbar gemacht werden. Das gleiche gilt für Empfehlungen aller Art.
Hey! Du scheinst an dieser Unterhaltung interessiert zu sein, hast aber noch kein Konto.
Hast du es satt, bei jedem Besuch durch die gleichen Beiträge zu scrollen? Wenn du dich für ein Konto anmeldest, kommst du immer genau dorthin zurück, wo du zuvor warst, und kannst dich über neue Antworten benachrichtigen lassen (entweder per E-Mail oder Push-Benachrichtigung). Du kannst auch Lesezeichen speichern und Beiträge positiv bewerten, um anderen Community-Mitgliedern deine Wertschätzung zu zeigen.
Mit deinem Input könnte dieser Beitrag noch besser werden 💗
Registrieren Anmelden545
Online32.8k
Benutzer82.9k
Themen1.3m
Beiträge