

Wemos D1 Mini pro direkt in ioBroker einbinden
-
Hey Leute,
arbeite mich ganz frisch in Arduino ein und verstehe die zusammenhänge noch nicht ganz.
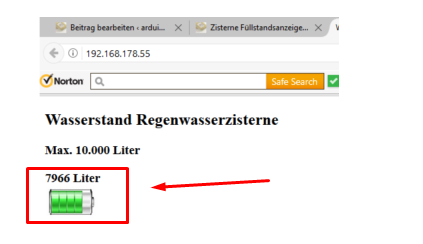
Nutze den Wemos D1 Mini mithilfe von einem Ultraschallsensor um den Füllstand der Zisterne zu erfragen.
Hier habe ich eine Anleitung dazu gefunden, und das funktioniert soweit auch.
https://arduino-projekte.info/zisterne-fuellstandsanzeige/Alles was ich nun möchte, ist diesen Wert welchen ich hier raus bekomme in ioBroker in den dafür vorgesehen Datenpunkt rein zu schreiben.
Wie mach ich das ?
habe wo gelesen, wenn ich espeasy drauf flashe dann macht die Ultraschall Messung probleme.
Deswegen wäre eine Lösung mit einer direkten Anbindung (vllt über mqtt?) am besten ? -
Hallo,
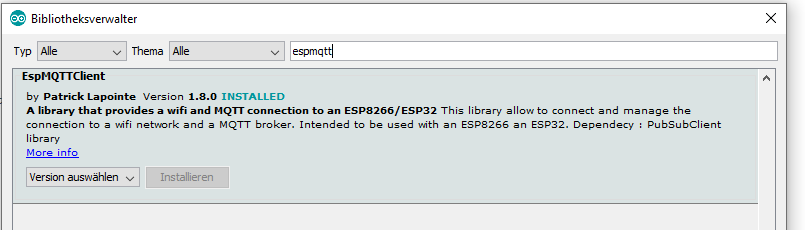
ich mach die MQTT anbindung immer mit dem EspMQTTClient.Gruß
Bernd -
Hallo,
ich mach die MQTT anbindung immer mit dem EspMQTTClient.Gruß
BerndEspMQTTClient ?

Sorry kannst du das detailierter erklären ? Ich steh irgendwie gerade auf dem Schlauch.
-
EspMQTTClient ?
Sorry kannst du das detailierter erklären ? Ich steh irgendwie gerade auf dem Schlauch.
@smartysmart das ist die Bibliothek für die Arduino IDE
-
@smartysmart das ist die Bibliothek für die Arduino IDE
@madnessracer ok, verstanden und installiert.
So wie verbind ich nun dem Wemos mit dem iobroker ?
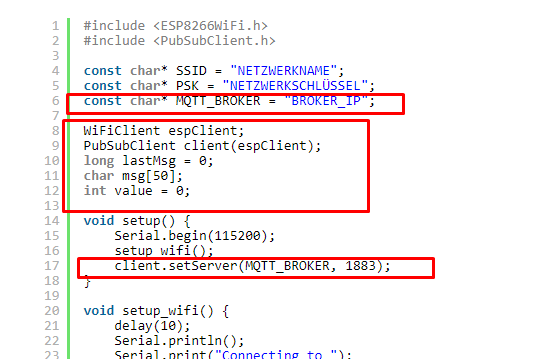
Habe diesen Code zu meinem hinzugefügt. Aber irgendwas fehlt mir glaub ich noch.
-
@madnessracer ok, verstanden und installiert.
So wie verbind ich nun dem Wemos mit dem iobroker ?
Habe diesen Code zu meinem hinzugefügt. Aber irgendwas fehlt mir glaub ich noch.
@smartysmart den PubSubclient kenne ich nicht.
Aber wenn du in der IDE unter Datei in die Beispiele schaust, gibt es bestimmt Beispiele für die lib. -
Habs hinbekommen

Hier der Beispielcode zum testen und weiter ausbauen falls es noch jemanden interessiert.
/*
 Basic ESP8266 MQTT example

 This sketch demonstrates the capabilities of the pubsub library in combination
 with the ESP8266 board/library.

 It connects to an MQTT server then:
  - publishes "hello world" to the topic "outTopic" every two seconds
  - subscribes to the topic "inTopic", printing out any messages
    it receives. NB - it assumes the received payloads are strings not binary
  - If the first character of the topic "inTopic" is an 1, switch ON the ESP Led,
    else switch it off

 It will reconnect to the server if the connection is lost using a blocking
 reconnect function. See the 'mqtt_reconnect_nonblocking' example for how to
 achieve the same result without blocking the main loop.

 To install the ESP8266 board, (using Arduino 1.6.4+):
  - Add the following 3rd party board manager under "File -> Preferences -> Additional Boards Manager URLs":
       http://arduino.esp8266.com/stable/package_esp8266com_index.json
  - Open the "Tools -> Board -> Board Manager" and click install for the ESP8266"
  - Select your ESP8266 in "Tools -> Board"

*/

#include <ESP8266WiFi.h>
#include <PubSubClient.h>

// Update these with values suitable for your network.

const char* ssid = "safedWLAN"; // HIER DEINEN WLAN SSID EINTRAGEN !!!!!
const char* password = "drastisch"; // HIER DEIN WLAN PASSWORT EINTRAGEN !!!!!
const char* mqtt_server = "192.168.178.56"; // HIER DEINE MQTT IP EINTRAGEN ... PORT WIRD WEITER UNTEN EINGETRAGEN!!!!!

WiFiClient espClient;
PubSubClient client(espClient);
long lastMsg = 0;
char msg[50];
int value = 0;

void setup_wifi() {

  delay(10);
  // We start by connecting to a WiFi network
  Serial.println();
  Serial.print("Connecting to ");
  Serial.println(ssid);

  WiFi.begin(ssid, password);

  while (WiFi.status() != WL_CONNECTED) {
    delay(500);
    Serial.print(".");
  }

  randomSeed(micros());

  Serial.println("");
  Serial.println("WiFi connected");
  Serial.println("IP address: ");
  Serial.println(WiFi.localIP());
}

void callback(char* topic, byte* payload, unsigned int length) {
  Serial.print("Message arrived [");
  Serial.print(topic);
  Serial.print("] ");
  for (int i = 0; i < length; i++) {
    Serial.print((char)payload[i]);
  }
  Serial.println();

  // Switch on the LED if an 1 was received as first character
  if ((char)payload[0] == '1') {
    digitalWrite(BUILTIN_LED, LOW);   // Turn the LED on (Note that LOW is the voltage level
    // but actually the LED is on; this is because
    // it is active low on the ESP-01)
  } else {
    digitalWrite(BUILTIN_LED, HIGH);  // Turn the LED off by making the voltage HIGH
  }

}

void reconnect() {
  // Loop until we're reconnected
  while (!client.connected()) {
    Serial.print("Attempting MQTT connection...");
    // Create a random client ID
    String clientId = "ESP8266Client-";
    clientId += String(random(0xffff), HEX);
    // Attempt to connect
    if (client.connect(clientId.c_str())) {
      Serial.println("connected");
      // Once connected, publish an announcement...
      client.publish("outTopic", "hello world");
      // ... and resubscribe
      client.subscribe("inTopic");
    } else {
      Serial.print("failed, rc=");
      Serial.print(client.state());
      Serial.println(" try again in 5 seconds");
      // Wait 5 seconds before retrying
      delay(5000);
    }
  }
}

void setup() {
  pinMode(BUILTIN_LED, OUTPUT);     // Initialize the BUILTIN_LED pin as an output
  Serial.begin(115200);
  setup_wifi();
  client.setServer(mqtt_server, 1885); // HIER DEINEN MQTT PORT EINTRAGEN !!!!!
  client.setCallback(callback);
}

void loop() {

  if (!client.connected()) {
    reconnect();
  }
  client.loop();

  long now = millis();
  if (now - lastMsg > 2000) {
    lastMsg = now;
    ++value;
    snprintf (msg, 50, "hello world #%ld", value);
    Serial.print("Publish message: ");
    Serial.println(msg);
    client.publish("outTopic", msg);
  }
}
Hey! Du scheinst an dieser Unterhaltung interessiert zu sein, hast aber noch kein Konto.
Hast du es satt, bei jedem Besuch durch die gleichen Beiträge zu scrollen? Wenn du dich für ein Konto anmeldest, kommst du immer genau dorthin zurück, wo du zuvor warst, und kannst dich über neue Antworten benachrichtigen lassen (entweder per E-Mail oder Push-Benachrichtigung). Du kannst auch Lesezeichen speichern und Beiträge positiv bewerten, um anderen Community-Mitgliedern deine Wertschätzung zu zeigen.
Mit deinem Input könnte dieser Beitrag noch besser werden 💗
Registrieren Anmelden591
Online32.8k
Benutzer82.9k
Themen1.3m
Beiträge