Navigation

    Logo
    • Register
    • Login
    • Search
    • Recent
    • Tags
    • Unread
    • Categories
    • Unreplied
    • Popular
    • GitHub
    • Docu
    • Hilfe
    1. Home
    2. Deutsch
    3. ioBroker Allgemein
    4. WLAN-Steckdose Gintenco (Sonoff): Problem beim flashen mit Tasmota

    NEWS

    • Neuer Blog: Fotos und Eindrücke aus Solingen

    • ioBroker@Smart Living Forum Solingen, 14.06. - Agenda added

    • ioBroker goes Matter ... Matter Adapter in Stable

    WLAN-Steckdose Gintenco (Sonoff): Problem beim flashen mit Tasmota

    This topic has been deleted. Only users with topic management privileges can see it.
    • SmarthomeMF
      SmarthomeMF last edited by

      Geht der flash vorgang durch oder bekommst du einen Error

      1 Reply Last reply Reply Quote 0
      • S
        s0nus last edited by

        Ich habe es mit allen möglichen schon versucht. Arduino, Atom/Platformio, espflasher, Nodemcu-Flasher und seit möglich unter Win10 und OSX. Es wird nie die Steckdose gefunden.

        1 Reply Last reply Reply Quote 0
        • S
          s0nus last edited by

          Kompilieren funktioniert noch (Atom), aber der Upload funzt nicht.

          z.B. kommt da folgende Fehlermeldung:

          Looking for upload port…

          Auto-detected: /dev/cu.SLAB_USBtoUART

          Uploading .pioenvs/sonoff/firmware.bin

          warning: espcomm_sync failed

          error: espcomm_open failed

          error: espcom_upload_mem failed

          *** (upload) Error 255

          1 Reply Last reply Reply Quote 0
          • K
            knopers1 last edited by

            warte

            Du startest FlashESP8266.exe

            ich lasse Dir gleich irgendwo meine Sammlung als zip

            edit:

            nimm die sonoff.bin- das ist die Tasmota Firmware.
            1526_unbenannt.png

            1 Reply Last reply Reply Quote 0
            • K
              knopers1 last edited by

              vorher kannst Du das blank Image 1>M flashen, es überschreibt dein flash mit nullen…

              1 Reply Last reply Reply Quote 0
              • S
                s0nus last edited by

                Das wird auch nix "Flash failed" kommt als Meldung.

                Das läuft in der Konsole durch:

                trying to connect

                flush start

                setting serial port timeouts to 1 ms

                setting serial port timeouts to 1000 ms

                flush complete

                espcomm_send_command: sending command header

                espcomm_send_command: sending command payload

                serialport_receive_C0: 8C instead of C0

                trying to connect

                flush start

                setting serial port timeouts to 1 ms

                flush start

                setting serial port timeouts to 1 ms

                setting serial port timeouts to 1000 ms

                flush complete

                espcomm_send_command: sending command header

                espcomm_send_command: sending command payload

                serialport_receive_C0: 72 instead of C0

                trying to connect

                flush start

                setting serial port timeouts to 1 ms

                setting serial port timeouts to 1000 ms

                flush complete

                espcomm_send_command: sending command header

                espcomm_send_command: sending command payload

                serialport_receive_C0: 8C instead of C0

                trying to connect

                flush start

                setting serial port timeouts to 1 ms

                1 Reply Last reply Reply Quote 0
                • K
                  knopers1 last edited by

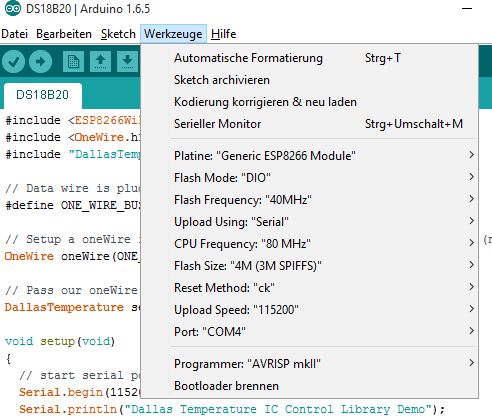
                  Kannst Du seriellen Monitor mit der Arduino Software öffnen?

                  Wenn die RX und TX Schnittstelle bei dem Sonoff Stecker i.O sind, müßte beim Booten etwas in der Konsole kommen. Die richtige Baudrahte muß eingestellt sein, sonnst kommen komische hieroglyphen. Unten recht stellt Du die Baudrahte ein.
                  1526_unbenannt.png

                  1 Reply Last reply Reply Quote 0
                  • K
                    knopers1 last edited by

                    Sonst hat jemand dort die Schnittstelle gekappt. Kannst Du ein Foto der Platine von der anderen Seite machen?

                    Man müßte evtl. direckt an den Pin am Flashbaustein heran gehen.

                    1 Reply Last reply Reply Quote 0
                    • S
                      s0nus last edited by

                      Es kommen nur kryptische Zeichen.

                      1 Reply Last reply Reply Quote 0
                      • K
                        knopers1 last edited by

                        dann ändere doch die Baudrahte auf eine andere bis du etwas normales lesen kannst. Hast Du 3.3V oder 5 V genommem? Hast Du versucht die RX und TX zu tauschen? Ist die Com-Schnittstelle richtig unter Windows installiert?

                        1 Reply Last reply Reply Quote 0
                        • S
                          s0nus last edited by

                          Baudraten teste ich jetzt. 3.3V habe ich eingestellt, da 5V ja die Steckdose grillt. RX und TX habe ich auch schon gedrht. Die COM wird sauber als COM3 erkannt.
                          4382_leiterplatte.jpg

                          1 Reply Last reply Reply Quote 0
                          • S
                            s0nus last edited by

                            Bei 74880 Baud kamwas sinnvolles raus.

                            rf cal sector: 251

                            rf[112⸮

                            ets Jan 8 2013, rst cause:2, boot mode:(3,6)

                            load 0x40100000, len 2408, room 16

                            tail 8

                            chksum 0xe5

                            load 0x3ffe8000, len 776, room 0

                            tail 8

                            chksum 0x84

                            load 0x3ffe8310, len 632, room 0

                            tail 8

                            chksum 0xd8

                            csum 0xd8

                            2nd boot version : 1.6

                            SPI Speed : 40MHz

                            SPI Mode : DOUT

                            SPI Flash Size & Map: 8MBit(512KB+512KB)

                            jump to run userl @ 1000

                            und das wiederholt sich laufend

                            1 Reply Last reply Reply Quote 0
                            • K
                              knopers1 last edited by

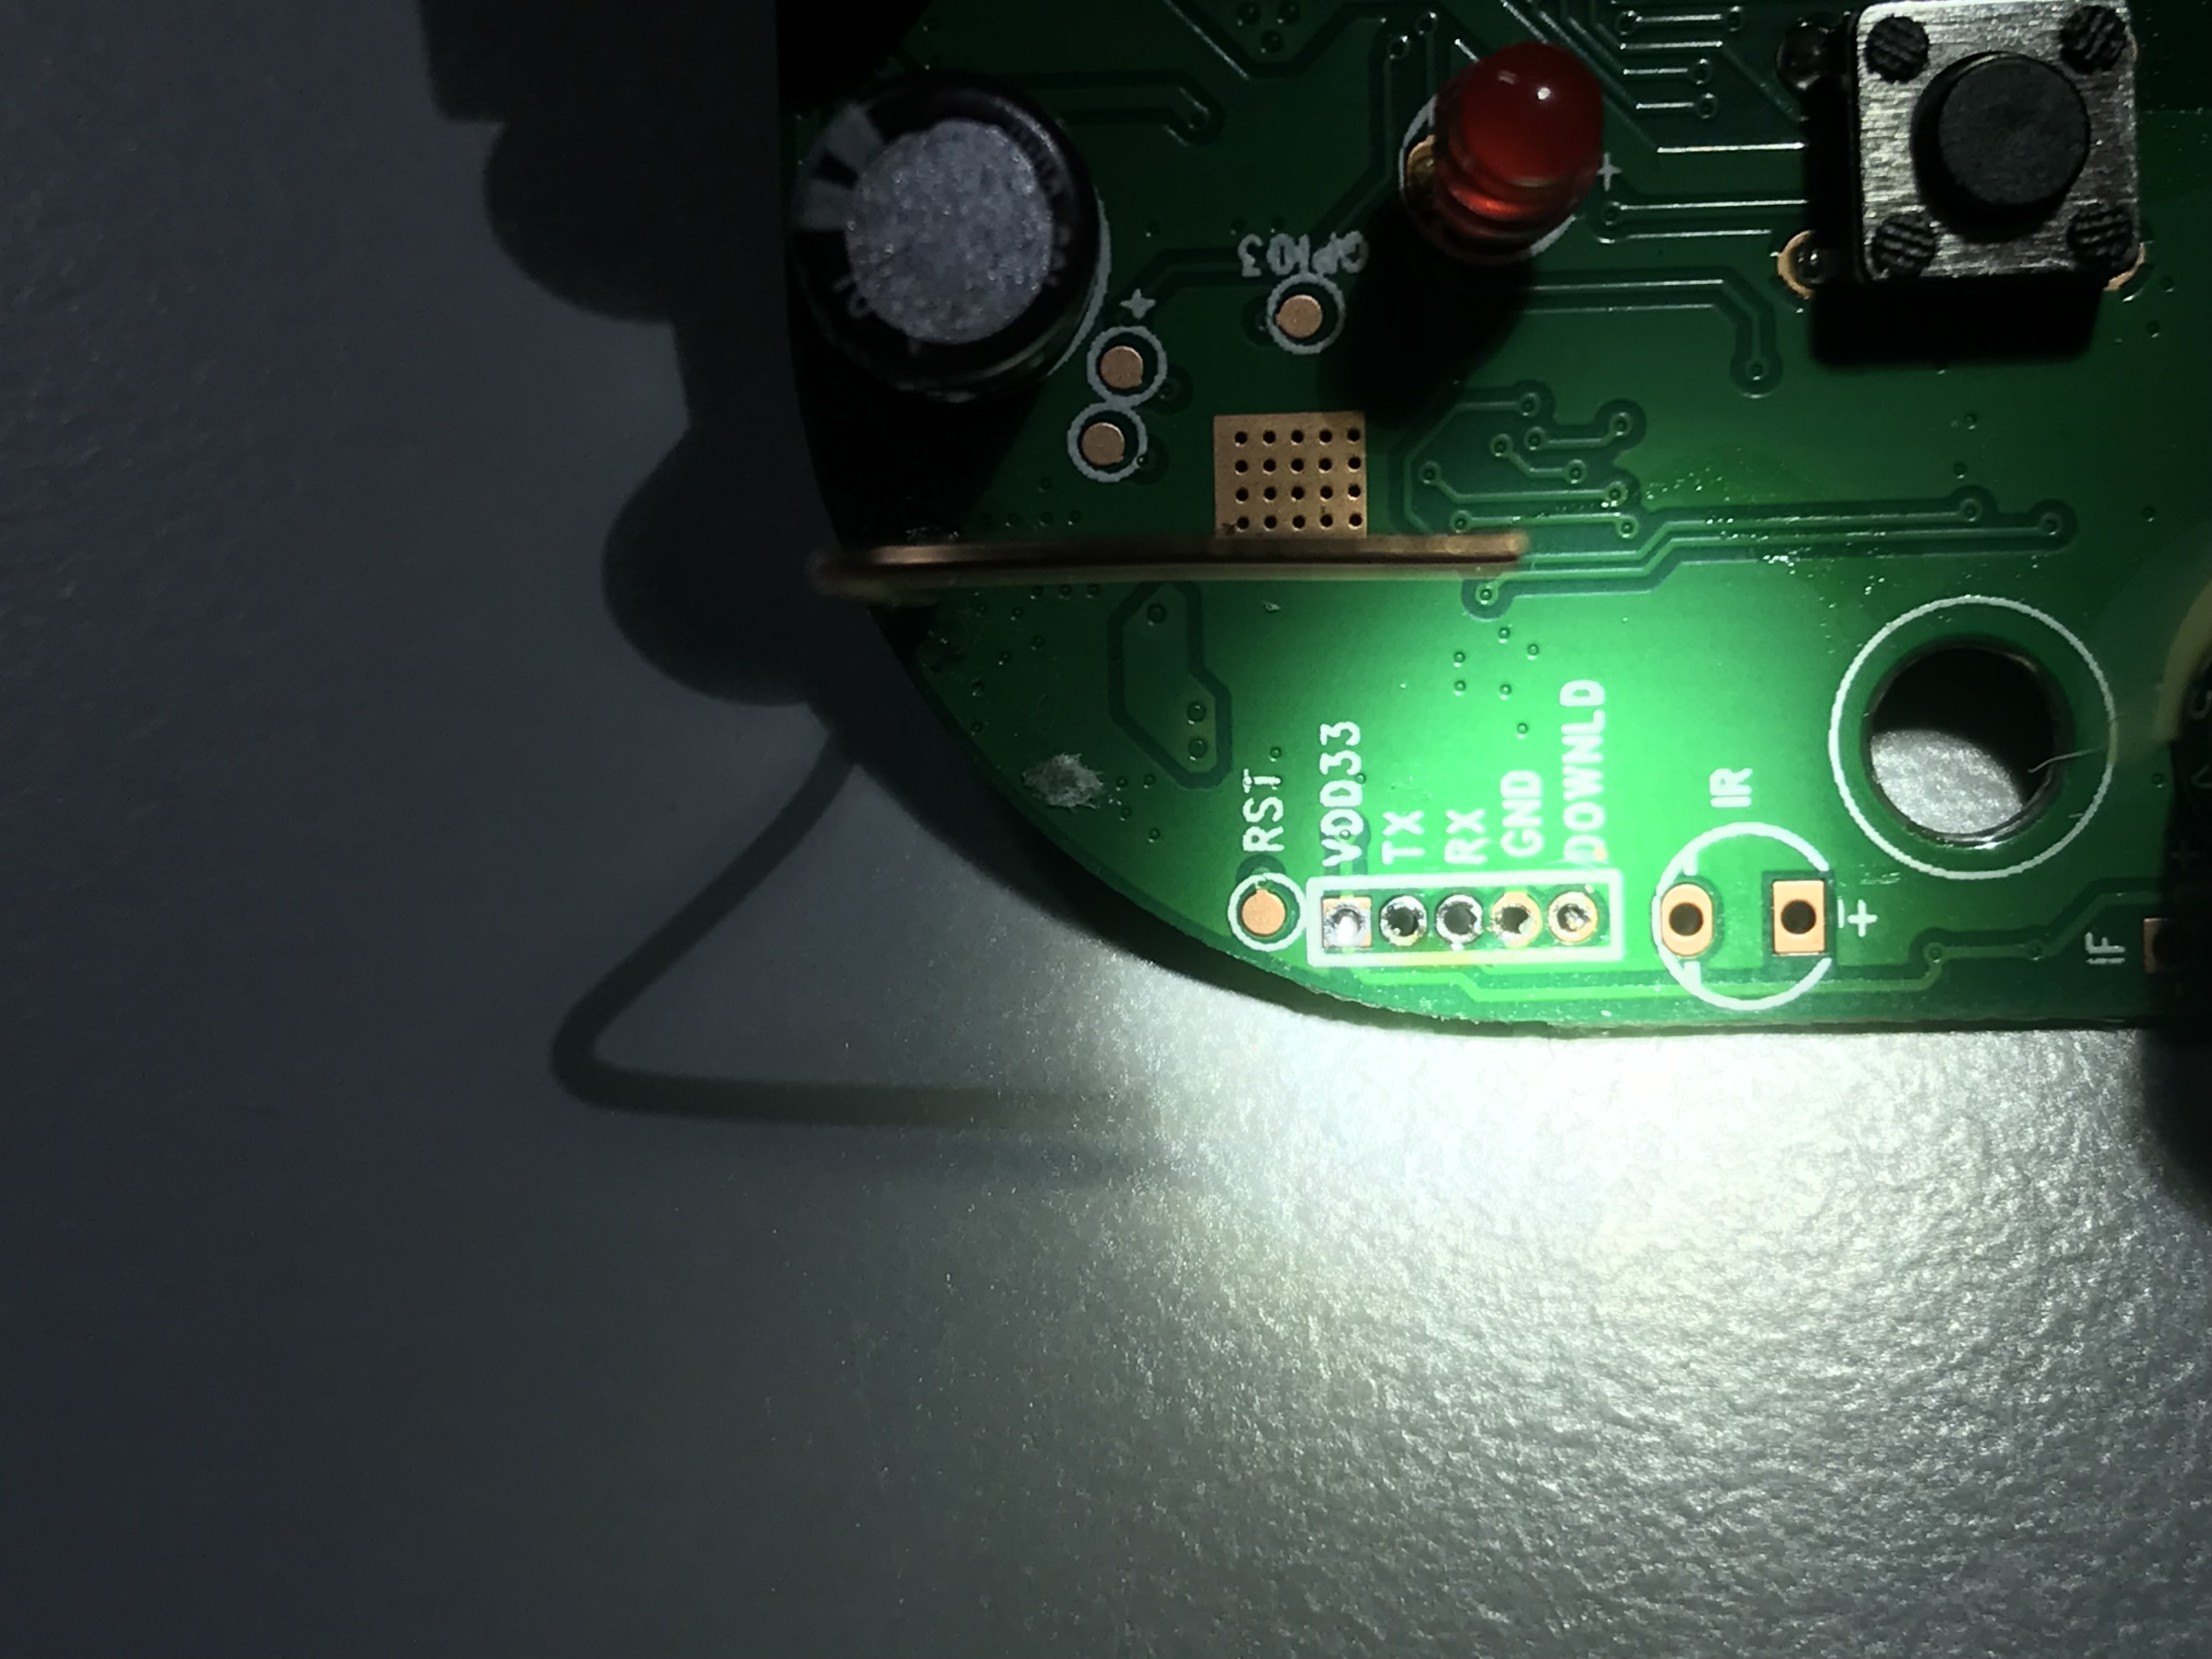
                              hej, das Foto ist nicht so gut… sehe ich da nur drei Lötpunkte?

                              Ein ESP8266 sitzt schon mal drauf, es sieht dem Sonoff s20 ähnlich...

                              Du solltest VDD33 als 3,3V nehmen, tx rx und GND. Wenn ich halbwegs die Lötpunkte deuten kann, sind sie falsch...

                              1 Reply Last reply Reply Quote 0
                              • S
                                s0nus last edited by

                                Ich habe da eine Buchsenleiste draufgelegter, die aber viel kleiner als die sonst verbaute ist. Die Pins haben einen Abstand von 1,27mm, deshalb ist es schwer erkennbar.
                                4382_b9fad1e7-fb81-41f9-b62e-96f5e9a19390.jpeg

                                1 Reply Last reply Reply Quote 0
                                • S
                                  s0nus last edited by

                                  Ich hoffe, daß man es hier etwas besser erkennt.
                                  4382_img_8500.jpg

                                  1 Reply Last reply Reply Quote 0
                                  • K
                                    knopers1 last edited by

                                    Kannst Du etwas auf dem Flash lesen? Es gibt noch andere als 8266 die mit anderer Firmware geflaht werden müssen. Außerdem gibt es noch einen Pin, und zwar der fünfte mit der Bezeichnung "download".

                                    Du könntest den Pin auf den GND legen, stecker herein in das Laptop, und flashen beim gebrücktem Pin mit GND.

                                    Hier nachzulesen: http://remotexy.com/en/help/esp8266-firmware-update/

                                    Mit etwas Glück geht es… Für Irgenetwas hat man den Pin dahin getan. Versuch ist es Wert...
                                    1526_help-esp8266-firmware-update-usbuart.png

                                    1 Reply Last reply Reply Quote 0
                                    • S
                                      s0nus last edited by

                                      Auf dem Chip steht ESP8266EX. Ich habe "Download" mal gegen Masse geschaltet. Jetzt hatte ich mal kurzzeitig dauerhaftes schnelles blinken und mit ATOM hat er begonnen was zu downloaden. Der 1. Balken lief bis 16% und der 2. bis 33%. Anschließend kam wieder eine Fehlermeldung und das wars.

                                      1 Reply Last reply Reply Quote 0
                                      • K
                                        knopers1 last edited by

                                        geht der Flasher nicht was ich Dir gegeben habe? Atom und ähnliche brauchen schon eine genaue Einstellung im Setup. Und dort ist viel, was man probieren könnte. Nimm doch den letzten Flashprogramm was ich Dir verlinkt habe, damit flashe ich alle Sonoffs. Das geht immer, vorausgesetzt, dass die Teile o.k sind…
                                        1526_arduinosetup.jpg

                                        1 Reply Last reply Reply Quote 0
                                        • S
                                          s0nus last edited by

                                          Es kommt dann "Chip sync error". Ich gebe es bald auf.

                                          1 Reply Last reply Reply Quote 0
                                          • K
                                            knopers1 last edited by

                                            hmm, dann muß ich auch fast schon den Handtuch werfen…

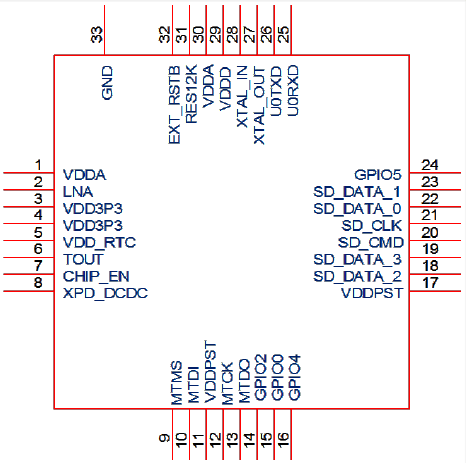
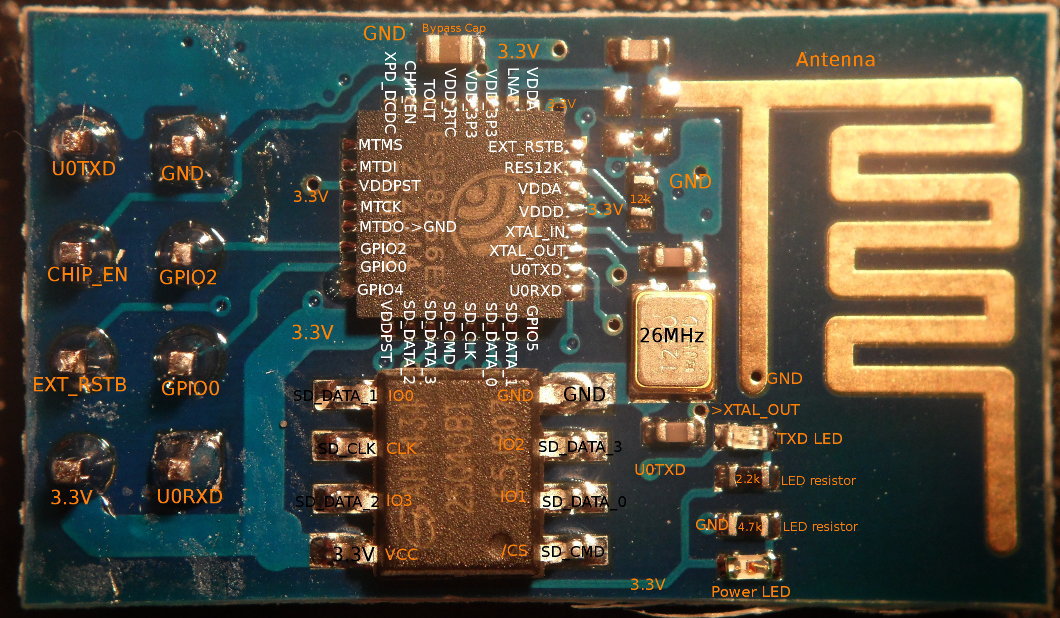
                                            Du könntest noch direkt den Flash anzapfen.

                                            Dazu brauchst Du 2xWiderstand 2K2 Ohm

                                            Unter VDDPS kommen 3,3V, GND ist klar...

                                            U0TXD & U0RXD ist deine Datenleitung.

                                            Reset Schalter zwischen GND und EXT_ASTB legen, den Pullup Wiederstand nicht vergessen.

                                            An dem PIN CHIP_EN kommt ebenfalls ein Pullup Wiederstand.

                                            Zum Flashen muß Du die Progtaste gedrückt halten und Reset Taste drücken. Und das ganze los lassen. Danach sollte das Teil im Programiermodus sein und das flashen automatisch funktionieren.
                                            1526_esp8266ex-pinout.png
                                            1526_esp8266_flash_prog_board_sch.png
                                            1526_esp8266-esp01-boardpicture.jpg

                                            1 Reply Last reply Reply Quote 0
                                            • First post
                                              Last post

                                            Support us

                                            ioBroker
                                            Community Adapters
                                            Donate
                                            FAQ Cloud / IOT
                                            HowTo: Node.js-Update
                                            HowTo: Backup/Restore
                                            Downloads
                                            BLOG

                                            857
                                            Online

                                            31.9k
                                            Users

                                            80.1k
                                            Topics

                                            1.3m
                                            Posts

                                            7
                                            46
                                            7017
                                            Loading More Posts
                                            • Oldest to Newest
                                            • Newest to Oldest
                                            • Most Votes
                                            Reply
                                            • Reply as topic
                                            Log in to reply
                                            Community
                                            Impressum | Datenschutz-Bestimmungen | Nutzungsbedingungen
                                            The ioBroker Community 2014-2023
                                            logo