

Tuya / Jinvoo unterputz Wandschalter
-
It took some time but gladly everything turned out to work properly at the end.
Many thanks to danielis + nordsat!
Here is my description for Tasmota 5.12.0
0 - Deconstruction
0.1 Detach the glass
0.2 Detach the board
The connections are on the back side.
1 - Wiring
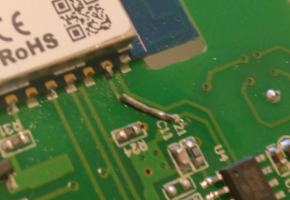
1.1 Welding:
TX; RX; GPIO0; GND; 3,3V; RST

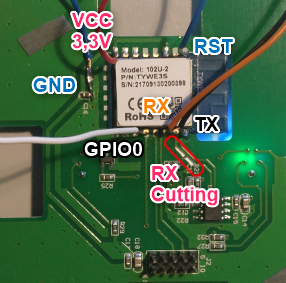
Full Tuya TYWE3S documentation:
https://docs.tuya.com/en/hardware/WiFi- … odule.html
1.2 Cutting RX on Board - most important hint!
2 - Connecting
2.1 Works with simple USB FTDI adapter, no separate power-supply needed.
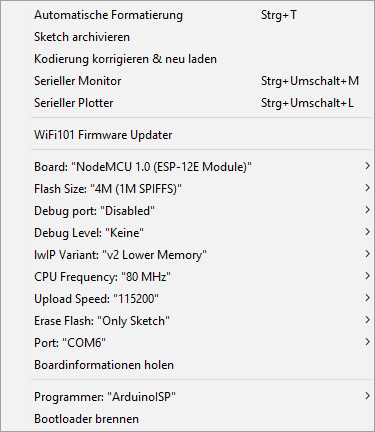
2.2 Use Arduino Software with the following settings
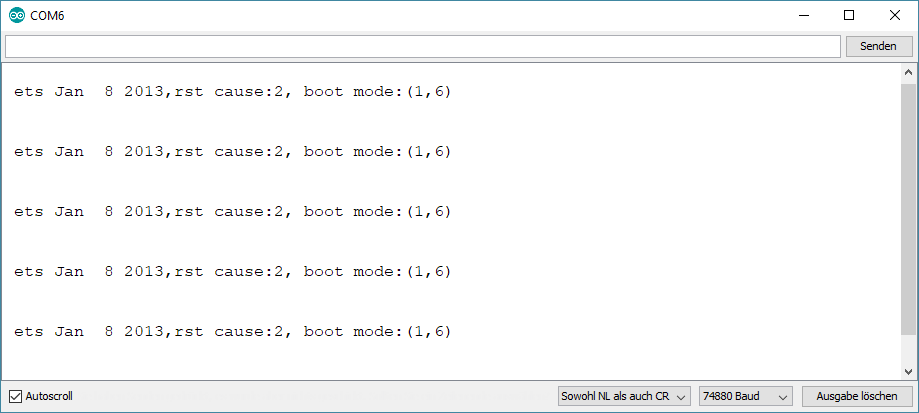
2.3 Open Serial Monitor at 74880 Baud
2.4 To get into boot mode, touch RST and GPIO0 to GND for 2-3 seconds, release RST and keep GPIO0 for 2-3 more seconds.
2.5 Serial Monitor echoes “boot mode *”
3 - Program definitions including LED status modification
3.1 Sonoff.ino
…
if ((payload >= 0) && (payload < MAX_LED_OPTION)) {
Settings.ledstate = payload;
if (!Settings.ledstate &0x07) {
...
/-------------------------------------------------------------------------------------------\
- Every 0.2 second
*-------------------------------------------------------------------------------------------*/
...
if (!(state % ((STATES/10)*2))) {
if (Settings.ledstate &16) {
SetLedPower(MqttClient.connected());
}else if (blinks ...
3.2 Sonoff_template.h
3.2.1
...
// Supported hardware modules
enum SupportedModules {
SONOFF_BASIC,
...
SONOFF_S31,
Tuya_T1,
Tuya_T2,
Tuya_T3,
MAXMODULE };
...
3.2.2
...
const uint8_t kNiceList[MAXMODULE] PROGMEM = {
SONOFF_BASIC,
…
Tuya_T1,
Tuya_T2,
Tuya_T3
};
...
3.2.3
...
// Default module settings
...
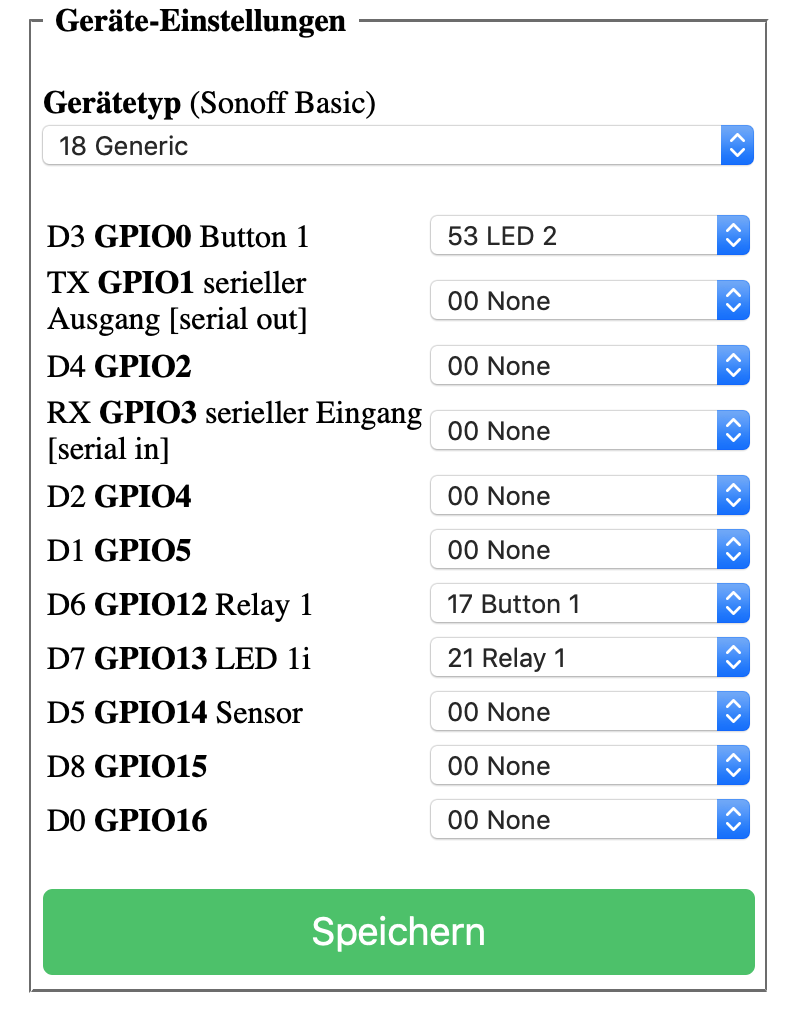
{ "Tuya T1", // Tuya Wallswitch 3 switches (ESP8266)
GPIO_LED1, // GPIO00
0, 0,
GPIO_KEY2, // GPIO03
0, // GPIO04
0, // GPIO05
0, 0, 0, 0, 0, 0,
GPIO_KEY1, // GPIO12
GPIO_REL1, // GPIO13
0,
0, // GPIO15
0, 0
},
{ "Tuya T2", // Tuya Wallswitch 2 switches (ESP8266)
GPIO_LED1, // GPIO00
0, 0,
GPIO_KEY2, // GPIO03
GPIO_REL2, // GPIO04
0, // GPIO05
0, 0, 0, 0, 0, 0,
GPIO_KEY1, // GPIO12
GPIO_REL1, // GPIO13
0,
0, // GPIO15
0, 0
},
{ "Tuya T3", // Tuya Wallswitch 3 switches (ESP8266)
GPIO_LED1, // GPIO00
0, 0,
GPIO_KEY2, // GPIO03
GPIO_REL2, // GPIO04
GPIO_KEY3, // GPIO05
0, 0, 0, 0, 0, 0,
GPIO_KEY1, // GPIO12
GPIO_REL1, // GPIO13
0,
GPIO_REL3, // GPIO15
0, 0
}
};
3.2.4 Sonoff.h
Adding enum states usable with the blue LED.
...
enum LedStateOptions {LED_OFF, LED_POWER, LED_MQTTSUB, LED_POWER_MQTTSUB, LED_MQTTPUB, LED_POWER_MQTTPUB, LED_MQTT, LED_POWER_MQTT, LEDPOWER, free9, free10, free11, free12, free13, free14, free15, LED_MQTT_CONNECTED, MAX_LED_OPTION};
...
3.3 user_config.h (suggestion)
Defining Wifi settings at: (so you don’t have to edit every new Tuya)
// -- Wifi
...
Defining MQTT settings at: (only if you are already running ioBroker MQTT adapter)
// -- MQTT
...
#define MQTT_HOST "x.x.x.x" // [MqttHost]
#define MQTT_PORT 1883 // [MqttPort] MQTT port (10123 on CloudMQTT)
#define MQTT_USER "UserName" // [MqttUser] Optional user
#define MQTT_PASS "Passwd" // [MqttPassword] Optional password
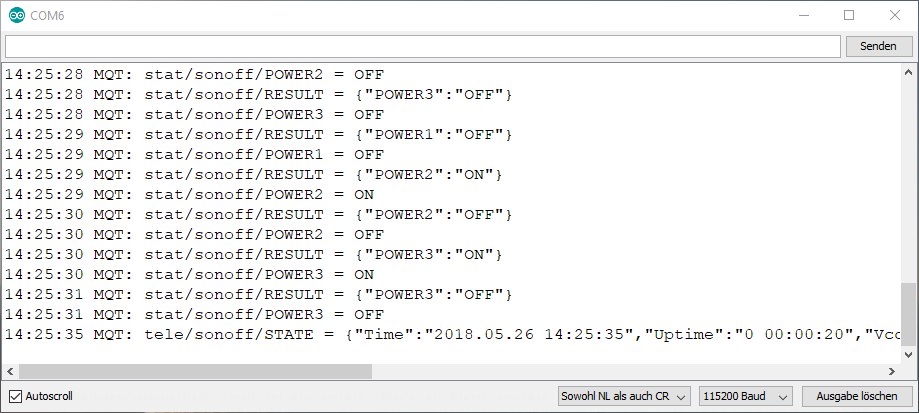
4 - Flashing
Like you are used to do with Sonoff.
Afterwards you can use the Serial Monitor at 115200 Baud.
5 - Router settings
Define the Wifi IP address for the new Tuya switch in your router.
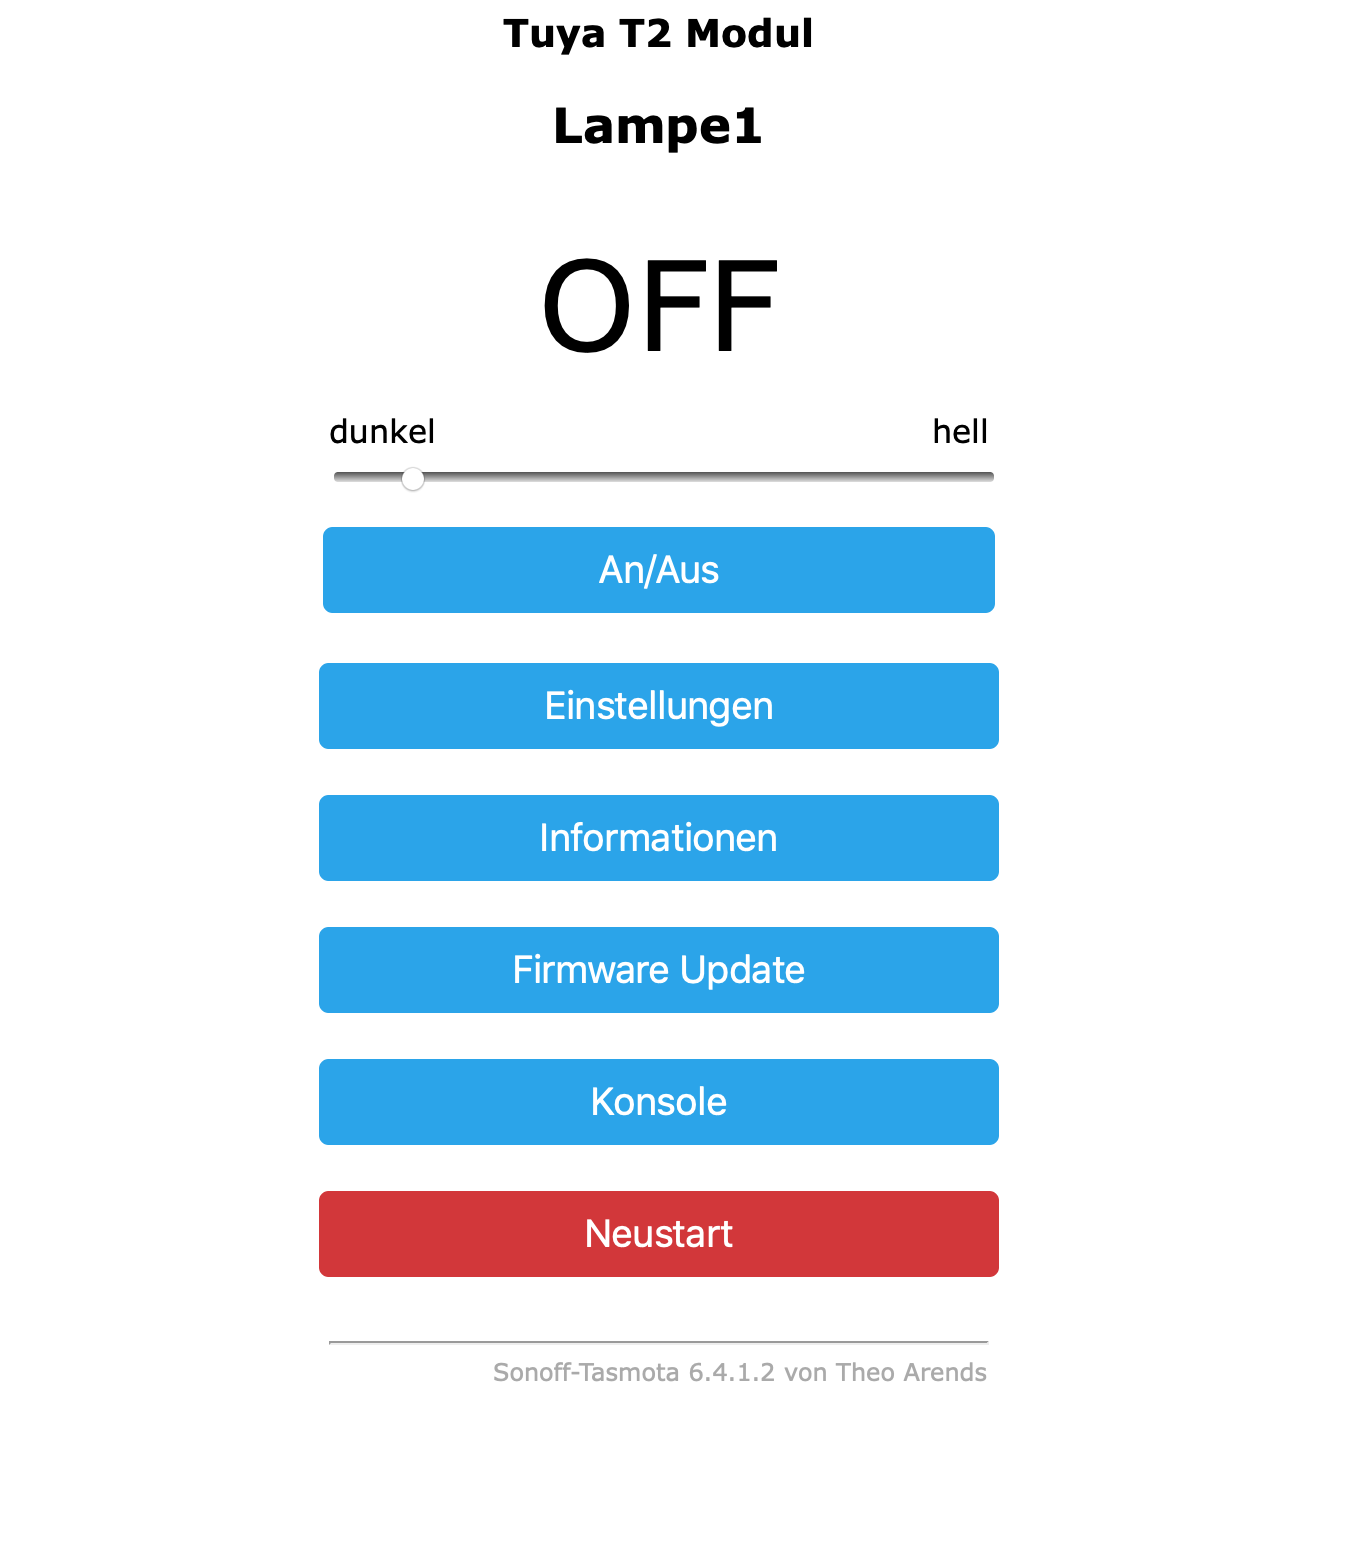
6 - Sonoff UI
Open the defined IP address >> Configuration >> Configure Module >> "Tuya T1/2/3"
7 - Using T2 as shutter actor
https://smarthome.schimmer-media.de/for … /&pageNo=2
7.1 Define Hue Bridge
Sonoff UI >> Configuration >> Configure Other >> select Hue Bridge
7.2 Lock simultaneous action for up and down and define runtime
Sonoff UI >> Console >>
SaveData on
PulseTime1 126
PulseTime2 127
setoption14 1
ledstate 0
SaveData off
#1 write mode on
#2 up = 26s
#3 down = 27s
#4 lock: up vs. down
#5 set blue LED to MQTT state
#6 write mode off
PulseTimes:
up to 11s => "110"
from 12s =>"112"
3s = "30"
13s = "113"
You can select the blue LED behaviour from 3.2.4 using the console
ledstate // feedbacks the current state
ledstate 16 // led is always turned on if MQTT is connected
ledstate 8 // led is always on
ledstate 0 // led is always off
8 - Rebuild
Check everything until you are 100% sure it works fine.
Unweld the wiring.
Re-establish the RX line on the board to use all white LEDs once again. (have fun!)
Reconstruct the switch.
Congratulations!
PS using many switches I can recommend to create a standard and safe the configuration to load it into the next ones afterwards.
-
Hey, nur mal so als Anregung,
Alles was ihr in der Tuya cloud habt könnt ihr über den Alexa2.0 Adapter auch über iObroker steuern.
Habe mir letztens nen 4er Set Steckdosenadapter gekauft. Funktioniert super.
Also die Geräte in der Smart life app einbinden, dann den Alexa Smart life Skill verbinden und die Geräte erscheinen sofort in der Alexa app und dann auch im IoBroker in dem Alexa2.0 Adapter und können ausgelesen und gesteuert werden.
-
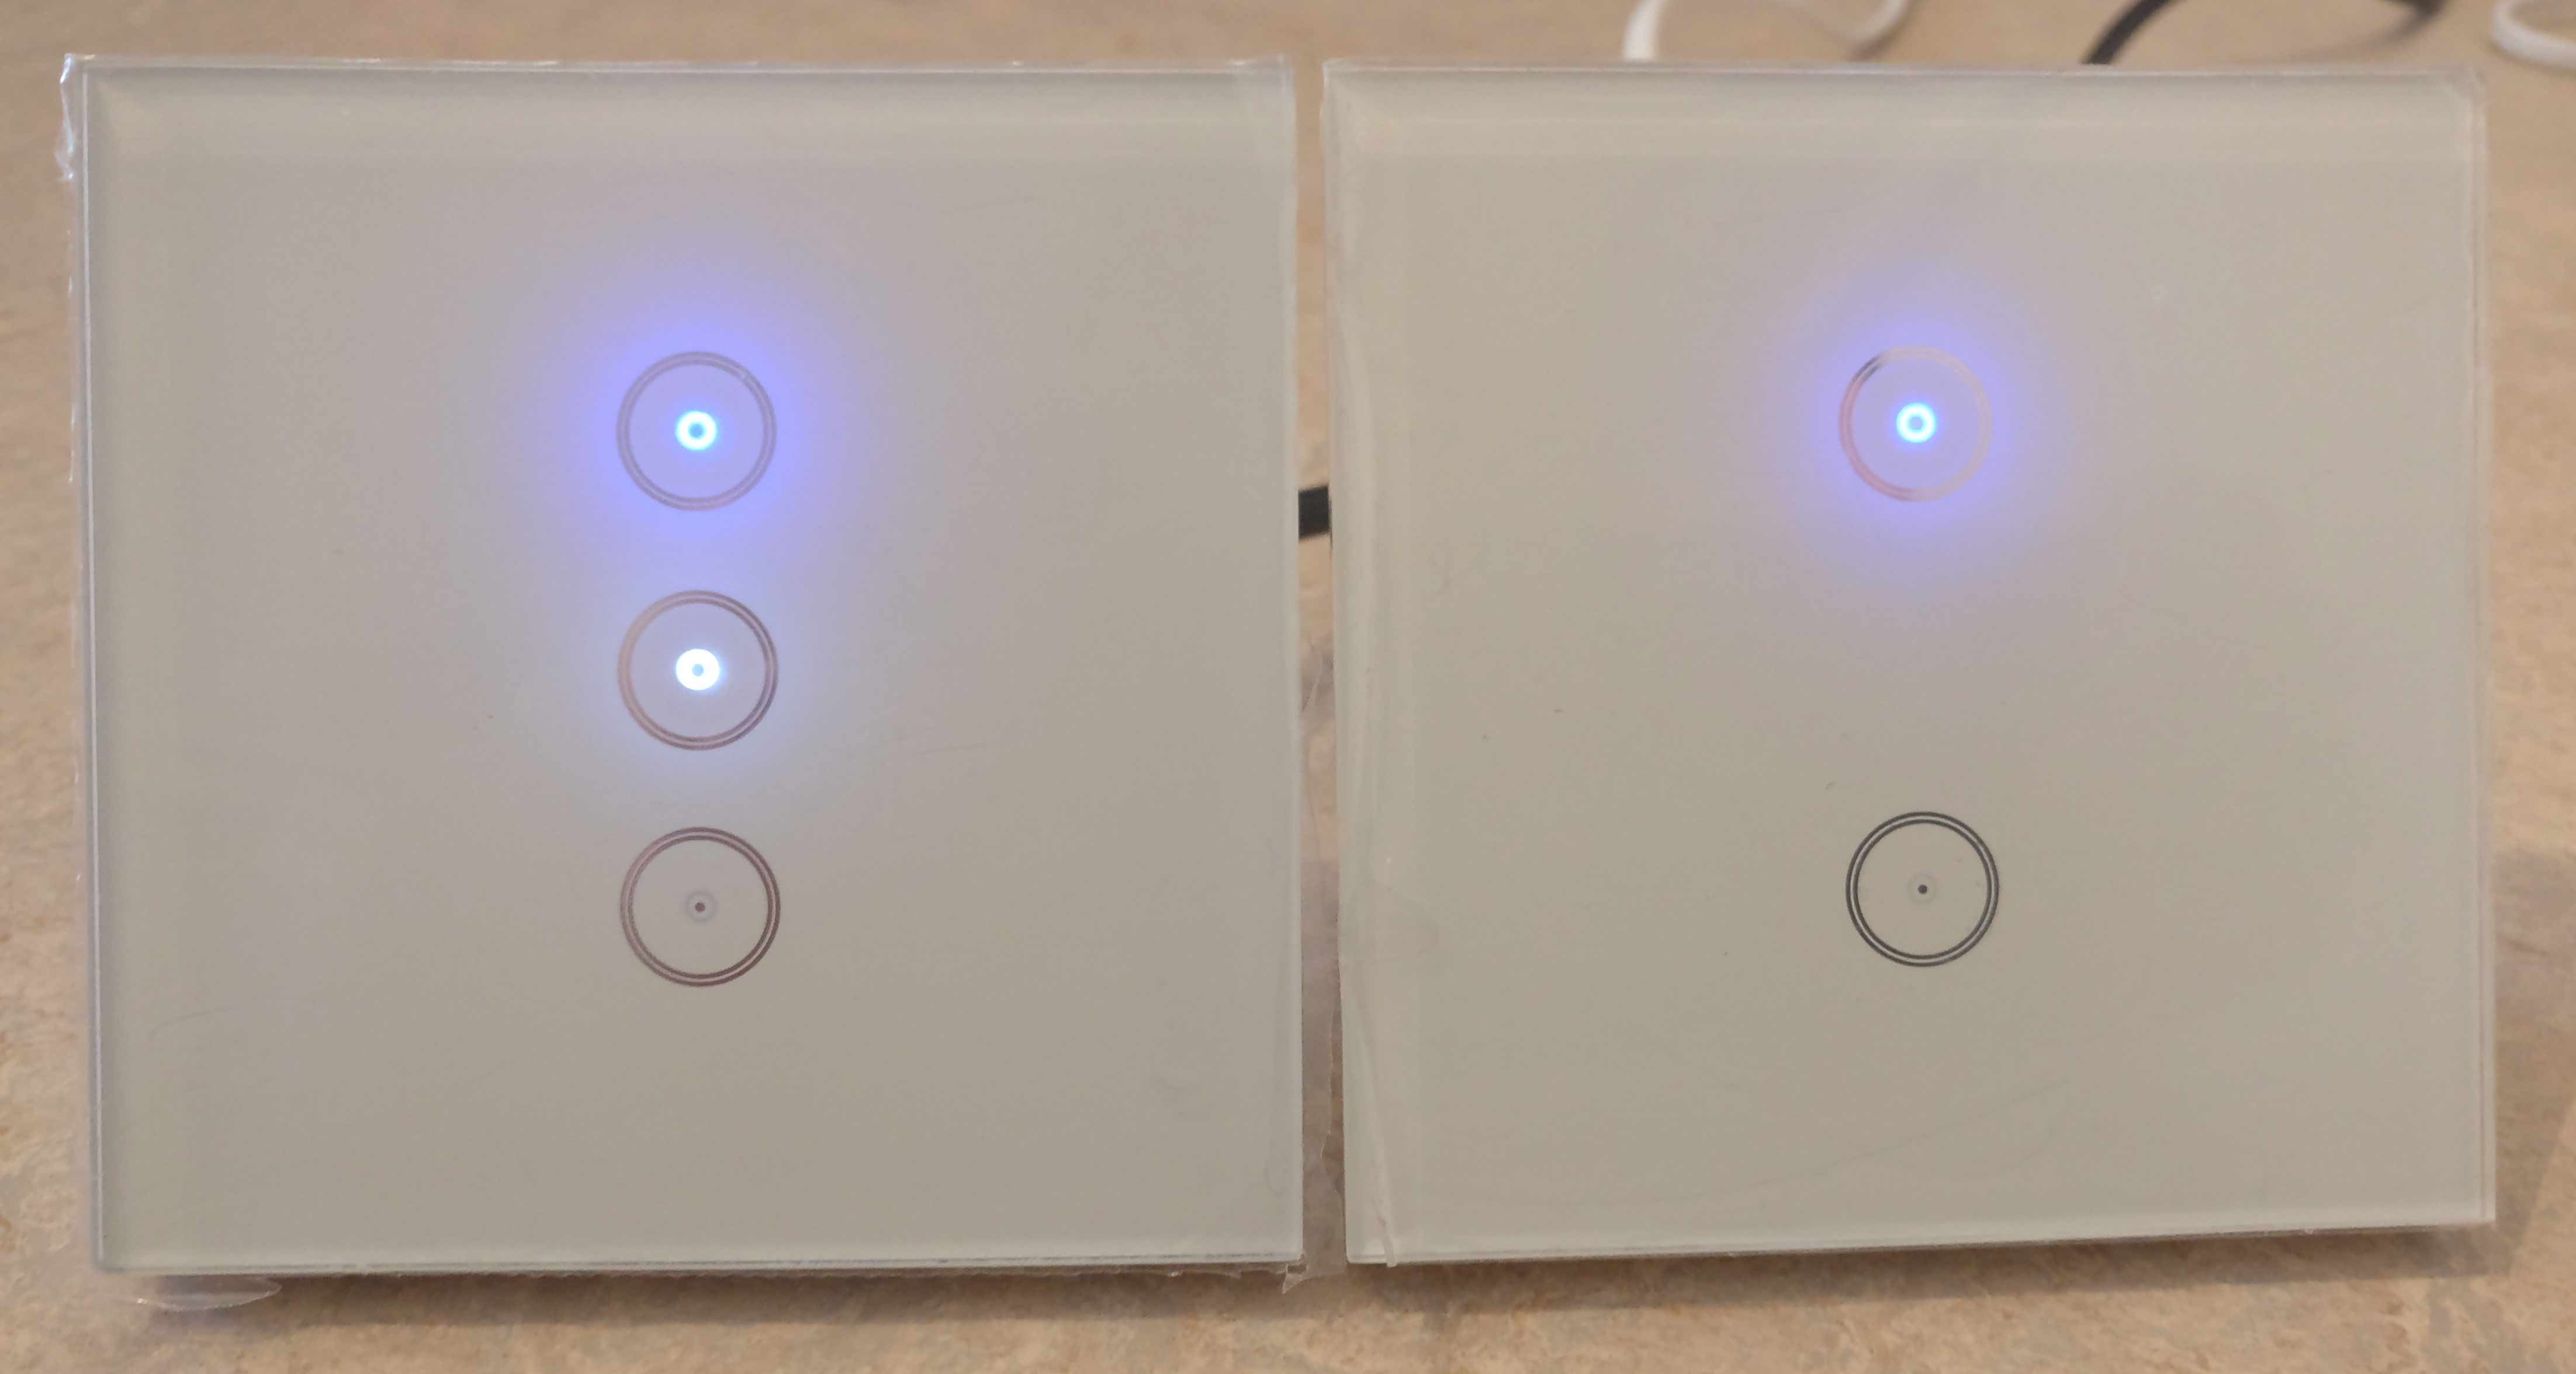
Hier noch ein kurzer Nachtrag, das sind die Einstellungen die bei meinem 1-Gang geflashten Jinvoo Lichtschalter funktionieren.
Ich musste für das flashen die RX Leitung nicht trennen.
English:
Those are my settings within the tasmota gui for my 1-gang jinvoo touch.
I did not have to cut the RX Line to flash my device.
8210_y.png -
-
Also bei mir funktioniert der flash nicht. Ich habe alles brav gemacht wie in der Anleitung, sogar RX getrennt. Ich komme in den "boot mode", aber der Upload will nicht funktionieren:
warning: espcomm_sync failed
error: espcomm_open failed
error: espcomm_upload_mem failed
*** [upload] Error 2
[ERROR] Took 29.29 seconds
im Serial Monitor sehe ich im Klartext alles bei 74880 Baud.
Wie kann ich den (2er) Schalter doch noch bewegen, den flash zu akzeptieren ;-) Wenn jemand ne Idee hat wäre ich dankbar. :?:
-
Hallo Zusammen! :)
Also zunächst mal muss ich sagen, dass das hier ein sehr cooles Forum ist für diese ganze Smarthome Geschichte 8-)
Ich bin absoluter Newbee was das ganze Flashen & Co angeht, aber schon kommt bei mir die erste Frage auf:
Ich nutze auch Zwei von diesen oben beschriebenen Tastern für meine Jalousiesteuerung mit der SmartLife App.
Klappt auch alles super. Jetzt bin ich seit dem WE mit dem Shelly1 und 2 am testen und auch sehr angetan von diesen kleine Teilen.
Auch Die Software finde ich sehr gelungen. Jetzt wäre natürlich meine frage, ob es möglich ist die Jinvoo Schalter auch mit der Shelly App
(Ich glaube die nutzt diese Tuya Software) zu betreiben? Fragen über Fragen… ;-) Ich habe leider noch keine Erfahrung in Sachen flashen + iobroker und was man sonst noch dazu alles braucht ;-) Vorerst würde mir auch reichen, wenn ich wüsste ob das mit diesem Schalter funzen würde und wie ich das bewerkstelligen müsste :-)
Vielen Dank für Eure Hilfe :D
-
Also bei mir funktioniert der flash nicht. Ich habe alles brav gemacht wie in der Anleitung, sogar RX getrennt. Ich komme in den "boot mode", aber der Upload will nicht funktionieren:
warning: espcomm_sync failed
error: espcomm_open failed
error: espcomm_upload_mem failed
*** [upload] Error 2
[ERROR] Took 29.29 seconds
im Serial Monitor sehe ich im Klartext alles bei 74880 Baud.
Wie kann ich den (2er) Schalter doch noch bewegen, den flash zu akzeptieren ;-) Wenn jemand ne Idee hat wäre ich dankbar. :?:
@eppelmann
Hallo Eppelmann,
hat das bei Dir endlich funktioniert?
Bei mir geht es auch nicht und weiß ich leider nicht was ich tun soll.
Danke!
Peter

Hey! Du scheinst an dieser Unterhaltung interessiert zu sein, hast aber noch kein Konto.
Hast du es satt, bei jedem Besuch durch die gleichen Beiträge zu scrollen? Wenn du dich für ein Konto anmeldest, kommst du immer genau dorthin zurück, wo du zuvor warst, und kannst dich über neue Antworten benachrichtigen lassen (entweder per E-Mail oder Push-Benachrichtigung). Du kannst auch Lesezeichen speichern und Beiträge positiv bewerten, um anderen Community-Mitgliedern deine Wertschätzung zu zeigen.
Mit deinem Input könnte dieser Beitrag noch besser werden 💗
Registrieren AnmeldenSupport us
441
Online33.0k
Benutzer83.5k
Themen1.3m
Beiträge