

ioBroker Raspberry Pi 4 und SSD
-
@AxelF1977 sagte:
Ich sehe nirgends die PARTUUID der SSD?
Also ist es die PARTUUID, die vorher schon drin stand. Somit wurde wieder von SD Card gebootet.
@AxelF1977 sagte in ioBroker Raspberry Pi 4 und SSD:
sudo blkid ergibt:
Hat die SSD keine Partitionen ? Du musst erst eine Partition erstellen ! (Schritte 4 - 8 ) und die Partition anschließend formatieren (Schritt 9).
@paul53 said in ioBroker Raspberry Pi 4 und SSD:
@AxelF1977 sagte:
Ich sehe nirgends die PARTUUID der SSD?
Also ist es die PARTUUID, die vorher schon drin stand. Somit wurde wieder von SD Card gebootet.
@AxelF1977 sagte in ioBroker Raspberry Pi 4 und SSD:
sudo blkid ergibt:
Hat die SSD keine Partitionen ? Du musst erst eine Partition erstellen ! (Schritte 4 - 8 ) und die Partition anschließend formatieren (Schritt 9).
Ich glaube, ich hatte in dem Prozess keine Partition angelegt, danke für den Hinweis. Ich habe den Wald vor lauter Bäumen nicht gesehen. Ich berichte ob es das gelöst hat.
-
Ich kappier es nicht. ich habe jeden Schritt einzeln befolgt. Eine Partition ist da auf der SSD
Disk /dev/sda: 119,2 GiB, 128035676160 bytes, 250069680 sectors
Disk model: Portable SSD
Units: sectors of 1 * 512 = 512 bytes
Sector size (logical/physical): 512 bytes / 4096 bytes
I/O size (minimum/optimal): 4096 bytes / 4096 bytes
Disklabel type: dos
Disk identifier: 0xd32ff59b

Device     Boot Start       End   Sectors   Size Id Type
/dev/sda1        2048 250069679 250067632 119,2G 83 Linux
der neue Ordner erstellt und gemountet (Ordner hat anderen Namen). Und trotzdem nutzt er wieder die PARTUUID der SD Karte.
sudo blkid
/dev/mmcblk0p1: LABEL_FATBOOT="boot" LABEL="boot" UUID="F661-303B" TYPE="vfat" PARTUUID="52e4cf4c-01"
/dev/mmcblk0p2: LABEL="rootfs" UUID="8d008fde-f12a-47f7-8519-197ea707d3d4" TYPE="ext4" PARTUUID="52e4cf4c-02"
/dev/sda1: UUID="1ddb967e-9538-47ef-ada3-1b94069c74ea" TYPE="ext4" PARTUUID="d32ff59b-01"
/dev/mmcblk0: PTUUID="52e4cf4c" PTTYPE="dos"
cat /boot/cmdline.txt dwc_otg.lpm_enable=0 console=serial0,115200 console=tty1 root=PARTUUID=52e4cf4c-02 rootfstype=ext4 elevator=deadline fsck.repair=yes rootwaitObwohl darin steht
root=/dev/sda1 rootfstype=ext4 rootwaitAuch das ansprechen direkt der PARTUUID ändert das nicht
root=PARTUUID=d32ff59b-01 rootfstype=ext4 rootwaitASROCK Deskmini Intel I3 8100 16GB mit Proxmox VM ioBroker VM DIYHue| CCU piVCCU + FHEM auf Raspberry | Maria DB mit Grafana und Prometheus auf Tinker Board
-
Ich kappier es nicht. ich habe jeden Schritt einzeln befolgt. Eine Partition ist da auf der SSD
Disk /dev/sda: 119,2 GiB, 128035676160 bytes, 250069680 sectors Disk model: Portable SSD Units: sectors of 1 * 512 = 512 bytes Sector size (logical/physical): 512 bytes / 4096 bytes I/O size (minimum/optimal): 4096 bytes / 4096 bytes Disklabel type: dos Disk identifier: 0xd32ff59b Device Boot Start End Sectors Size Id Type /dev/sda1 2048 250069679 250067632 119,2G 83 Linuxder neue Ordner erstellt und gemountet (Ordner hat anderen Namen). Und trotzdem nutzt er wieder die PARTUUID der SD Karte.
sudo blkid /dev/mmcblk0p1: LABEL_FATBOOT="boot" LABEL="boot" UUID="F661-303B" TYPE="vfat" PARTUUID="52e4cf4c-01" /dev/mmcblk0p2: LABEL="rootfs" UUID="8d008fde-f12a-47f7-8519-197ea707d3d4" TYPE="ext4" PARTUUID="52e4cf4c-02" /dev/sda1: UUID="1ddb967e-9538-47ef-ada3-1b94069c74ea" TYPE="ext4" PARTUUID="d32ff59b-01" /dev/mmcblk0: PTUUID="52e4cf4c" PTTYPE="dos"cat /boot/cmdline.txt dwc_otg.lpm_enable=0 console=serial0,115200 console=tty1 root=PARTUUID=52e4cf4c-02 rootfstype=ext4 elevator=deadline fsck.repair=yes rootwaitObwohl darin steht
root=/dev/sda1 rootfstype=ext4 rootwaitAuch das ansprechen direkt der PARTUUID ändert das nicht
root=PARTUUID=d32ff59b-01 rootfstype=ext4 rootwait@AxelF1977 sagte in ioBroker Raspberry Pi 4 und SSD
cat /boot/cmdline.txt
dwc_otg.lpm_enable=0 console=serial0,115200 console=tty1 root=PARTUUID=52e4cf4c-02 rootfstype=ext4 elevator=deadline fsck.repair=yes rootwaitDas root-Verzeichnis hast du nach dem Formatieren auf die SSD kopiert (Schritte 10 - 12) ?
Dann ändere die /boot/cmdline.txt indwc_otg.lpm_enable=0 console=serial0,115200 console=tty1 root=/dev/sda1 rootfstype=ext4 elevator=deadline fsck.repair=yes rootwaitDu musst die Datei beim Verlassen von nano auch speichern: CTRL + X und Y (when prompted to save).
Bitte verzichtet auf Chat-Nachrichten, denn die Handhabung ist grauenhaft !
Produktiv: RPi 2 mit S.USV, HM-MOD-RPI und SLC-USB-Stick mit root fs -
@AxelF1977 sagte in ioBroker Raspberry Pi 4 und SSD
cat /boot/cmdline.txt
dwc_otg.lpm_enable=0 console=serial0,115200 console=tty1 root=PARTUUID=52e4cf4c-02 rootfstype=ext4 elevator=deadline fsck.repair=yes rootwaitDas root-Verzeichnis hast du nach dem Formatieren auf die SSD kopiert (Schritte 10 - 12) ?
Dann ändere die /boot/cmdline.txt indwc_otg.lpm_enable=0 console=serial0,115200 console=tty1 root=/dev/sda1 rootfstype=ext4 elevator=deadline fsck.repair=yes rootwaitDu musst die Datei beim Verlassen von nano auch speichern: CTRL + X und Y (when prompted to save).
@paul53 said in ioBroker Raspberry Pi 4 und SSD:
@AxelF1977 sagte in ioBroker Raspberry Pi 4 und SSD
cat /boot/cmdline.txt
dwc_otg.lpm_enable=0 console=serial0,115200 console=tty1 root=PARTUUID=52e4cf4c-02 rootfstype=ext4 elevator=deadline fsck.repair=yes rootwaitDas root-Verzeichnis hast du nach dem Formatieren auf die SSD kopiert (Schritte 10 - 12) ?
Dann ändere die /boot/cmdline.txt indwc_otg.lpm_enable=0 console=serial0,115200 console=tty1 root=/dev/sda1 rootfstype=ext4 elevator=deadline fsck.repair=yes rootwaitDu musst die Datei beim Verlassen von nano auch speichern: CTRL + X und Y (when prompted to save).
Ich habe es mal in die von Dir gepostete Zeile geändert in der cmdline.txt
Ergebnis
dwc_otg.lpm_enable=0 console=serial0,115200 console=tty1 root=PARTUUID=52e4cf4c-02 rootfstype=ext4 elevator=deadline fsck.repair=yes rootwaitAlso wieder die SD Karte.
Ich habe das root Verzeichnis mit
sudo rsync -avx / /media/meinordnernameentsprechend in den neuen Ordner verschoben.
ASROCK Deskmini Intel I3 8100 16GB mit Proxmox VM ioBroker VM DIYHue| CCU piVCCU + FHEM auf Raspberry | Maria DB mit Grafana und Prometheus auf Tinker Board
-
@paul53 said in ioBroker Raspberry Pi 4 und SSD:
@AxelF1977 sagte in ioBroker Raspberry Pi 4 und SSD
cat /boot/cmdline.txt
dwc_otg.lpm_enable=0 console=serial0,115200 console=tty1 root=PARTUUID=52e4cf4c-02 rootfstype=ext4 elevator=deadline fsck.repair=yes rootwaitDas root-Verzeichnis hast du nach dem Formatieren auf die SSD kopiert (Schritte 10 - 12) ?
Dann ändere die /boot/cmdline.txt indwc_otg.lpm_enable=0 console=serial0,115200 console=tty1 root=/dev/sda1 rootfstype=ext4 elevator=deadline fsck.repair=yes rootwaitDu musst die Datei beim Verlassen von nano auch speichern: CTRL + X und Y (when prompted to save).
Ich habe es mal in die von Dir gepostete Zeile geändert in der cmdline.txt
Ergebnis
dwc_otg.lpm_enable=0 console=serial0,115200 console=tty1 root=PARTUUID=52e4cf4c-02 rootfstype=ext4 elevator=deadline fsck.repair=yes rootwaitAlso wieder die SD Karte.
Ich habe das root Verzeichnis mit
sudo rsync -avx / /media/meinordnernameentsprechend in den neuen Ordner verschoben.
@AxelF1977 sagte:
geändert in der cmdline.txt
ErgebnisAber nicht erfolgreich gespeichert (Rechteproblem ?)
sudo nano /boot/cmdline.txt cat /boot/cmdline.txt -
@paul53 said in ioBroker Raspberry Pi 4 und SSD:
@AxelF1977 sagte in ioBroker Raspberry Pi 4 und SSD
cat /boot/cmdline.txt
dwc_otg.lpm_enable=0 console=serial0,115200 console=tty1 root=PARTUUID=52e4cf4c-02 rootfstype=ext4 elevator=deadline fsck.repair=yes rootwaitDas root-Verzeichnis hast du nach dem Formatieren auf die SSD kopiert (Schritte 10 - 12) ?
Dann ändere die /boot/cmdline.txt indwc_otg.lpm_enable=0 console=serial0,115200 console=tty1 root=/dev/sda1 rootfstype=ext4 elevator=deadline fsck.repair=yes rootwaitDu musst die Datei beim Verlassen von nano auch speichern: CTRL + X und Y (when prompted to save).
Ich habe es mal in die von Dir gepostete Zeile geändert in der cmdline.txt
Ergebnis
dwc_otg.lpm_enable=0 console=serial0,115200 console=tty1 root=PARTUUID=52e4cf4c-02 rootfstype=ext4 elevator=deadline fsck.repair=yes rootwaitAlso wieder die SD Karte.
Ich habe das root Verzeichnis mit
sudo rsync -avx / /media/meinordnernameentsprechend in den neuen Ordner verschoben.
@AxelF1977 sagte in ioBroker Raspberry Pi 4 und SSD:
Ich habe das root Verzeichnis mit
sudo rsync -avx / /media/meinordnername
entsprechend in den neuen Ordner verschoben.Dann müssen die root-Verzeichnisse zu sehen sein, wenn /dev/sda1 mounted ist.
ls -l /media/meinordnername -
Ich bin jetzt nochmal alles durchgegengen, von anfang an.
SD Karte neu aufgesetzt, neue Partition, gemountet
ls -l /media/SSDBrokerausgeführt, und die Abfrage war positiv.
cmdline.txt angepasst, geprüft, gespeichert.
Reboot
Jetzt sagt
ls -l /media/SSDBrokerfolgendes: insgesamt 0
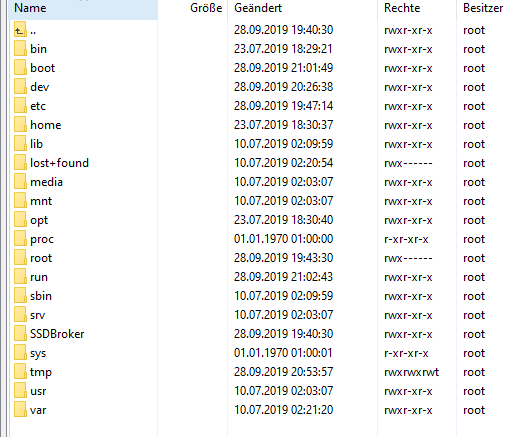
Wenn das Laufwerk erneut mounte, dann kommt nach
ls -l /media/SSDBrokerfolgendes
insgesamt 88
drwxr-xr-x  2 root root  4096 Sep 27 23:10 bin
drwxr-xr-x  2 root root  4096 Sep 27 23:12 boot
drwxr-xr-x  2 root root  4096 Sep 27 23:18 dev
drwxr-xr-x 81 root root  4096 Sep 27 23:12 etc
drwxr-xr-x  4 root root  4096 Jul 23 18:30 home
drwxr-xr-x 16 root root  4096 Jul 10 02:09 lib
drwx------  2 root root 16384 Jul 10 02:20 lost+found
drwxr-xr-x  3 root root  4096 Sep 27 23:19 media
drwxr-xr-x  2 root root  4096 Jul 10 02:03 mnt
drwxr-xr-x  4 root root  4096 Jul 23 18:30 opt
dr-xr-xr-x  2 root root  4096 Jan  1  1970 proc
drwx------  2 root root  4096 Jul 10 02:03 root
drwxr-xr-x  2 root root  4096 Jul 23 18:41 run
drwxr-xr-x  2 root root  4096 Sep 27 23:10 sbin
drwxr-xr-x  2 root root  4096 Jul 10 02:03 srv
dr-xr-xr-x  2 root root  4096 Jan  1  1970 sys
drwxrwxrwt  8 root root  4096 Sep 27 23:12 tmp
drwxr-xr-x 10 root root  4096 Jul 10 02:03 usr
drwxr-xr-x 11 root root  4096 Jul 10 02:21 var
Also muss ich das Laufwerk bei jedem Neustart neu mounten? Hier lag wohl den ganzen Tag schon das Problem...
Allerdings ändert das nichts, an dem angezeigten verfügbaren Speicher in ioBroker
ASROCK Deskmini Intel I3 8100 16GB mit Proxmox VM ioBroker VM DIYHue| CCU piVCCU + FHEM auf Raspberry | Maria DB mit Grafana und Prometheus auf Tinker Board
-
Ich bin jetzt nochmal alles durchgegengen, von anfang an.
SD Karte neu aufgesetzt, neue Partition, gemountet
ls -l /media/SSDBrokerausgeführt, und die Abfrage war positiv.
cmdline.txt angepasst, geprüft, gespeichert.
Reboot
Jetzt sagt
ls -l /media/SSDBrokerfolgendes: insgesamt 0
Wenn das Laufwerk erneut mounte, dann kommt nach
ls -l /media/SSDBrokerfolgendes
insgesamt 88
drwxr-xr-x  2 root root  4096 Sep 27 23:10 bin
drwxr-xr-x  2 root root  4096 Sep 27 23:12 boot
drwxr-xr-x  2 root root  4096 Sep 27 23:18 dev
drwxr-xr-x 81 root root  4096 Sep 27 23:12 etc
drwxr-xr-x  4 root root  4096 Jul 23 18:30 home
drwxr-xr-x 16 root root  4096 Jul 10 02:09 lib
drwx------  2 root root 16384 Jul 10 02:20 lost+found
drwxr-xr-x  3 root root  4096 Sep 27 23:19 media
drwxr-xr-x  2 root root  4096 Jul 10 02:03 mnt
drwxr-xr-x  4 root root  4096 Jul 23 18:30 opt
dr-xr-xr-x  2 root root  4096 Jan  1  1970 proc
drwx------  2 root root  4096 Jul 10 02:03 root
drwxr-xr-x  2 root root  4096 Jul 23 18:41 run
drwxr-xr-x  2 root root  4096 Sep 27 23:10 sbin
drwxr-xr-x  2 root root  4096 Jul 10 02:03 srv
dr-xr-xr-x  2 root root  4096 Jan  1  1970 sys
drwxrwxrwt  8 root root  4096 Sep 27 23:12 tmp
drwxr-xr-x 10 root root  4096 Jul 10 02:03 usr
drwxr-xr-x 11 root root  4096 Jul 10 02:21 var
Also muss ich das Laufwerk bei jedem Neustart neu mounten? Hier lag wohl den ganzen Tag schon das Problem...
Allerdings ändert das nichts, an dem angezeigten verfügbaren Speicher in ioBroker
@AxelF1977 sagte:
Also muss ich das Laufwerk bei jedem Neustart neu mounten?
Nein, das ist nur die Kontrolle, ob das Kopieren des root-Verzeichnisses auf die SSD erfolgreich war.
@AxelF1977 sagte in ioBroker Raspberry Pi 4 und SSD:
Allerdings ändert das nichts, an dem angezeigten verfügbaren Speicher in ioBroker
Dann wird immer noch von SD Card gebootet. Was sagt ?
cat /boot/cmdline.txtBitte verzichtet auf Chat-Nachrichten, denn die Handhabung ist grauenhaft !
Produktiv: RPi 2 mit S.USV, HM-MOD-RPI und SLC-USB-Stick mit root fs -
@AxelF1977 sagte:
Also muss ich das Laufwerk bei jedem Neustart neu mounten?
Nein, das ist nur die Kontrolle, ob das Kopieren des root-Verzeichnisses auf die SSD erfolgreich war.
@AxelF1977 sagte in ioBroker Raspberry Pi 4 und SSD:
Allerdings ändert das nichts, an dem angezeigten verfügbaren Speicher in ioBroker
Dann wird immer noch von SD Card gebootet. Was sagt ?
cat /boot/cmdline.txt@paul53 said in ioBroker Raspberry Pi 4 und SSD:
@AxelF1977 sagte:
Also muss ich das Laufwerk bei jedem Neustart neu mounten?
Nein, das ist nur die Kontrolle, ob das Kopieren des root-Verzeichnisses auf die SSD erfolgreich war.
@AxelF1977 sagte in ioBroker Raspberry Pi 4 und SSD:
Allerdings ändert das nichts, an dem angezeigten verfügbaren Speicher in ioBroker
Dann wird immer noch von SD Card gebootet. Was sagt ?
cat /boot/cmdline.txtDas gleiche wie vorher, es bleibt bei der PARTUUID von der SD Karte.
ASROCK Deskmini Intel I3 8100 16GB mit Proxmox VM ioBroker VM DIYHue| CCU piVCCU + FHEM auf Raspberry | Maria DB mit Grafana und Prometheus auf Tinker Board
-
@paul53 said in ioBroker Raspberry Pi 4 und SSD:
@AxelF1977 sagte:
Also muss ich das Laufwerk bei jedem Neustart neu mounten?
Nein, das ist nur die Kontrolle, ob das Kopieren des root-Verzeichnisses auf die SSD erfolgreich war.
@AxelF1977 sagte in ioBroker Raspberry Pi 4 und SSD:
Allerdings ändert das nichts, an dem angezeigten verfügbaren Speicher in ioBroker
Dann wird immer noch von SD Card gebootet. Was sagt ?
cat /boot/cmdline.txtDas gleiche wie vorher, es bleibt bei der PARTUUID von der SD Karte.
@AxelF1977
Da die Bootpartition der SD Card FAT32-formatiert ist, kann die Datei cmdline.txt auch unter Windows mit Notepad++ (kein Notepad oder Wordpad !!) geändert werden.
Bitte auf die Statuszeile unten achten:

Bitte verzichtet auf Chat-Nachrichten, denn die Handhabung ist grauenhaft !
Produktiv: RPi 2 mit S.USV, HM-MOD-RPI und SLC-USB-Stick mit root fs -
@AxelF1977
Da die Bootpartition der SD Card FAT32-formatiert ist, kann die Datei cmdline.txt auch unter Windows mit Notepad++ (kein Notepad oder Wordpad !!) geändert werden.
Bitte auf die Statuszeile unten achten:
@paul53 said in ioBroker Raspberry Pi 4 und SSD:
@AxelF1977
Da die Bootpartition der SD Card FAT32-formatiert ist, kann die Datei cmdline.txt auch unter Windows mit Notepad++ (kein Notepad oder Wordpad !!) geändert werden.
Bitte auf die Statuszeile unten achten:
Ich hab mir die Datei mal im PSPAD Editor angesehen. Es steht genau das, was in der Konsole eingegeben wurde per SSH. Also an falschen Schreibrechten liegt es leider auch nicht .
Ich habe es erneut nochmal nach neu aufgesetzt, alles wieder von vorne. Es bleibt bei dem Ergebnis, es scheint nicht zuu funktionieren.
ioBroker ist erhablich schneller, aber der Speicherplatz der zur Verfügung steht, ist laut ioBroker immer nocvh der selber von der SD Karte.
Belügt mich ioBroker? Gibt es andere Wege das zu prüfen?Es kann doch nicht sein, dass das System so so dagegen wehrt?
Was mir noch aufgefallen ist, mache ich den Raspi per WINSCP und SSH auf, dann ist da zwar der angelegte und gemountete Ordner SSDBroker, aber der ist leer...
-
Hallo,
ich benötige mal eure Hilfe.Ich habe ein bestehendes IoBroker mit einem auf einen Raspberry Pi 4
Mit diesem wollte ich auf eine neue SSD mit 400GB umziehen.Als Vorlage zum Umziehen habe ich dieses Anleitung durchgeführt.
https://www.tomshardware.com/news/boot-raspberry-pi-from-usb,39782.html
-
Ich habe mir meine Device anzeigen lassen
sudo fdisk -l -
Dann habe ich mit
sudo fdisk /dev/sdameine neue SSD (Disk /dev/sda: 440 GiB) formatiert.
Mit P ,d,n,p,1 und 2X Enter anschl. w -
Mit
sudo mkfs.ext4 /dev/sda1habe ich meine SSD partitioniert -
Mit
sudo mkdir /media/newdrivehabe ich das Verzeichnis newdrive unter media angelget -
Anschl. habe ich mit
sudo rsync -avx / /media/newdrivedie Daten aus dem Root in das newdrive Verzeichnis kopiert. -
Dann habe ich die cmdline.txt erweitert mit
root=/dev/sda1 rootfstype=ext4 rootwait
Gesamt steht da jetztconsole=serial0,115200 console=tty1 root=PARTUUID=5e3da3da-02 rootfstype=ext4 elevator=deadline fsck.repair=yes rootwait quiet splash plymouth.ignore-serial-consoles root=/dev/sda1 rootfstype=ext4 rootwait -
Als letztes dann noch ein reboot
Das Raspberry bootet aber jetzt nicht durch.
Ein Kontakt über SSH ist nicht möglich -
-
Hallo,
ich benötige mal eure Hilfe.Ich habe ein bestehendes IoBroker mit einem auf einen Raspberry Pi 4
Mit diesem wollte ich auf eine neue SSD mit 400GB umziehen.Als Vorlage zum Umziehen habe ich dieses Anleitung durchgeführt.
https://www.tomshardware.com/news/boot-raspberry-pi-from-usb,39782.html
-
Ich habe mir meine Device anzeigen lassen
sudo fdisk -l -
Dann habe ich mit
sudo fdisk /dev/sdameine neue SSD (Disk /dev/sda: 440 GiB) formatiert.
Mit P ,d,n,p,1 und 2X Enter anschl. w -
Mit
sudo mkfs.ext4 /dev/sda1habe ich meine SSD partitioniert -
Mit
sudo mkdir /media/newdrivehabe ich das Verzeichnis newdrive unter media angelget -
Anschl. habe ich mit
sudo rsync -avx / /media/newdrivedie Daten aus dem Root in das newdrive Verzeichnis kopiert. -
Dann habe ich die cmdline.txt erweitert mit
root=/dev/sda1 rootfstype=ext4 rootwait
Gesamt steht da jetztconsole=serial0,115200 console=tty1 root=PARTUUID=5e3da3da-02 rootfstype=ext4 elevator=deadline fsck.repair=yes rootwait quiet splash plymouth.ignore-serial-consoles root=/dev/sda1 rootfstype=ext4 rootwait -
Als letztes dann noch ein reboot
Das Raspberry bootet aber jetzt nicht durch.
Ein Kontakt über SSH ist nicht möglich@RalfEngelberth sagte in ioBroker Raspberry Pi 4 und SSD:
Das Raspberry bootet aber jetzt nicht durch.
Beim Pi4 muss man noch von SD booten.
Die Funktion direkt von SSD zu booten ist noch nicht implementiert -
-
@RalfEngelberth sagte in ioBroker Raspberry Pi 4 und SSD:
Das Raspberry bootet aber jetzt nicht durch.
Beim Pi4 muss man noch von SD booten.
Die Funktion direkt von SSD zu booten ist noch nicht implementiert@Homoran sagte in ioBroker Raspberry Pi 4 und SSD:
@RalfEngelberth sagte in ioBroker Raspberry Pi 4 und SSD:
Das Raspberry bootet aber jetzt nicht durch.
Beim Pi4 muss man noch von SD booten.
Die Funktion direkt von SSD zu booten ist noch nicht implementiertDie Anleitung ist doch für Boot über SD
Oder ist das nicht die richtige. -
@Homoran sagte in ioBroker Raspberry Pi 4 und SSD:
@RalfEngelberth sagte in ioBroker Raspberry Pi 4 und SSD:
Das Raspberry bootet aber jetzt nicht durch.
Beim Pi4 muss man noch von SD booten.
Die Funktion direkt von SSD zu booten ist noch nicht implementiertDie Anleitung ist doch für Boot über SD
Oder ist das nicht die richtige.@RalfEngelberth sagte in ioBroker Raspberry Pi 4 und SSD:
Die Anleitung ist doch für Boot über SD
Aber nicht für Pi4. oder?
bei Pi2 und 3 klappt das
kein Support per PN! - Fragen im Forum stellen -
Benutzt das Voting rechts unten im Beitrag wenn er euch geholfen hat.
Das Forum freut sich über eine Spende. Benutzt dazu den Spendenbutton oben rechts. Danke!
der Installationsfixer: curl -fsL https://iobroker.net/fix.sh | bash - -
@RalfEngelberth sagte in ioBroker Raspberry Pi 4 und SSD:
Die Anleitung ist doch für Boot über SD
Aber nicht für Pi4. oder?
bei Pi2 und 3 klappt das
@Homoran sagte in ioBroker Raspberry Pi 4 und SSD:
@RalfEngelberth sagte in ioBroker Raspberry Pi 4 und SSD:
Die Anleitung ist doch für Boot über SD
Aber nicht für Pi4. oder?
bei Pi2 und 3 klappt das
Was wäre denn der richtige Weg?
-
@RalfEngelberth sagte in ioBroker Raspberry Pi 4 und SSD:
Die Anleitung ist doch für Boot über SD
Aber nicht für Pi4. oder?
bei Pi2 und 3 klappt das
@Homoran sagte in ioBroker Raspberry Pi 4 und SSD:
Aber nicht für Pi4. oder?
Habe mir jetzt doch die Anleitung selber angesehen.
How to Run a Raspberry Pi 4 Off an SSD
The first thing you need to do is prepare your external drive so that all of the appropriate data is on it. To get started:- Connect your external drive to the Pi. Make sure to attach your drive to one of the blue-colored USB 3.0 ports.
Also doch für den Pi4.
Wenn du genau nach deren Anleitung vorgegangen bist kann ich dir auch nicht helfen
kein Support per PN! - Fragen im Forum stellen -
Benutzt das Voting rechts unten im Beitrag wenn er euch geholfen hat.
Das Forum freut sich über eine Spende. Benutzt dazu den Spendenbutton oben rechts. Danke!
der Installationsfixer: curl -fsL https://iobroker.net/fix.sh | bash - -
Hallo,
ich benötige mal eure Hilfe.Ich habe ein bestehendes IoBroker mit einem auf einen Raspberry Pi 4
Mit diesem wollte ich auf eine neue SSD mit 400GB umziehen.Als Vorlage zum Umziehen habe ich dieses Anleitung durchgeführt.
https://www.tomshardware.com/news/boot-raspberry-pi-from-usb,39782.html
-
Ich habe mir meine Device anzeigen lassen
sudo fdisk -l -
Dann habe ich mit
sudo fdisk /dev/sdameine neue SSD (Disk /dev/sda: 440 GiB) formatiert.
Mit P ,d,n,p,1 und 2X Enter anschl. w -
Mit
sudo mkfs.ext4 /dev/sda1habe ich meine SSD partitioniert -
Mit
sudo mkdir /media/newdrivehabe ich das Verzeichnis newdrive unter media angelget -
Anschl. habe ich mit
sudo rsync -avx / /media/newdrivedie Daten aus dem Root in das newdrive Verzeichnis kopiert. -
Dann habe ich die cmdline.txt erweitert mit
root=/dev/sda1 rootfstype=ext4 rootwait
Gesamt steht da jetztconsole=serial0,115200 console=tty1 root=PARTUUID=5e3da3da-02 rootfstype=ext4 elevator=deadline fsck.repair=yes rootwait quiet splash plymouth.ignore-serial-consoles root=/dev/sda1 rootfstype=ext4 rootwait -
Als letztes dann noch ein reboot
Das Raspberry bootet aber jetzt nicht durch.
Ein Kontakt über SSH ist nicht möglich@RalfEngelberth sagte:
Dann habe ich die cmdline.txt erweitert
Das ist falsch. Der Eintrag
root=PARTUUID=5e3da3da-02hätte ersetzt werden müssen durch
root=/dev/sda1oder durch die PARTUUID der SSD, was sicherer funktioniert als /dev/sda1.
-
-
@RalfEngelberth sagte:
Dann habe ich die cmdline.txt erweitert
Das ist falsch. Der Eintrag
root=PARTUUID=5e3da3da-02hätte ersetzt werden müssen durch
root=/dev/sda1oder durch die PARTUUID der SSD, was sicherer funktioniert als /dev/sda1.
@paul53 sagte in ioBroker Raspberry Pi 4 und SSD:
@RalfEngelberth sagte:
Dann habe ich die cmdline.txt erweitert
Das ist falsch. Der Eintrag
root=PARTUUID=5e3da3da-02hätte ersetzt werden müssen durch
root=/dev/sda1oder durch die PARTUUID der SSD, was sicherer funktioniert als /dev/sda1.
Dann steht als jetzt in der cmdline.txt
console=serial0,115200 console=tty1 root=/dev/sda1 rootfstype=ext4 elevator=deadline fsck.repair=yes rootwait quiet splash plymouth.ignore-serial-consoles rootwaitWas ist mit rootwait beibt das auch drin?
Hey! Du scheinst an dieser Unterhaltung interessiert zu sein, hast aber noch kein Konto.
Hast du es satt, bei jedem Besuch durch die gleichen Beiträge zu scrollen? Wenn du dich für ein Konto anmeldest, kommst du immer genau dorthin zurück, wo du zuvor warst, und kannst dich über neue Antworten benachrichtigen lassen (entweder per E-Mail oder Push-Benachrichtigung). Du kannst auch Lesezeichen speichern und Beiträge positiv bewerten, um anderen Community-Mitgliedern deine Wertschätzung zu zeigen.
Mit deinem Input könnte dieser Beitrag noch besser werden 💗
Registrieren Anmelden539
Online32.8k
Benutzer82.9k
Themen1.3m
Beiträge