


Alexa in Node Red ohne contrib-alexa-home oder Ähnliches
-
@jrudolph Hallo, danke für das feedback.
Wird der request durch die Gerätesuche im Webserver Tab angezeigt?
Hast Du an den Geräten welche erkannt werden sollen den Haken gesetzt?
@zzippo Der Request der Gerätesuche wird nicht angezeigt. Ja, Haken ist gesetzt.
Habe mir mal die Logs des Reverse Proxy angesehen. Der Request vom Skill kommt offensichtlich an: (access.log)
[01/Nov/2020:14:25:44 +0000] "POST /alexaDisc HTTP/1.1" 401 5066 "-" "-"Aber es kommt ein Auth. Error: (error.log)
14:25:44.322042 2020] [auth_basic:error] [pid 2356:tid 2963797024] [client 3.250.10.88:53768] AH01618: user ******\n not found: /alexaDiscDie Logs waren übrigens im Root-Verzeichnis gelandet. APACHE_LOG_DIR war anscheinend nicht gesetzt.
Ich setze den Reverse Proxy nochmal neu auf und melde mich dann wieder.
-
@jrudolph eventuell lässt du das script noch einmal das <domain>.conf generieren. Hier fehlten ja diverse escapes vor den $ Zeichen, deshalb geht auch der Log in das Hauptverzeichnis.
-
@zzippo Der Request der Gerätesuche wird nicht angezeigt. Ja, Haken ist gesetzt.
Habe mir mal die Logs des Reverse Proxy angesehen. Der Request vom Skill kommt offensichtlich an: (access.log)
[01/Nov/2020:14:25:44 +0000] "POST /alexaDisc HTTP/1.1" 401 5066 "-" "-"Aber es kommt ein Auth. Error: (error.log)
14:25:44.322042 2020] [auth_basic:error] [pid 2356:tid 2963797024] [client 3.250.10.88:53768] AH01618: user ******\n not found: /alexaDiscDie Logs waren übrigens im Root-Verzeichnis gelandet. APACHE_LOG_DIR war anscheinend nicht gesetzt.
Ich setze den Reverse Proxy nochmal neu auf und melde mich dann wieder.
@jrudolph
hier noch die aktiven module bei meinem Apache, vielleicht fehlt ja noch was bei Dir.pi@raspberrypi:/etc/apache2 $ cd mods-enabled pi@raspberrypi:/etc/apache2/mods-enabled $ ls -l total 0 lrwxrwxrwx 1 root root 36 Oct 29 2019 access_compat.load -> ../mods-available/access_compat.load lrwxrwxrwx 1 root root 28 Oct 29 2019 alias.conf -> ../mods-available/alias.conf lrwxrwxrwx 1 root root 28 Oct 29 2019 alias.load -> ../mods-available/alias.load lrwxrwxrwx 1 root root 33 Oct 29 2019 auth_basic.load -> ../mods-available/auth_basic.load lrwxrwxrwx 1 root root 33 Oct 29 2019 authn_core.load -> ../mods-available/authn_core.load lrwxrwxrwx 1 root root 33 Oct 29 2019 authn_file.load -> ../mods-available/authn_file.load lrwxrwxrwx 1 root root 33 Oct 29 2019 authz_core.load -> ../mods-available/authz_core.load lrwxrwxrwx 1 root root 33 Oct 29 2019 authz_host.load -> ../mods-available/authz_host.load lrwxrwxrwx 1 root root 33 Oct 29 2019 authz_user.load -> ../mods-available/authz_user.load lrwxrwxrwx 1 root root 32 Oct 29 2019 autoindex.conf -> ../mods-available/autoindex.conf lrwxrwxrwx 1 root root 32 Oct 29 2019 autoindex.load -> ../mods-available/autoindex.load lrwxrwxrwx 1 root root 30 Oct 29 2019 deflate.conf -> ../mods-available/deflate.conf lrwxrwxrwx 1 root root 30 Oct 29 2019 deflate.load -> ../mods-available/deflate.load lrwxrwxrwx 1 root root 26 Oct 29 2019 dir.conf -> ../mods-available/dir.conf lrwxrwxrwx 1 root root 26 Oct 29 2019 dir.load -> ../mods-available/dir.load lrwxrwxrwx 1 root root 26 Oct 29 2019 env.load -> ../mods-available/env.load lrwxrwxrwx 1 root root 29 Oct 29 2019 filter.load -> ../mods-available/filter.load lrwxrwxrwx 1 root root 30 Oct 30 2019 headers.load -> ../mods-available/headers.load lrwxrwxrwx 1 root root 27 Oct 29 2019 mime.conf -> ../mods-available/mime.conf lrwxrwxrwx 1 root root 27 Oct 29 2019 mime.load -> ../mods-available/mime.load lrwxrwxrwx 1 root root 32 Oct 29 2019 mpm_event.conf -> ../mods-available/mpm_event.conf lrwxrwxrwx 1 root root 32 Oct 29 2019 mpm_event.load -> ../mods-available/mpm_event.load lrwxrwxrwx 1 root root 34 Oct 29 2019 negotiation.conf -> ../mods-available/negotiation.conf lrwxrwxrwx 1 root root 34 Oct 29 2019 negotiation.load -> ../mods-available/negotiation.load lrwxrwxrwx 1 root root 37 Oct 30 2019 proxy_balancer.conf -> ../mods-available/proxy_balancer.conf lrwxrwxrwx 1 root root 37 Oct 30 2019 proxy_balancer.load -> ../mods-available/proxy_balancer.load lrwxrwxrwx 1 root root 28 Oct 30 2019 proxy.conf -> ../mods-available/proxy.conf lrwxrwxrwx 1 root root 33 Oct 30 2019 proxy_http.load -> ../mods-available/proxy_http.load lrwxrwxrwx 1 root root 28 Oct 30 2019 proxy.load -> ../mods-available/proxy.load lrwxrwxrwx 1 root root 37 Oct 30 2019 proxy_wstunnel.load -> ../mods-available/proxy_wstunnel.load lrwxrwxrwx 1 root root 33 Oct 29 2019 reqtimeout.conf -> ../mods-available/reqtimeout.conf lrwxrwxrwx 1 root root 33 Oct 29 2019 reqtimeout.load -> ../mods-available/reqtimeout.load lrwxrwxrwx 1 root root 30 Oct 15 13:28 rewrite.load -> ../mods-available/rewrite.load lrwxrwxrwx 1 root root 31 Oct 29 2019 setenvif.conf -> ../mods-available/setenvif.conf lrwxrwxrwx 1 root root 31 Oct 29 2019 setenvif.load -> ../mods-available/setenvif.load lrwxrwxrwx 1 root root 34 Oct 30 2019 slotmem_shm.load -> ../mods-available/slotmem_shm.load lrwxrwxrwx 1 root root 36 Oct 30 2019 socache_shmcb.load -> ../mods-available/socache_shmcb.load lrwxrwxrwx 1 root root 26 Oct 30 2019 ssl.conf -> ../mods-available/ssl.conf lrwxrwxrwx 1 root root 26 Oct 30 2019 ssl.load -> ../mods-available/ssl.load lrwxrwxrwx 1 root root 29 Oct 29 2019 status.conf -> ../mods-available/status.conf lrwxrwxrwx 1 root root 29 Oct 29 2019 status.load -> ../mods-available/status.load lrwxrwxrwx 1 root root 30 Oct 30 2019 xml2enc.load -> ../mods-available/xml2enc.load pi@raspberrypi:/etc/apache2/mods-enabled $ -
@jrudolph
hier noch die aktiven module bei meinem Apache, vielleicht fehlt ja noch was bei Dir.pi@raspberrypi:/etc/apache2 $ cd mods-enabled pi@raspberrypi:/etc/apache2/mods-enabled $ ls -l total 0 lrwxrwxrwx 1 root root 36 Oct 29 2019 access_compat.load -> ../mods-available/access_compat.load lrwxrwxrwx 1 root root 28 Oct 29 2019 alias.conf -> ../mods-available/alias.conf lrwxrwxrwx 1 root root 28 Oct 29 2019 alias.load -> ../mods-available/alias.load lrwxrwxrwx 1 root root 33 Oct 29 2019 auth_basic.load -> ../mods-available/auth_basic.load lrwxrwxrwx 1 root root 33 Oct 29 2019 authn_core.load -> ../mods-available/authn_core.load lrwxrwxrwx 1 root root 33 Oct 29 2019 authn_file.load -> ../mods-available/authn_file.load lrwxrwxrwx 1 root root 33 Oct 29 2019 authz_core.load -> ../mods-available/authz_core.load lrwxrwxrwx 1 root root 33 Oct 29 2019 authz_host.load -> ../mods-available/authz_host.load lrwxrwxrwx 1 root root 33 Oct 29 2019 authz_user.load -> ../mods-available/authz_user.load lrwxrwxrwx 1 root root 32 Oct 29 2019 autoindex.conf -> ../mods-available/autoindex.conf lrwxrwxrwx 1 root root 32 Oct 29 2019 autoindex.load -> ../mods-available/autoindex.load lrwxrwxrwx 1 root root 30 Oct 29 2019 deflate.conf -> ../mods-available/deflate.conf lrwxrwxrwx 1 root root 30 Oct 29 2019 deflate.load -> ../mods-available/deflate.load lrwxrwxrwx 1 root root 26 Oct 29 2019 dir.conf -> ../mods-available/dir.conf lrwxrwxrwx 1 root root 26 Oct 29 2019 dir.load -> ../mods-available/dir.load lrwxrwxrwx 1 root root 26 Oct 29 2019 env.load -> ../mods-available/env.load lrwxrwxrwx 1 root root 29 Oct 29 2019 filter.load -> ../mods-available/filter.load lrwxrwxrwx 1 root root 30 Oct 30 2019 headers.load -> ../mods-available/headers.load lrwxrwxrwx 1 root root 27 Oct 29 2019 mime.conf -> ../mods-available/mime.conf lrwxrwxrwx 1 root root 27 Oct 29 2019 mime.load -> ../mods-available/mime.load lrwxrwxrwx 1 root root 32 Oct 29 2019 mpm_event.conf -> ../mods-available/mpm_event.conf lrwxrwxrwx 1 root root 32 Oct 29 2019 mpm_event.load -> ../mods-available/mpm_event.load lrwxrwxrwx 1 root root 34 Oct 29 2019 negotiation.conf -> ../mods-available/negotiation.conf lrwxrwxrwx 1 root root 34 Oct 29 2019 negotiation.load -> ../mods-available/negotiation.load lrwxrwxrwx 1 root root 37 Oct 30 2019 proxy_balancer.conf -> ../mods-available/proxy_balancer.conf lrwxrwxrwx 1 root root 37 Oct 30 2019 proxy_balancer.load -> ../mods-available/proxy_balancer.load lrwxrwxrwx 1 root root 28 Oct 30 2019 proxy.conf -> ../mods-available/proxy.conf lrwxrwxrwx 1 root root 33 Oct 30 2019 proxy_http.load -> ../mods-available/proxy_http.load lrwxrwxrwx 1 root root 28 Oct 30 2019 proxy.load -> ../mods-available/proxy.load lrwxrwxrwx 1 root root 37 Oct 30 2019 proxy_wstunnel.load -> ../mods-available/proxy_wstunnel.load lrwxrwxrwx 1 root root 33 Oct 29 2019 reqtimeout.conf -> ../mods-available/reqtimeout.conf lrwxrwxrwx 1 root root 33 Oct 29 2019 reqtimeout.load -> ../mods-available/reqtimeout.load lrwxrwxrwx 1 root root 30 Oct 15 13:28 rewrite.load -> ../mods-available/rewrite.load lrwxrwxrwx 1 root root 31 Oct 29 2019 setenvif.conf -> ../mods-available/setenvif.conf lrwxrwxrwx 1 root root 31 Oct 29 2019 setenvif.load -> ../mods-available/setenvif.load lrwxrwxrwx 1 root root 34 Oct 30 2019 slotmem_shm.load -> ../mods-available/slotmem_shm.load lrwxrwxrwx 1 root root 36 Oct 30 2019 socache_shmcb.load -> ../mods-available/socache_shmcb.load lrwxrwxrwx 1 root root 26 Oct 30 2019 ssl.conf -> ../mods-available/ssl.conf lrwxrwxrwx 1 root root 26 Oct 30 2019 ssl.load -> ../mods-available/ssl.load lrwxrwxrwx 1 root root 29 Oct 29 2019 status.conf -> ../mods-available/status.conf lrwxrwxrwx 1 root root 29 Oct 29 2019 status.load -> ../mods-available/status.load lrwxrwxrwx 1 root root 30 Oct 30 2019 xml2enc.load -> ../mods-available/xml2enc.load pi@raspberrypi:/etc/apache2/mods-enabled $@zzippo
An genau der gleichen Stelle hänge ich auch.
Wenn ich eine Anfrage von localhost, oder auch von extern auf /alexaDisc mache kommt eine Passwortabfrage und der AlexaDeviceGenerator zeigt New Request Detected an, bevor er abstürzt.
Gehe ich in Amazon Alexa auf Geräte erkennen, findet er keine neuen Geräte und der AlexaDeviceGenerator zeigt keine Reaktion.
In meinem Errorlog kommt die Meldung Password Mismatch.
Ich habe mit echo Nutzername:Passwort | base64 das ganze nochmals kontrolliert und es scheint zu stimmen.
Momentan habe ich keine Idee, an welcher Stelle der Fehler liegen könnte. -
@jrudolph
hier noch die aktiven module bei meinem Apache, vielleicht fehlt ja noch was bei Dir.pi@raspberrypi:/etc/apache2 $ cd mods-enabled pi@raspberrypi:/etc/apache2/mods-enabled $ ls -l total 0 lrwxrwxrwx 1 root root 36 Oct 29 2019 access_compat.load -> ../mods-available/access_compat.load lrwxrwxrwx 1 root root 28 Oct 29 2019 alias.conf -> ../mods-available/alias.conf lrwxrwxrwx 1 root root 28 Oct 29 2019 alias.load -> ../mods-available/alias.load lrwxrwxrwx 1 root root 33 Oct 29 2019 auth_basic.load -> ../mods-available/auth_basic.load lrwxrwxrwx 1 root root 33 Oct 29 2019 authn_core.load -> ../mods-available/authn_core.load lrwxrwxrwx 1 root root 33 Oct 29 2019 authn_file.load -> ../mods-available/authn_file.load lrwxrwxrwx 1 root root 33 Oct 29 2019 authz_core.load -> ../mods-available/authz_core.load lrwxrwxrwx 1 root root 33 Oct 29 2019 authz_host.load -> ../mods-available/authz_host.load lrwxrwxrwx 1 root root 33 Oct 29 2019 authz_user.load -> ../mods-available/authz_user.load lrwxrwxrwx 1 root root 32 Oct 29 2019 autoindex.conf -> ../mods-available/autoindex.conf lrwxrwxrwx 1 root root 32 Oct 29 2019 autoindex.load -> ../mods-available/autoindex.load lrwxrwxrwx 1 root root 30 Oct 29 2019 deflate.conf -> ../mods-available/deflate.conf lrwxrwxrwx 1 root root 30 Oct 29 2019 deflate.load -> ../mods-available/deflate.load lrwxrwxrwx 1 root root 26 Oct 29 2019 dir.conf -> ../mods-available/dir.conf lrwxrwxrwx 1 root root 26 Oct 29 2019 dir.load -> ../mods-available/dir.load lrwxrwxrwx 1 root root 26 Oct 29 2019 env.load -> ../mods-available/env.load lrwxrwxrwx 1 root root 29 Oct 29 2019 filter.load -> ../mods-available/filter.load lrwxrwxrwx 1 root root 30 Oct 30 2019 headers.load -> ../mods-available/headers.load lrwxrwxrwx 1 root root 27 Oct 29 2019 mime.conf -> ../mods-available/mime.conf lrwxrwxrwx 1 root root 27 Oct 29 2019 mime.load -> ../mods-available/mime.load lrwxrwxrwx 1 root root 32 Oct 29 2019 mpm_event.conf -> ../mods-available/mpm_event.conf lrwxrwxrwx 1 root root 32 Oct 29 2019 mpm_event.load -> ../mods-available/mpm_event.load lrwxrwxrwx 1 root root 34 Oct 29 2019 negotiation.conf -> ../mods-available/negotiation.conf lrwxrwxrwx 1 root root 34 Oct 29 2019 negotiation.load -> ../mods-available/negotiation.load lrwxrwxrwx 1 root root 37 Oct 30 2019 proxy_balancer.conf -> ../mods-available/proxy_balancer.conf lrwxrwxrwx 1 root root 37 Oct 30 2019 proxy_balancer.load -> ../mods-available/proxy_balancer.load lrwxrwxrwx 1 root root 28 Oct 30 2019 proxy.conf -> ../mods-available/proxy.conf lrwxrwxrwx 1 root root 33 Oct 30 2019 proxy_http.load -> ../mods-available/proxy_http.load lrwxrwxrwx 1 root root 28 Oct 30 2019 proxy.load -> ../mods-available/proxy.load lrwxrwxrwx 1 root root 37 Oct 30 2019 proxy_wstunnel.load -> ../mods-available/proxy_wstunnel.load lrwxrwxrwx 1 root root 33 Oct 29 2019 reqtimeout.conf -> ../mods-available/reqtimeout.conf lrwxrwxrwx 1 root root 33 Oct 29 2019 reqtimeout.load -> ../mods-available/reqtimeout.load lrwxrwxrwx 1 root root 30 Oct 15 13:28 rewrite.load -> ../mods-available/rewrite.load lrwxrwxrwx 1 root root 31 Oct 29 2019 setenvif.conf -> ../mods-available/setenvif.conf lrwxrwxrwx 1 root root 31 Oct 29 2019 setenvif.load -> ../mods-available/setenvif.load lrwxrwxrwx 1 root root 34 Oct 30 2019 slotmem_shm.load -> ../mods-available/slotmem_shm.load lrwxrwxrwx 1 root root 36 Oct 30 2019 socache_shmcb.load -> ../mods-available/socache_shmcb.load lrwxrwxrwx 1 root root 26 Oct 30 2019 ssl.conf -> ../mods-available/ssl.conf lrwxrwxrwx 1 root root 26 Oct 30 2019 ssl.load -> ../mods-available/ssl.load lrwxrwxrwx 1 root root 29 Oct 29 2019 status.conf -> ../mods-available/status.conf lrwxrwxrwx 1 root root 29 Oct 29 2019 status.load -> ../mods-available/status.load lrwxrwxrwx 1 root root 30 Oct 30 2019 xml2enc.load -> ../mods-available/xml2enc.load pi@raspberrypi:/etc/apache2/mods-enabled $@zzippo Ich hatte ja den Reverse Proxy komplett neu aufgesetzt. Das Script war fehlerfrei gelaufen (BTW, der Tipfehler in Zeile 65 ist immer noch drin). Es bleibt dabei, dass ein Password Mismatch gemeldet wird. Ich hatte auch den Skill komplett neu aufgesetzt, so dass das Passwort definitiv übereinstimmt.
Die manuelle Verbindung zu Node-Red unter Verwendung von user und pw funktioniert einwandfrei.
Ich habe auch Deinen Code im Skill und im Script geprüft --> alles einwandfrei und nachvollziehbar.
Evtl. ein Apache Bug?
Ich überlege testweise den Reverse Proxy mit Nginx aufzusetzen. -
@zzippo Ich hatte ja den Reverse Proxy komplett neu aufgesetzt. Das Script war fehlerfrei gelaufen (BTW, der Tipfehler in Zeile 65 ist immer noch drin). Es bleibt dabei, dass ein Password Mismatch gemeldet wird. Ich hatte auch den Skill komplett neu aufgesetzt, so dass das Passwort definitiv übereinstimmt.
Die manuelle Verbindung zu Node-Red unter Verwendung von user und pw funktioniert einwandfrei.
Ich habe auch Deinen Code im Skill und im Script geprüft --> alles einwandfrei und nachvollziehbar.
Evtl. ein Apache Bug?
Ich überlege testweise den Reverse Proxy mit Nginx aufzusetzen.@jrudolph Also, ich habe den Reverse Proxy mit einem nacktem raspbian-buster-lite auf einem PI3 über curl
vom geposteten link installiert. Das Script lief durch, und die Geräteerkennung funktioniert. kann es am PI1 liegen?
kann ich mir eigentlich nicht vorstellen. Steh gerade vor einem Rätsel. -
@zzippo Ich hatte ja den Reverse Proxy komplett neu aufgesetzt. Das Script war fehlerfrei gelaufen (BTW, der Tipfehler in Zeile 65 ist immer noch drin). Es bleibt dabei, dass ein Password Mismatch gemeldet wird. Ich hatte auch den Skill komplett neu aufgesetzt, so dass das Passwort definitiv übereinstimmt.
Die manuelle Verbindung zu Node-Red unter Verwendung von user und pw funktioniert einwandfrei.
Ich habe auch Deinen Code im Skill und im Script geprüft --> alles einwandfrei und nachvollziehbar.
Evtl. ein Apache Bug?
Ich überlege testweise den Reverse Proxy mit Nginx aufzusetzen.@jrudolph
Ich glaub ich habe es....
irgend etwas stimmt mit dem Base64 encoded passwort nicht. In meiner Lamda Funktion ist am ende ein '=' im Passwort, welches ausgegebene wird, hat am ende ein 'K'
unter: diesem link kannst Du es gegenprüfen.
Wenn du oben 'Username:Passwort' eingibst. -
@jrudolph
Ich glaub ich habe es....
irgend etwas stimmt mit dem Base64 encoded passwort nicht. In meiner Lamda Funktion ist am ende ein '=' im Passwort, welches ausgegebene wird, hat am ende ein 'K'
unter: diesem link kannst Du es gegenprüfen.
Wenn du oben 'Username:Passwort' eingibst. -
@zzippo Ich frage mich wie ich das damals gemacht habe, der richtige Befehl für die Ausgabe des Passwortes wäre:
echo -n $username:$pass | base64.
Ich ändere gleich das script, und beseitige auch den Ausgabefehler in Zeile 65. -
@zzippo wie fast immer, sitzt das Problem zwischen Stuhl und Monitor. :angry:
kann mich wirklich ärgern über diesen Fehler. Entschuldige bitte, das ich Dir diese Sucherei eingebrockt habe. -
@zzippo Danke! Das probiere ich morgen gleich mal aus (habe gerade einen Termin). Hat mir aber Spaß gemacht mich mit dem Thema mal näher zu befassen.
Schönen Abend noch!
@jrudolph Dann hoffe ich, das morgen alles klappt. wenn es erstmal läuft, dann macht es richtig Freude. Ich wäre dann auch motiviert, weiter an der Sache zu entwickeln, obwohl im Moment schon alle meine Bedürfnisse gedeckt sind.
Wenn ich nicht so ein blutiger Anfänger in JS wäre, würde ich auch einen Adapter bauen. Ich werde mir in den nächsten Tagen mal ein paar Youtube Videos zu Gemüte führen, evtl. hilft das ja. -
@jrudolph Dann hoffe ich, das morgen alles klappt. wenn es erstmal läuft, dann macht es richtig Freude. Ich wäre dann auch motiviert, weiter an der Sache zu entwickeln, obwohl im Moment schon alle meine Bedürfnisse gedeckt sind.
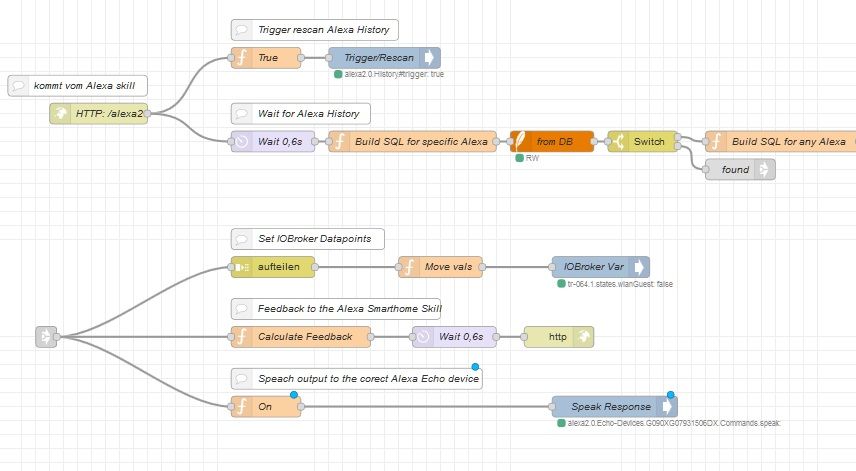
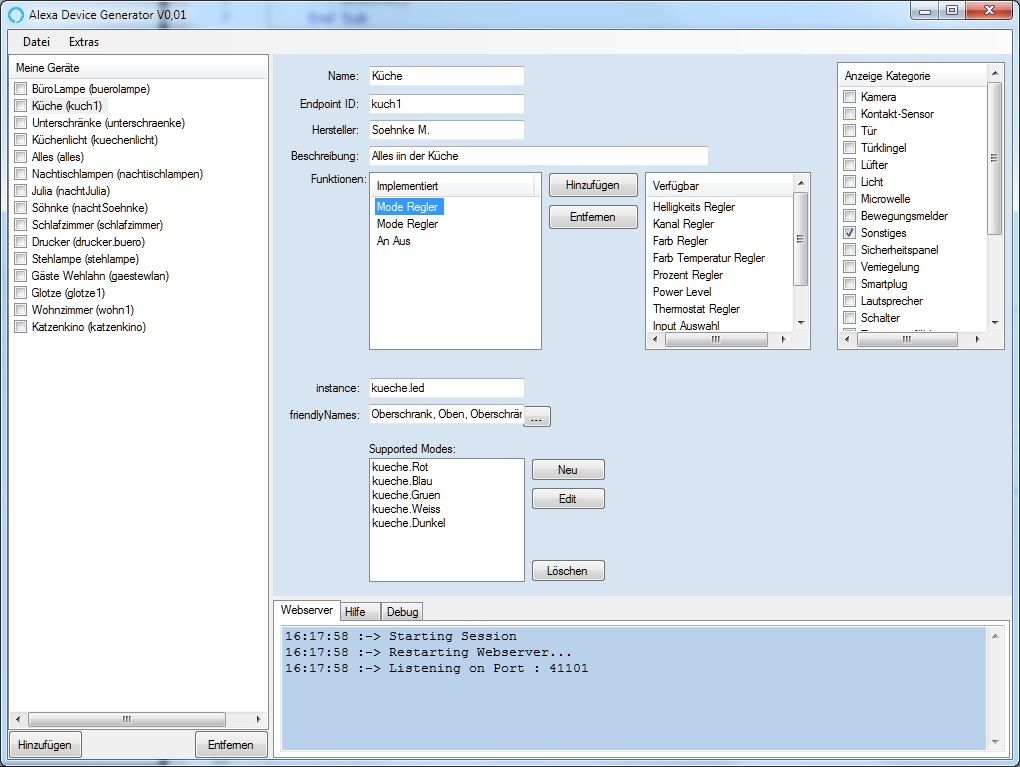
Wenn ich nicht so ein blutiger Anfänger in JS wäre, würde ich auch einen Adapter bauen. Ich werde mir in den nächsten Tagen mal ein paar Youtube Videos zu Gemüte führen, evtl. hilft das ja.@zzippo Könntest du mal zeigen, wie du die Rolladensteuerung eingerichtet hast. Geht das auch über den Mode Regler?
Ich habe das folgendermaßen versucht zu lösen:
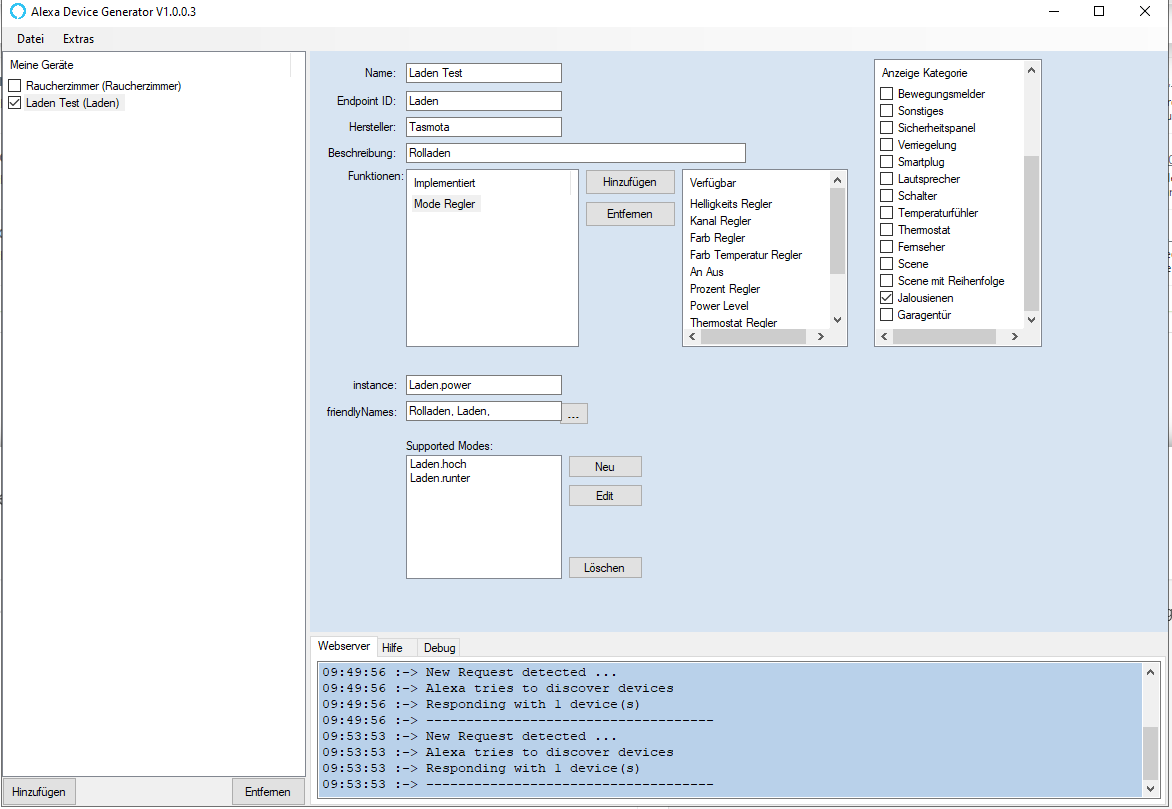

Das Gerät wird von Alexa auch gefunden, allerdings kommt als Antwort: "Ich weiß nicht, wie ich diese Einstellung für Laden Test machen kann."
Bei den friendly Names hinter den Supported Modes habe ich Laden Test hoch bzw. runter eingegeben. -
@zzippo Könntest du mal zeigen, wie du die Rolladensteuerung eingerichtet hast. Geht das auch über den Mode Regler?
Ich habe das folgendermaßen versucht zu lösen:
Das Gerät wird von Alexa auch gefunden, allerdings kommt als Antwort: "Ich weiß nicht, wie ich diese Einstellung für Laden Test machen kann."
Bei den friendly Names hinter den Supported Modes habe ich Laden Test hoch bzw. runter eingegeben.@Ju5t1n said in Alexa in Node Red ohne contrib-alexa-home oder Ähnliches:
@zzippo Könntest du mal zeigen, wie du die Rolladensteuerung eingerichtet hast. Geht das auch über den Mode Regler?
Ich habe das folgendermaßen versucht zu lösen:Hallo Ju5t1n,
Toll das es klappt.
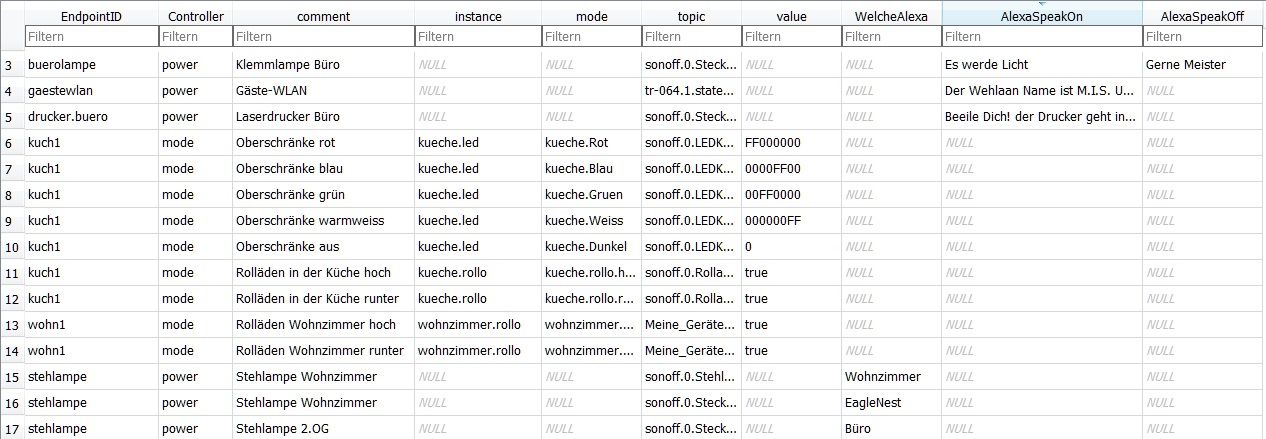
Ich habe die Rolläden auch über mode angebunden, bin aber gerade dabei das umzustellen, weil die neuen Tasmota Versionen Rolläden speziell unterstützen.
ich habe es so gemacht:
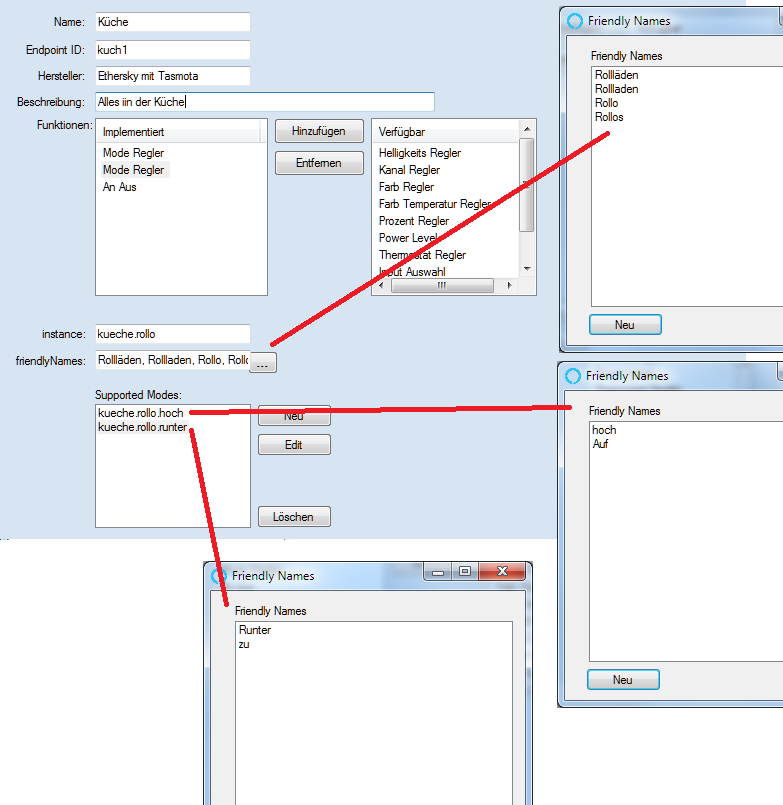

und kann dann mit dem Befehl 'Alexa, Küche Rolladen runter' arbeiten.
-
@jrudolph Dann hoffe ich, das morgen alles klappt. wenn es erstmal läuft, dann macht es richtig Freude. Ich wäre dann auch motiviert, weiter an der Sache zu entwickeln, obwohl im Moment schon alle meine Bedürfnisse gedeckt sind.
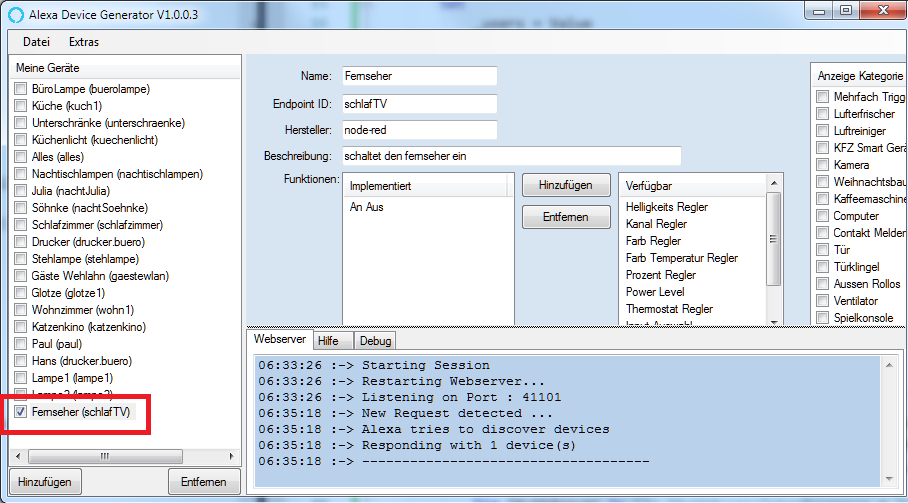
Wenn ich nicht so ein blutiger Anfänger in JS wäre, würde ich auch einen Adapter bauen. Ich werde mir in den nächsten Tagen mal ein paar Youtube Videos zu Gemüte führen, evtl. hilft das ja.@zzippo Ich kann bestätigen dass nun neue Geräte gefunden werden. Erst gab es noch Probleme mit der Verbindung zwischen Proxy und PC. Im PC mußte ich noch eine Firewall Regel für den Port 41101 einrichten. Das als Hinweis für andere bei denen es evtl. auch an dieser Stelle klemmt.
-
@zzippo Ich kann bestätigen dass nun neue Geräte gefunden werden. Erst gab es noch Probleme mit der Verbindung zwischen Proxy und PC. Im PC mußte ich noch eine Firewall Regel für den Port 41101 einrichten. Das als Hinweis für andere bei denen es evtl. auch an dieser Stelle klemmt.
-
@jrudolph, danke für den Hinweis. Wundert mich aber, weil ich die Firewall Regel per Software setzte, hattest Du das Programm mit Administrator Rechten gestartet?
@zzippo Tja, hat mich auch gewundert. Ich sehe die Regel für den AlexaDeviceGenerator (für alle Ports) in den Windows Defender Firewall Regeln. Habe mal probehalber wieder meine 41101 Regel deaktiviert --> geht wieder nicht. Regel 41101 aktiviert --> alles OK.
Ja, läuft unter Admin.
Jedenfalls funktioniert es jetzt. -
Vorab, was wird benötigt:
- Eine Dyndns Adresse, damit wir unser Smart Home aus dem Internet erreichen können.
- Einen Rechner der als Reverse-Proxy dient, in meinem Fall ein Raspi.
- Eine Portfreigabe im Router auf den Reverse-Proxy (port80 und port 443)
- IOBroker mit NodeRed
- Windows Rechner um neue Geräte zu konfigurieren.
Für Teil 1 brauchen wir noch nichts.
Teil 1: Erstellen eines eigenen Alexa Smarthome skills
Bevor wir anfangen müssen wir uns als Developer bei Amazon anmelden, außerdem brauchen wir einen AWS account, da wir eine Lambda Funktion schreiben müssen. AWS ist ein kostenpflichtiger Dienst von Amazon, aber keine Angst, das monatliche Frei-Volumen ist so riesig, das man damit hunderte Smarthomes versorgen kann. (Als Beispiel: jeden Monat eine Million Lambda Aufrufe frei, was in unserem Fall einem Kommando unseres Skills an Alexa entspricht.)
Wie man sich irgendwo anmeldet brauche ich ja wohl nicht erklären.
Amazon Developer Seite: https://developer.amazon.com/de/
Amazon AWS Seite: https://aws.amazon.com/de/Haben wir die Anmelde-Formalitäten hinter uns, brauchen wir ständig mehrere Tabs im Browser um Daten hin und her zu kopieren. Wir fangen an auf der Alexa Skill Developer Seite unter: https://developer.amazon.com/alexa/console/ask?
Nach dem einloggen klicken wir auf den blauen Knopf „Create skill“
Dann können wir aussuchen welchen Typ Skill wir erstellen wollen.
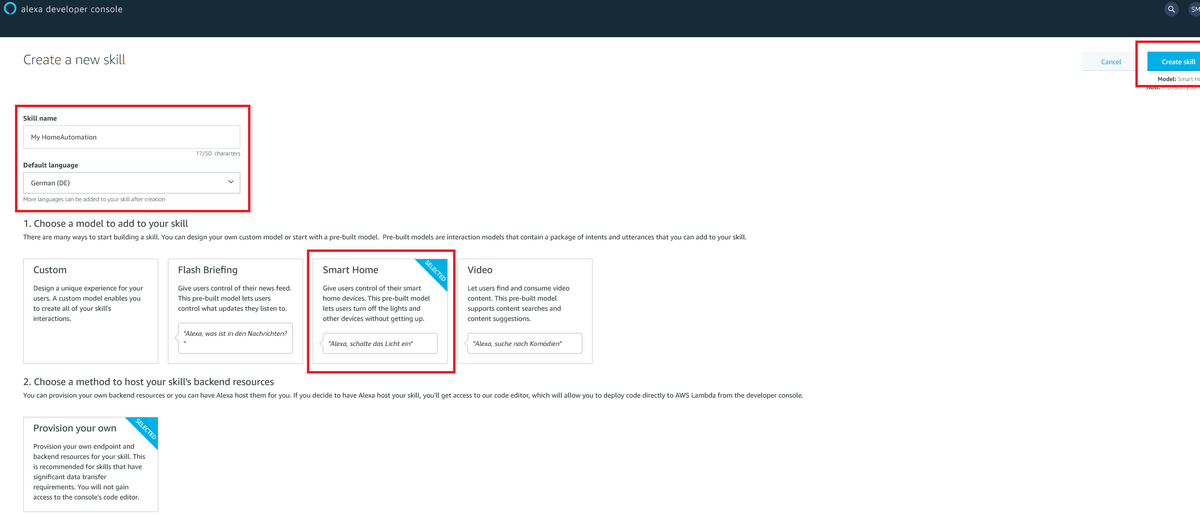
Wir geben unserem skill einen Namen, und wählen Smart Home, danach klicken wir auf Create skill. In einem weiteren Tab öffnen wir AWS-Lambda unter:
https://eu-west-1.console.aws.amazon.com/lambda/home?region=eu-west-1#/functions
Die Lambda Funktion ist sozusagen das Interface zwischem dem Skill und unserem Smart Home, normalerweise würde hier der Hersteller Deines Smart Home Devices, seine Routinen zur Verwaltung der Benutzer und Geräte implementieren.Wir klicken auf ‚Funktion erstellen‘, und es erscheint diese Seite:
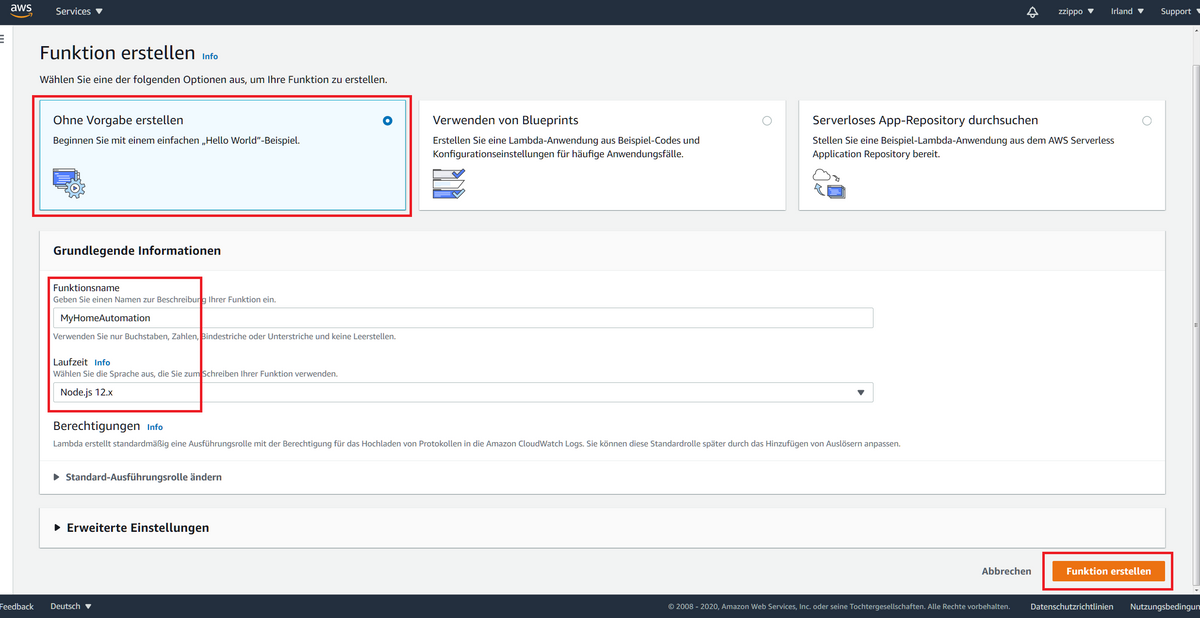
Wir geben unserer Funktion einen beliebigen Namen und wählen Node.js 12x als Laufzeit aus. Danach unten auf Funktion erstellen. Dann sollten wir folgendes sehen:
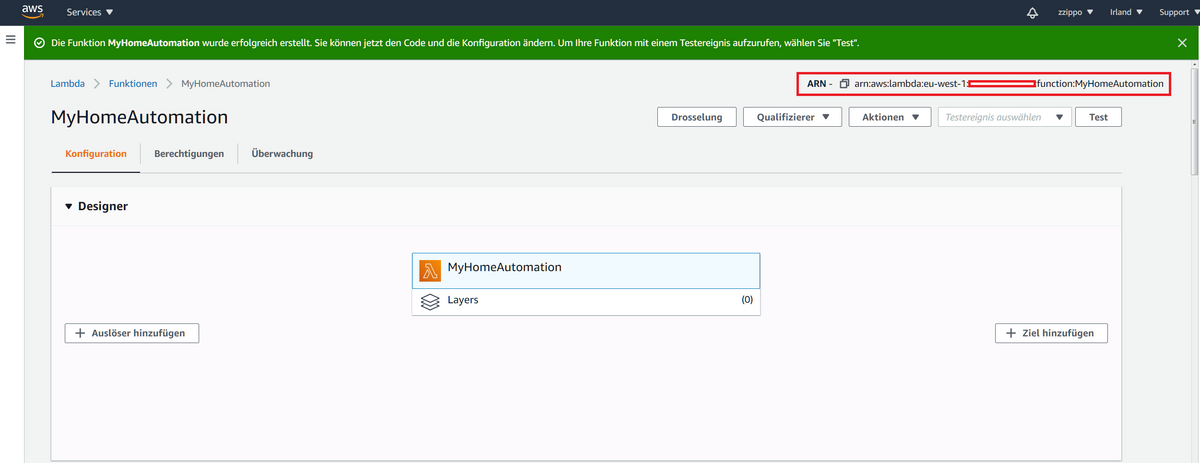
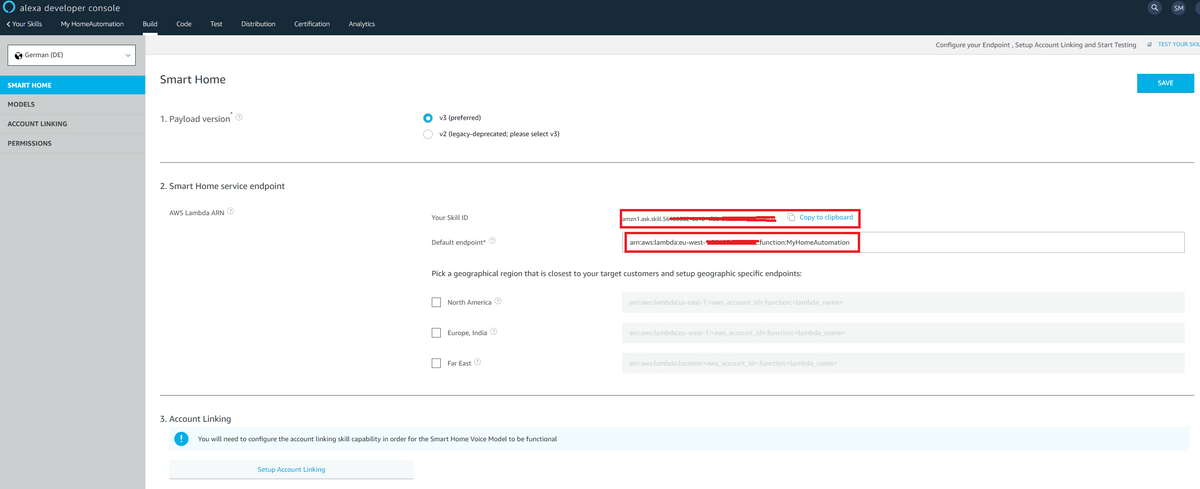
Jetzt kopieren wir die oben rechts erschienene ARN, wechseln auf den Alexa skill Tab und tragen Sie im Alexa Skill unter: ‚default endpoint‘ ein. Danach kopieren wir im Alexa skill die „Your skill ID“, und klicken ‚Save‘.
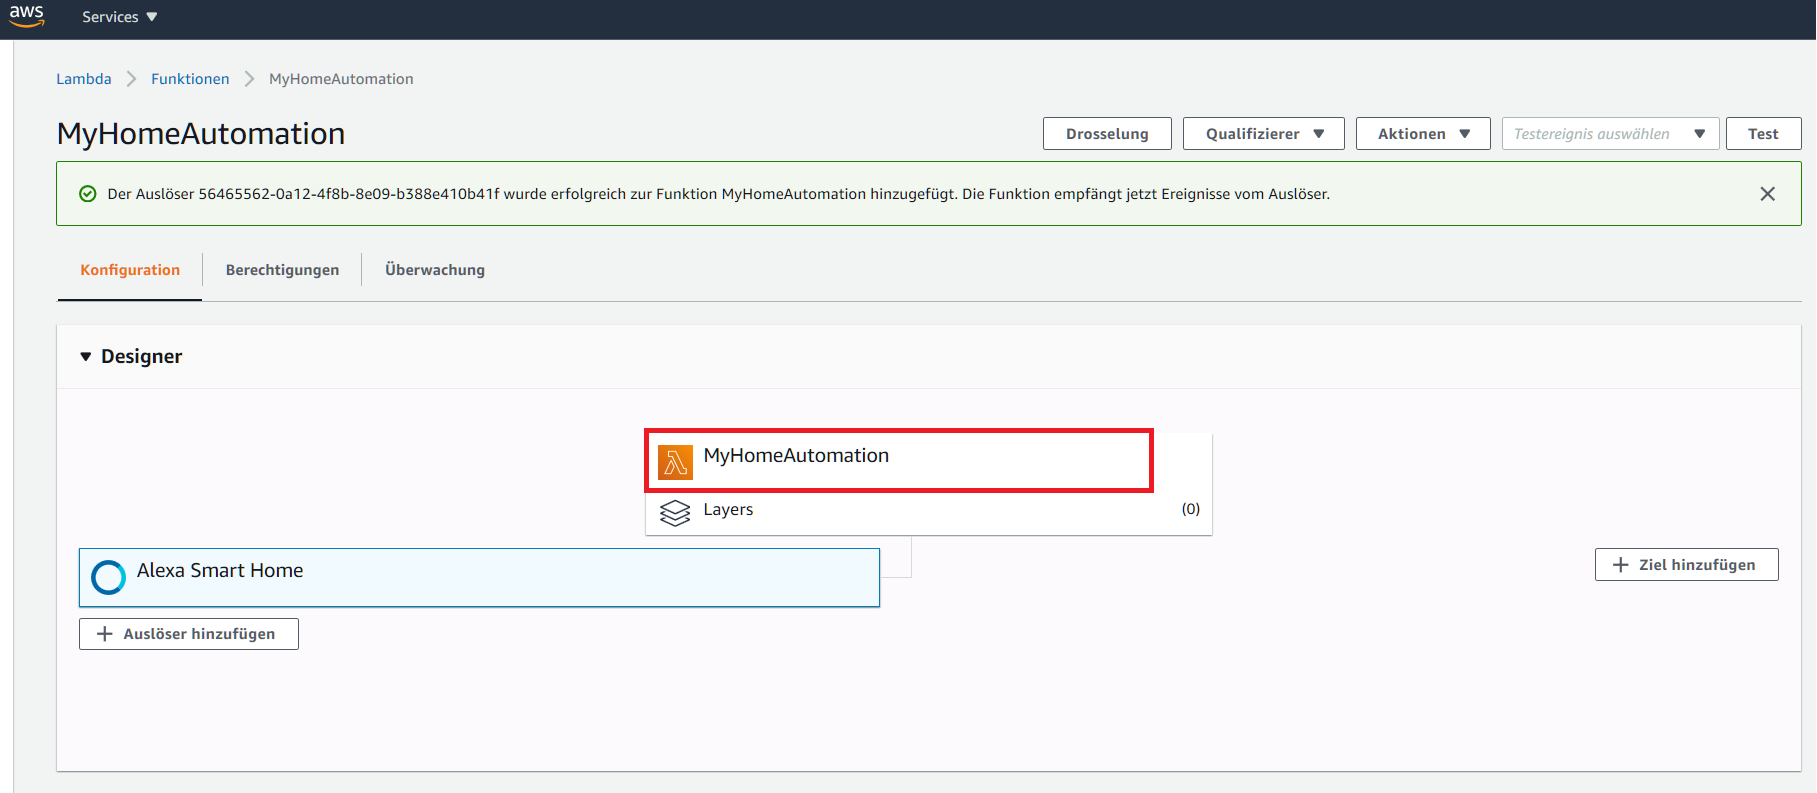
jetzt wechseln wir wieder auf den Lambda tab. Hier klicken wir jetzt auf Auslöser hinzufügen, es erscheint folgendes:
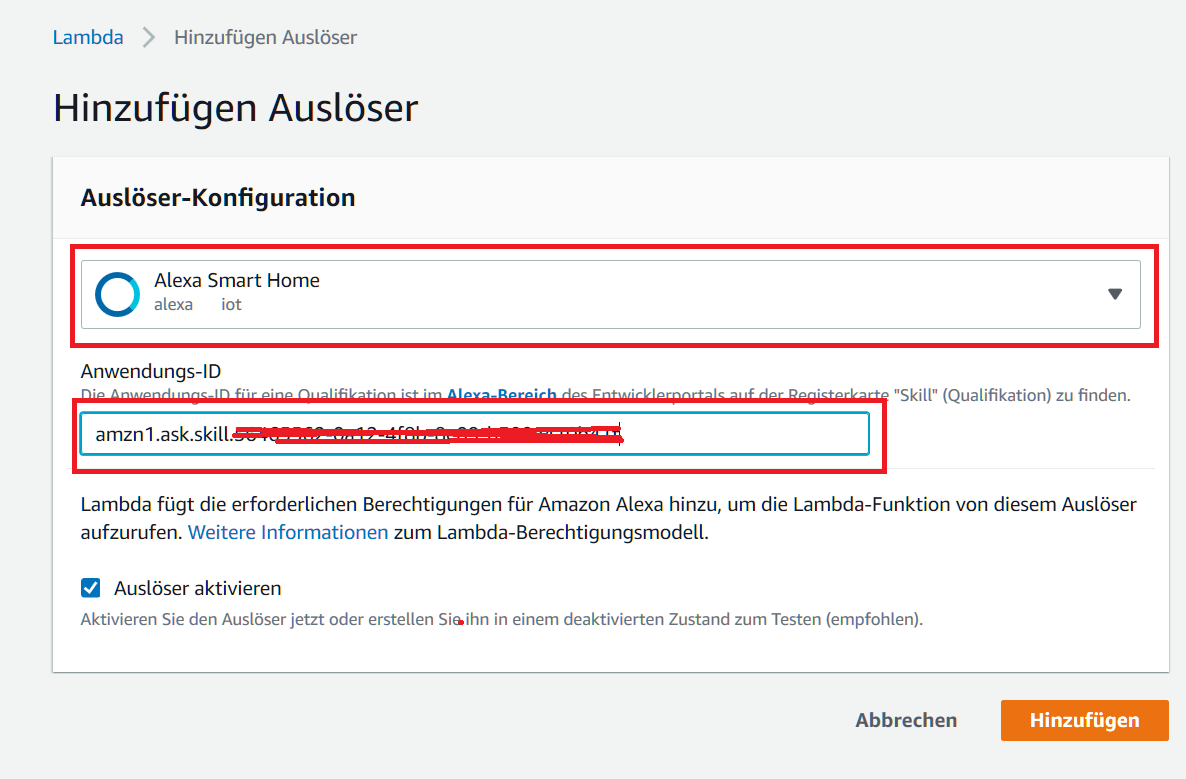
Wir wählen als Auslöser Alexa Smart Home, und unter Anwendungs-ID die eben kopierte Adresse. Danach klicken wir Hinzufügen. Damit haben wir den Alexa Skill und die Lambda Funktion schon einmal miteinander ‚verheiratet‘.
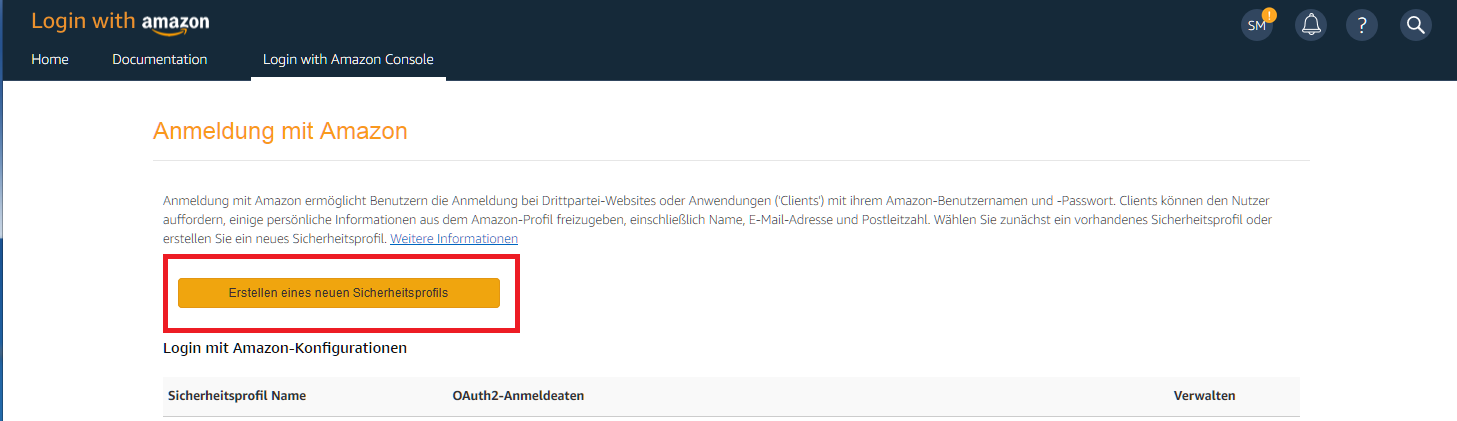
Wenn ein neuer Benutzer, in diesem Fall ja Ihr selbst, den Skill aktivieren möchte, so muss er sich authentifizieren. Amazon Benutzt hier das AuthO verfahren, dieses müssen wir jetzt noch kurz einrichten. Wir benutzen den Amazon Account um uns zu identifizieren. Öffne in einem neuen Tab die Amazon Developer Seite mit:
https://developer.amazon.com/de/
Klicke oben auf Developer Console
Danach auf Login mit Amazon

Jetzt auf Erstellen eines neuen Sicherheitsprofils
Nun geben wir wieder einen beliebigen Namen ein, sowie eine Beschreibung. Außerdem brauchen wir noch eine Web Adresse mit den Datenschutzhinweisen, Hier sollte eine Sinnvolle Adresse stehen,
damit auch alles funktioniert. Bei mir ist es eine leere Webseite. Danach könnt ihr auf speichern drücken.
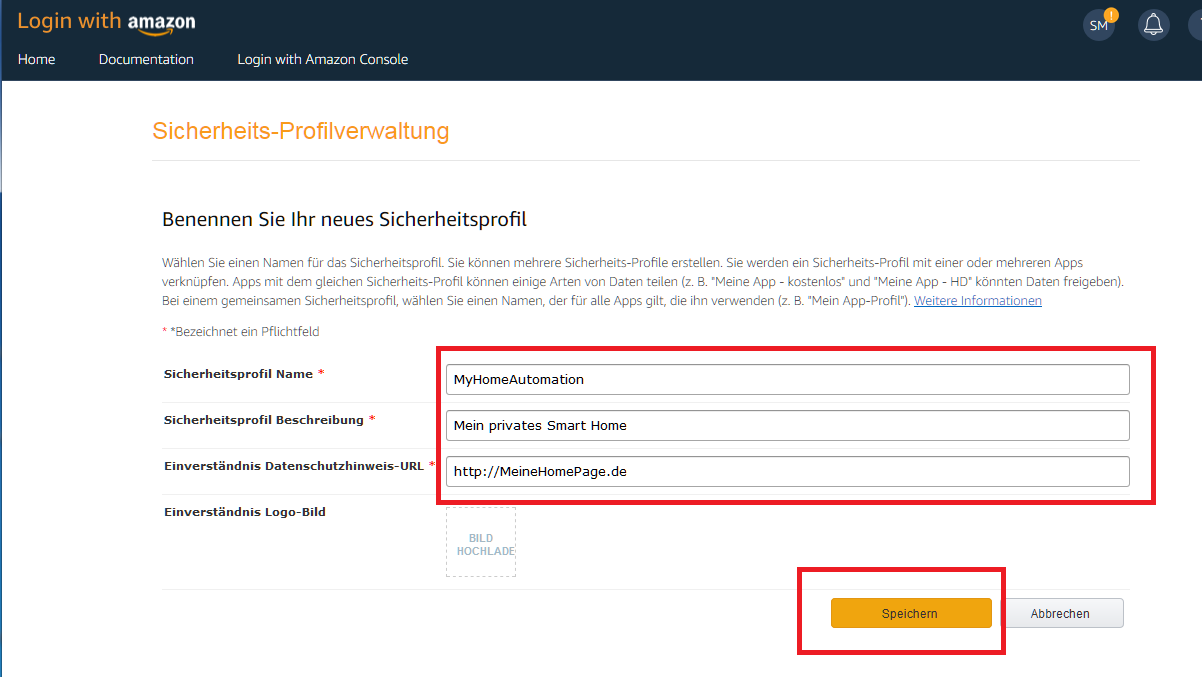
Nach dem Speichern klicken wir auf „Client-ID und Client-Geheimnis anzeigen“. Wir kopieren jetzt die client-ID und wechseln auf unseren Alexa Skill tab. Hier wählen wir auf der linken Seite die Schaltfläche ‚ACCOUNT LINKING‘ und fügen unter: ‚Your Client ID‘ die kopierte ID ein. Das gleiche machen wir mit ‚Client Geheimnis‘ welches unter Your Secret eingetragen wird.
Im Feld ‚Your Web Autorization URI‘ geben wir https://www.amazon.com/ap/oa
ein. Im Feld Access Token URI geben wir: https://api.amazon.com/auth/o2/token
ein. Jetzt klicken wir auf ‚Add scope‘, und geben im Eingabefeld ‚profile‘ ein.
Jetzt drücken wir wieder den Save button oben
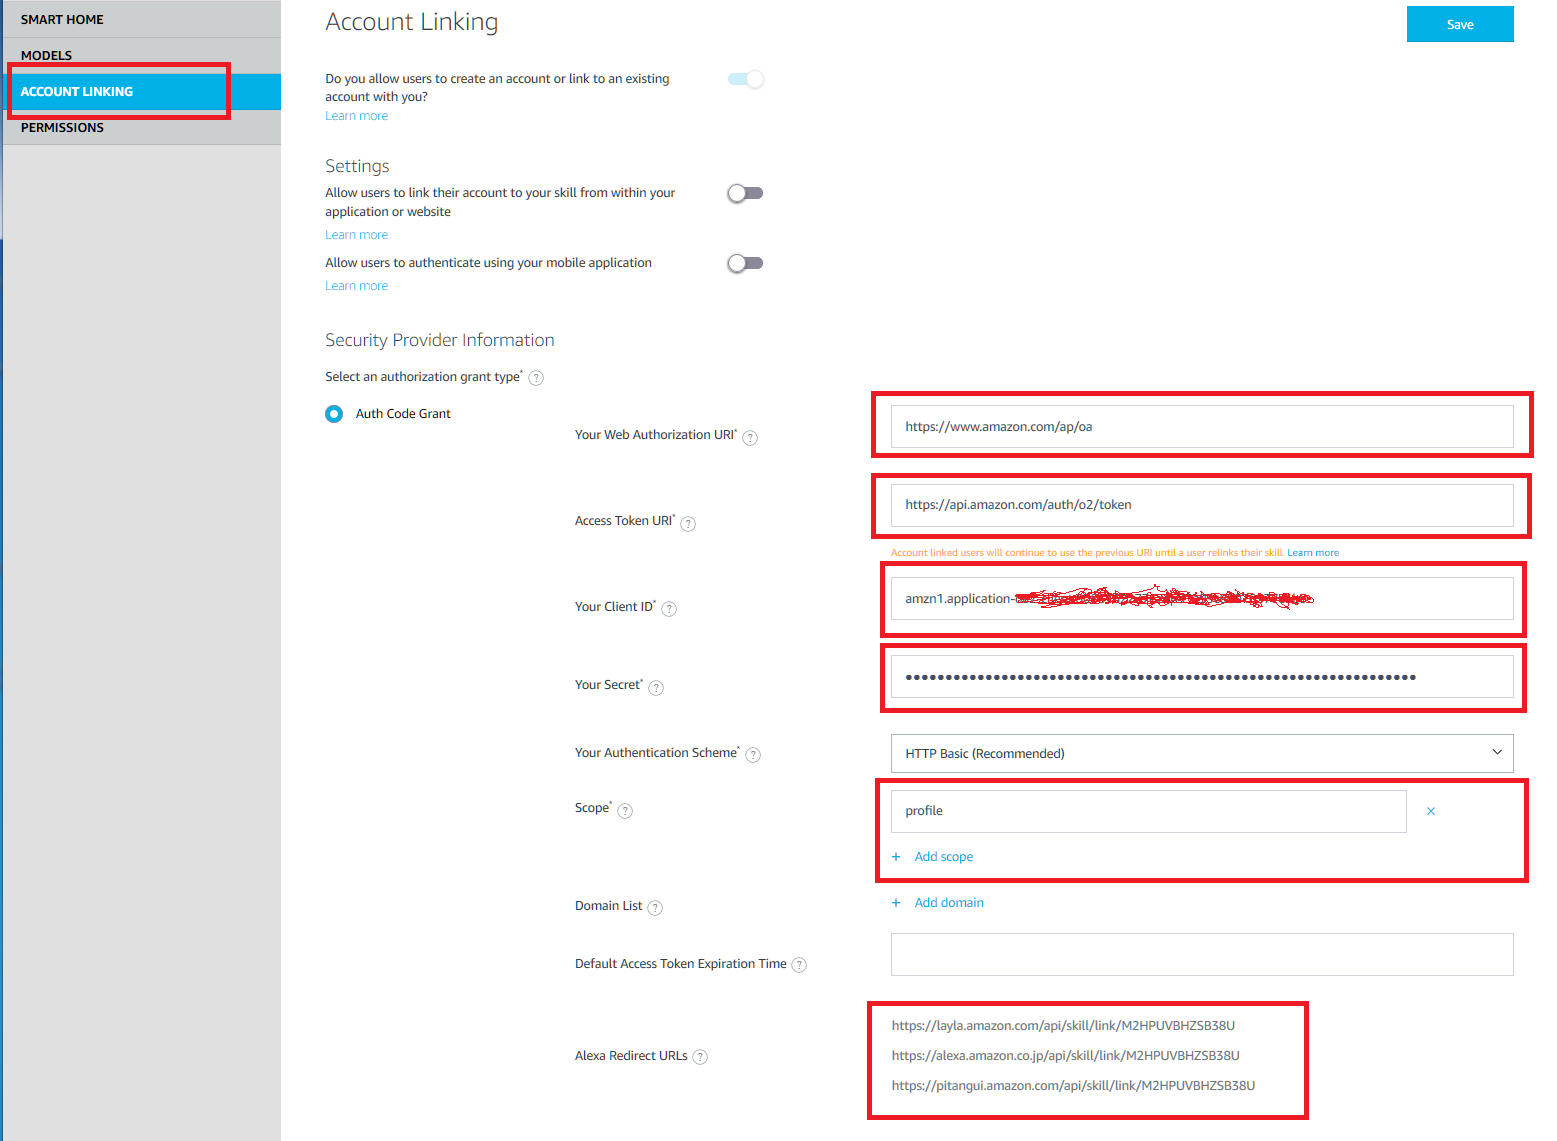
Danach müssen wir noch die 3 unten stehenden ‚Alexa Redirect URL’s‘ in die Zulässigen Rückleitungs URL’s des Authentifizierungsdienstes eingeben. Dafür klicken wir im Tab ‚Login with Amazon‘ auf das Zahnrad neben unserem erstellten Login, und wählen Webeinstellung
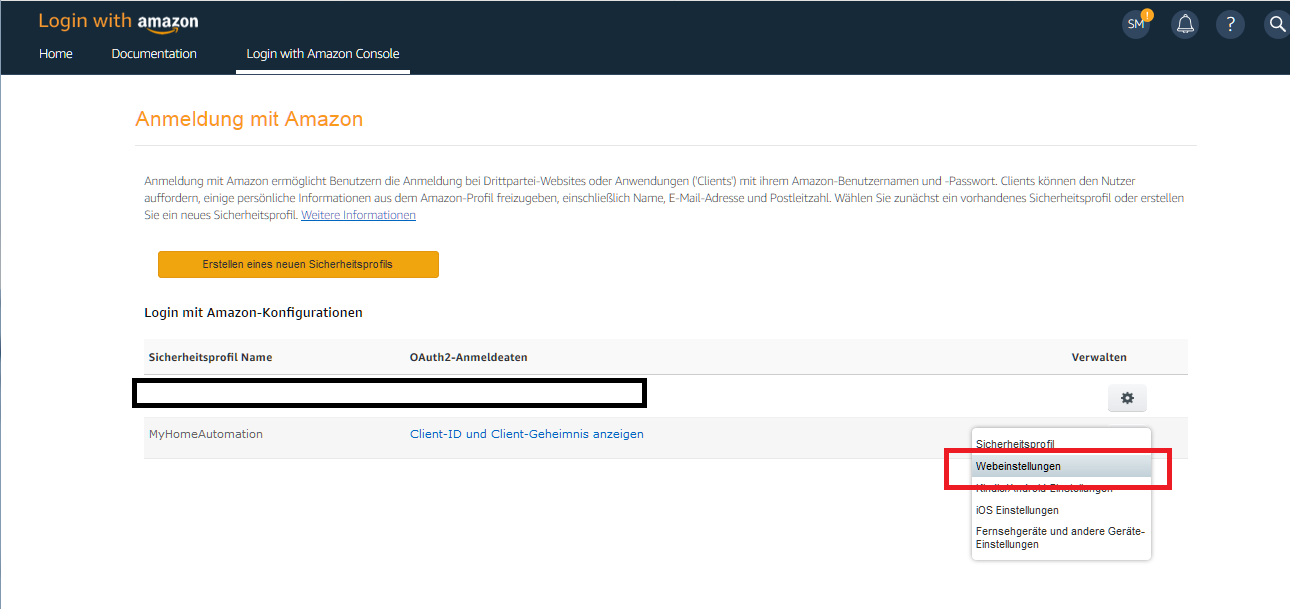
Jetzt kopieren wir nacheinander die 3 Adressen und drücken natürlich speichern.

Jetzt wechseln wir noch einmal in den Alexa Skill tab und wählen links Permission, und schalten den Schalter ‚Send Alexa events‘ auf ein, danach wieder Save.

Jetzt fehlt nur noch der Code für die Lambda Funktion, wir wechseln also in den Lambda Tab. Ist der Funktionscode nicht zu sehen dann klickt auf die Lambda Funktion. Darunter erscheint dann ein code Fenster.
Jetzt löschen wir alles was im code Fenster ist und kopieren den folgenden code hinein:
index.js
danach klicken wir auf deploy.
Die Zeilen 9 und 10 müssen wir später noch ändern, hier kommt dann eure Adresse und das codierte Passwort rein.Jetzt sollte alles Startklar sein, und wir können die Alexa App, am Besten im Browser starten.
unter: https://alexa.amazon.de
wir gehen jetzt links auf Skills und dann oben rechts auf Ihre Skills.
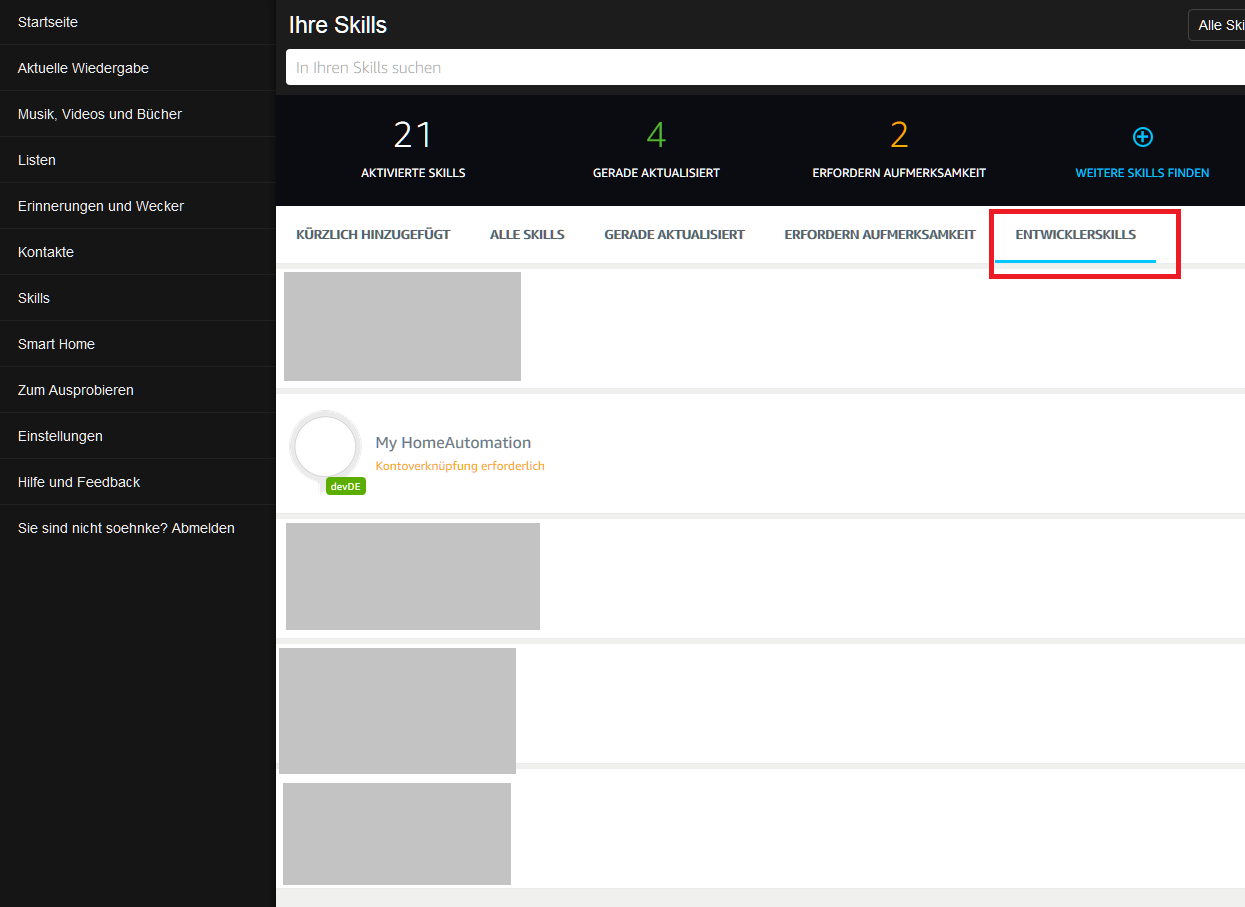
jetzt wählen wir oben Entwicklerskills an.
Wenn ich in meiner Anleitung nicht vergessen habe sollte jetzt der Skill auftauchen, und ihr könnt ihn installieren.Gerne Feedback, ob bis hierhin alles verständlich war, und ob es funktioniert hat.
Teil 2 wird dann wesendlich einfacher, ich mache ein Skript, welches alles automatisch auf einem frischen Raspi installiert.
inkl. Apache Webserver, LetsEncrypt Zertifikat, Einrichtung des Reverse Proxy mit Fernzugriff auf Node Red.P.S. Bitte keine Kommentare wenn das js Skript nicht optimal ist. Ich habe mir das innerhalb von einer Woche selbst beibringen müssen, da ich sonst nie etwas damit zu tun hatte.
@zzippo Hi, besten Dank. Ich bin bei Teil 1 bis zum letzten Schritt gekommen. Leider wird bei mir in Alexa unter Skills der Button "Entwicklerskills" überhaupt nicht angezeigt. Muss ich da noch etwas zusätzlich aktivieren, damit ich das bekomme?

EDIT: hat sich erledigt. Irgendwie hatte ich einen Amazon Developer Account unter der gleichen Email, aber mit anderem Passwort als mein 'normaler' Amazon Account, der auch meine Echos drin hat. Daher war mein Alexa Developer und mein Alexa nicht miteinander verbunden.
Support us
638
Online32.7k
Users82.5k
Topics1.3m
Posts